In this tutorial example, we will go through creating a service workorder, scheduling a tech to perform the service, entering details of the service performed, and printing out a report that can be used as an invoice to send to a client.
•Do note that this is a very basic overview only, and does not cover every field and its use, nor time saving and useful feature of the workorder entry screen.
•We always recommend that you review this Help file's entire section on Service Workorders for complete overview, suggestions on use, tips on use and more.
•NOTE: screenshots in any of these How do I...?'s tutorials may not be exactly as in your database as dependant on your data, grid layout, etc
1. Run AyaNova
2. Create the new service workorder for the client
3. Schedule your tech(s) via the workorder
4. Details of labor service provided entered into the workorder
5. Set workorder to Service Completed
6. Invoice the billable items to your customer
Now that you have installed the AyaNova program and its sample database (see the installation steps if needed) start the AyaNova program:
•Run AyaNova from the desktop icon

•Or run AyaNova from the Start -> All Programs -> AyaNova -> AyaNova menu option

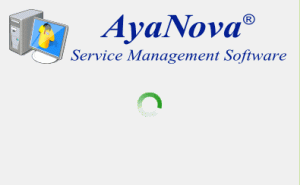
When started, the AyaNova program will initially pre-load items it needs for faster access later.
And then the AyaNova login screen will appear.
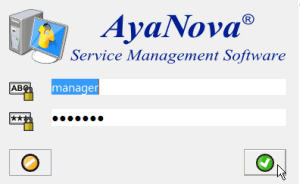
•If you have just installed AyaNova, the AyaNova Administrator username and password will be pre-entered for you just as per the screenshot above - as the AyaNova Administrator username if not yet changed is manager with password letmein
•Once AyaNova is licensed (either temporarily or with a paid for license) the username and password fields will be blank for your security
•Test logging in as other sample users - see the Sample Users and Passwords for login names and passwords.
Once you log in, the AyaNova program will load.
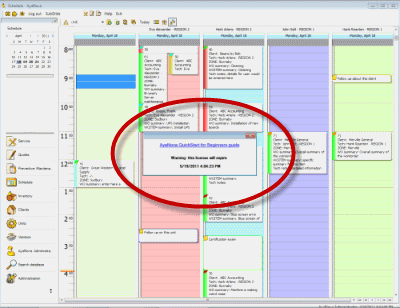
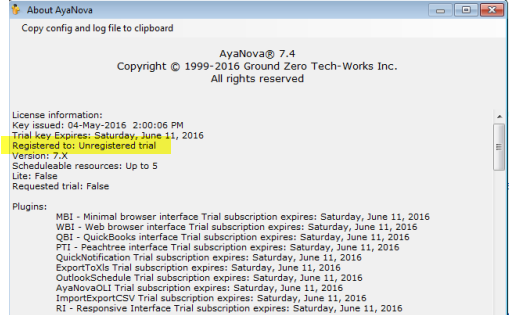
If your AyaNova is either not yet licensed or is temporarily licensed, a popup will display showing the date when your trial AyaNova will expire, and a link to get you started by providing links to tutorials and videos.
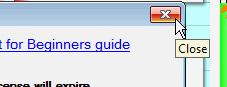
As with any screens in AyaNova, you can easily exit out by clicking on the X in the upper right-hand corner.
The AyaNova installation you ran installed the AyaNova program files and the AyaNova database that includes sample data.
You can see whether your AyaNova is licensed or not by checking Help -> About AyaNova

When you first log into AyaNova and close the popup, AyaNova will be displaying the Dashboard from where you can quickly access service workorders and create new.
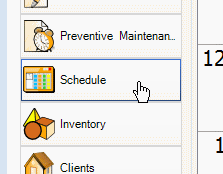
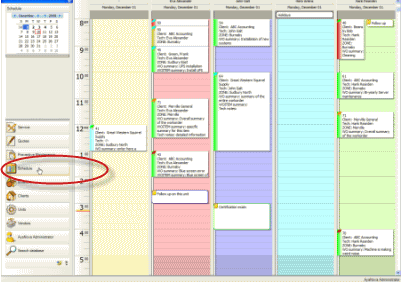
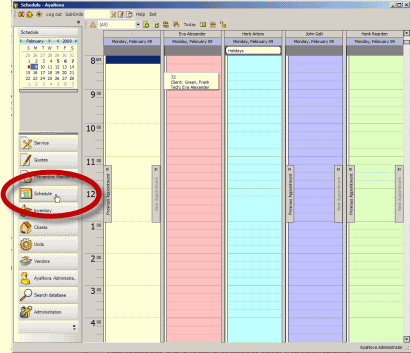
Use the Navigation Pane on the left to move to other sections of AyaNova. For example, below are screenshots showing that to view the Schedule screen you click on the Schedule navigation pane on the left.
So if you want to view the Clients grid that shows a grid listing your client records, you would click on the Clients navigation pane, and so on.
Review about customizing the Navigation Pane and more in the Navigation Pane section of this Help documentation
Records in AyaNova are displayed in grids.
You can easily filter any grid so that certain records only show based on criteria you set, as well as sort based on what columns are set, you can display or not display certain columns, and report from these grids.
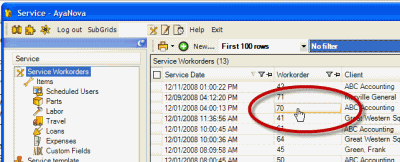
Click on a specific record field to open that entry screen. For example, if you click on the workorder # as per the screenshot above, then Workorder #70 entry screen will open. Whereas if you clicked on the field ABC Accounting, then the client entry screen for that client would open.
See more about use of grids in the Grids section of this Help documentation
2. Create the new service workorder for the client
You can create a new service workorder many different ways - do check out the following as they provide many time saving steps:
Create a new service workorder
Create new workorder for a client or unit
Create via the schedule screen
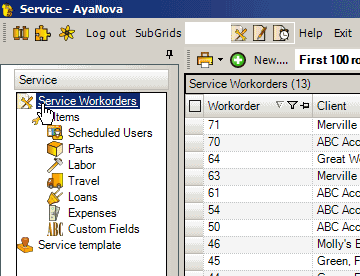
In this example, we will create a new service workorder from the Service Workorders grid:
•Click on the Service navigation pane to view the Service Workorders grid
•select the menu option New... from the Service Workorders grid
•select the sample client Green, Frank
•click on the OK button to create the new workorder for this client
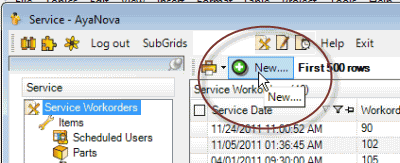


•Click on the Save menu option - note that the service workorder now has a workorder number automatically assigned to it.
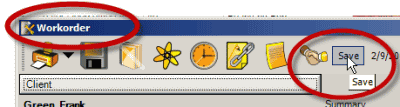
Your workorder number will be +1 of the last workorder number ever created with this database.
As we won't cover all the fields and selections in the various areas of the service workorder, it is recommended that you do review the Service Workorder section of this Help file
•Service workorder header area
•Unit
3. Schedule your tech(s) via the workorder
•Select the Scheduled Users tab on the left to see and enter records about who will be scheduled to perform the service for this workorder
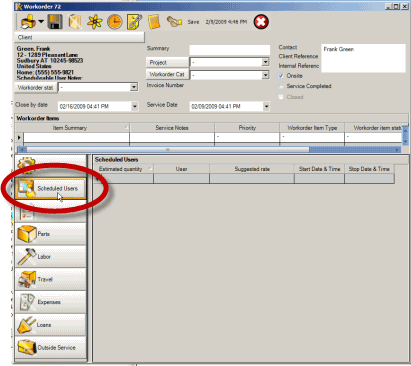
•Create a new Scheduled User record by using your mouse to click within the grey record field of User to drop down and select the user Eva - as soon as you do so, you will note that it creates a new record
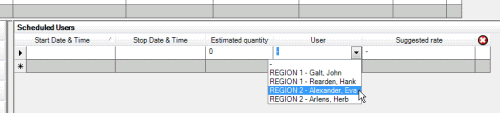
The format that your schedulable users display in depends on the Global Settings for User Display Format.
•Drop down the Start Date & Time and select today's date
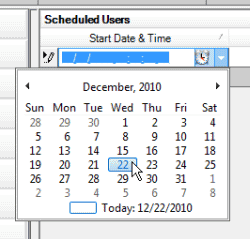
If you select today's date, the time will default to the actual time it is right now.
If you select a date not today, the time will default to either 12:00AM or whatever pre-set time you have set in your Global Settings for Scheduled Default Time
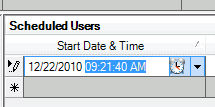
•How time displays (i.e. with or without seconds, etc) depends on your Windows settings. See Currency, Date & Time Display
•Refer to the section on entering time
To edit, use your mouse to highlight the time and enter in the time you want or click on the clock and use your mouse to select a time option.
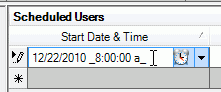
For example if you want it to be 08:00 AM - highlight and type in 080000 a

OR
Use your mouse to click on the clock icon and select a time from the options
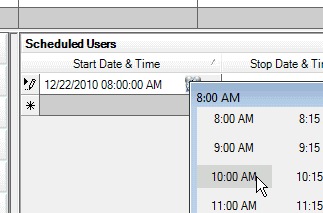
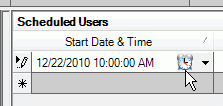
and then tab to the next field for it to update the Stop Date & Time field automatically.

Note how AyaNova will automatically enters in a date and time for you in the Stop Date & Time if there was nothing entered there before as a time saving feature.
How many minutes it enters the Stop Date & Time are dependant on what you have configured in the Global Settings - Scheduled / Labor Default Minutes setting
Also too that the Estimated Qty will automatically fill in for you based on the difference between the Start Date & Time, and the Stop Date & Time
•Drop down and select a rate
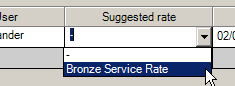
In our sample data the client Green, Frank has a contract that limits him to only specific rates.
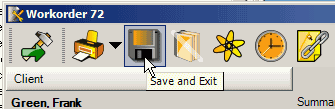
•Save & Exit out of this service workorder
•Now view the Schedule screen.
•AyaNova automatically refreshes your grids every 5 minutes, but as we just saved and we want to see this workorder item, click the ![]() Refresh menu option
Refresh menu option
•You will now see that your scheduled workorder item for Eva is showing for today
See also:
Scheduled Users subsection of the order entry screen
Global Settings - Scheduled Users / Labor Default Minutes
How do I schedule a user for a new workorder item via the Schedule screen?
•Return to the Service Workorders grid
4. Details of labor service provided entered into the workorder
•We are going to assume for the purposes of this tutorial, that the service has now been performed.
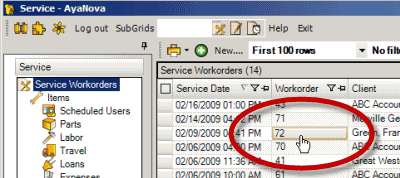
•Open the workorder again by clicking on the workorder number in the Service Workorder
•Select the Scheduled Users subsection again in the workorder entry screen
•Click within the Scheduled Users grid section - you will note when you do so that a new menu option Convert Scheduled User To Labor appears at the top

•Select this menu option ![]() Convert Scheduled User To Labor
Convert Scheduled User To Labor
•When you do so, a new Labor record is automatically created based on those settings you had for the Scheduled User record. This saves you entry time. You can of course just create a Labor record manually instead.

•In the Service Details enter details about the service performed such as the text "specific details about the service performed so that have a history to refer to" and tab off.
See also:
Convert scheduled items to labor easily
Labor subsection of the order entry screen
Global Settings - Default Service Sales Tax
5. Set workorder to Service Completed
•For the purposes of this tutorial, we are going to assume that is all we want to enter in this workorder
•Of course, you can enter a lot more details including parts, travel, additional workorder items etc
•As we won't cover all the fields and selections in the various areas of the service workorder, it is recommended that you do review the Service Workorder section of this Help file
•Service workorder header area
•Unit
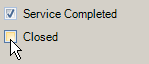
•Check-mark the Service Completed check box
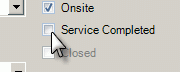
•Once set to Service Completed, then the Invoice: field is now editable. All other fields other than the Workorder Status and Closed are no longer editable as it is assumed at this point if you have completed the workorder, you will no longer edit it.
6. Invoice the billable items to your customer
•You will note that the only fields that are now editable are Invoice Number, Workorder Status, Service is Completed, and Closed.
When a workorder is check-marked Service Completed, this sets the workorder so that it can not be accidentally edited - because you have said it is completed, and therefore should not be edited or changed. If you have to edit a field that is not one of those four stated above, you need to un-check-mark Service Completed
•At this point in this example, you want to invoice your customer so that you get paid for the work performed.
A. If using the optional add-on QBI QuickBooks accounting software interface:
B. If using the optional add-on PTI Peachtree accounting software interface:
C. If not using QBI or PTI but another accounting program:
D. If not using QBI, PTI or any other accounting program:
A. If using the optional add-on QBI QuickBooks accounting software interface:
Use QBI to invoice out the workorders billable items, the QuickBooks invoice number is automatically entered in the Invoice Number field, and the workorder is automatically Closed (if selected to do so in QBI Preferences) and the Workorder Status set to that in your Global Settings for Workorder Closed Status.
B. If using the optional add-on PTI Peachtree accounting software interface:
Use PTI to invoice out the workorders billable items, the Peachtree invoice number is automatically entered in the Invoice Number field, and the workorder is automatically Closed (if selected to do so in PTI Preferences) and the Workorder Status set to that in your Global Settings for Workorder Closed Status.
C. If not using QBI or PTI but another accounting program:
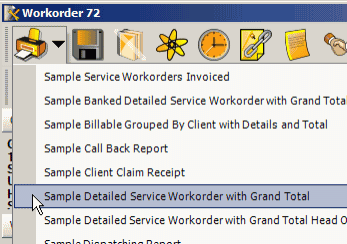
Print out for example the Sample Detailed Completed Service Workorder with Grand Total report for this workorder so that you can refer to the print out when invoicing the billable items. And include the AyaNova print out with your invoice you send to the customer so that they can see details of the work performed.
Then manually enter the invoice number from your accounting program into the Invoice Number field so that you can cross reference to the invoice in your accounting program.
![]()
When the customer pays the invoice, at that time check-mark the Closed field in AyaNova for this workorder.
D. If not using QBI, PTI or any other accounting program:
Print off for example the Sample Detailed Service Workorder with Grand Total to provide to the client as an invoice.
All report templates can be further customized including adding your own logo
Change the Workorder Status to a status that you have created perhaps called "Invoiced - waiting on payment" so that you can easily see at a glance that you are waiting to be paid, as well as filter the grid on this status so that you can easily see at a glance which workorder's payment are still outstanding
You can create as many different Workorder Statuses as you want!
And check the Service Completed checkbox so that the workorder is not accidentally further edited (as you have sent the invoice in to the client, so you won't want any changes made)
When payment is received from the customer, to track your $ amount received from the client, you could enter into the Invoice field the $ amount that you received
If entered as a number, even though this is a "text" field, not a currency, you could use in reports summing up totals and more!
And change the Workorder Status to a status called "Invoiced - Payment Received" so that you can easily filter and see at a glance that payment has been received for this workorder
And checkmark the Closed checkbox to close the workorder.
Iif you ever need to unClose, just log in as the AyaNova Administrator to do so
•Do note that this was a very basic overview only, and does not cover every field and its use, nor time saving and useful feature of the workorder entry screen.
•It is recommended that you review this Help file's entire section on Service Workorders for complete overview , suggestions on use, tips on use and more.