We will identify here the service workorder data fields that are selectable to be included via descriptive text in a Peachtree invoice's Notes section via PTI
Where ever you see text that is preceded and followed by a ~ symbol in each of the text areas - these are referred to as tokens
Tokens in the descriptive text template denotes to PTI to obtain the data for that token from the service workorder if applicable.
For example, ~W0#~ will be replaced by the service workorder number.
Each of the text areas corresponds to a section of a AyaNova service workorder.
If the service workorder data field is not listed here, than it can not be entered as descriptive text on a PeachTree invoice via PTI - it is suggested to enter it manually in the PeachTree invoice itself, or instead print out a Detailed Completed Workorder report to accompany the invoice so that all details are provided to the client along with the invoice.
From the service workorder header fields text area section:
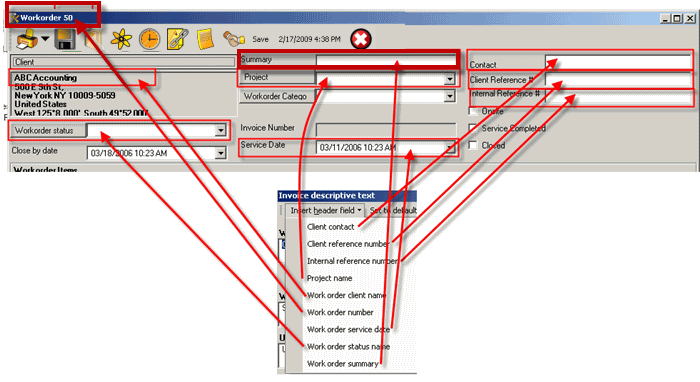
Screenshot below shows the correspondence of the service workorder header fields with the selection in the descriptive text template.
•Select Client contact to insert the ~CONTACT~ token to represent the data from the billable service workorder's Contact field into the workorder header fields text area
•Select Client reference number to insert ~CREF#~
•Select Internal reference number to insert ~OURREF#~
•Select Project name to insert ~PROJ~
•Select Workorder client name to insert ~CLIENT~
•Select Workorder number to insert ~WO#~
•Select Workorder service date to insert ~SERVDATE~
•Select Workorder status name to insert ~STAT~
•Select Workorder summary to insert ~DESC~

From the workorder items fields text area section:
Screenshot below shows the correspondence of the service workorder item fields with the selection in the descriptive text template.
•Select Workorder item summary to insert the ~ITEM_SUMMARY~ token to represent the data from the billable service workorder item's Item Summary field into the workorder items text area
•Select Workorder item service notes to insert ~ITEM_SERVICE_NOTES~
•Select Workorder item type to insert ~ITEM_TYPE~
•Select Workorder item request date to insert ~ITEM_REQUEST_DATE~
•Select Workorder item status to insert ~ITEM_STATUS~

From the Unit text area section:
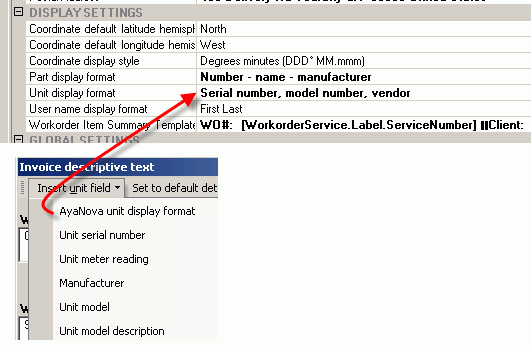
•Select AyaNova unit display format to insert the ~AYAFORMAT~ token to represent the Global Settings format of the selected unit in that billable service workorder into the Unit text area
•Select Unit serial number to insert ~UNIT_SN~
•Select Unit meter reading to insert ~UNIT_METER~ (note - only a meter reading that was entered via the meter reading steps as outlined in the AyaNova Manual TUTORIAL: Entering a Meter Reading to Auto-include the Service Workorder Number)
•Select Manufacturer to insert ~UNIT_MAKE~
•Select Unit model name to insert ~UNIT_MODEL_NAME~
•Select Unit model number to insert ~UNIT_MODEL_DESC_NUMBER~

From the Labor text area section:
Screenshot below shows the correspondence of the service workorder Labor with the selection in the descriptive text template.
•Select Start date and time to insert the ~SERVICE_START~ token to represent the Labor record's Start Date & Time into the Service text area
•Select Stop date and time to insert ~SERVICE_STOP~
•Select Quantity to insert ~SERVICE_QUANTITY~
•Select Rate name to insert ~RATE_NAME~
•Select Technician to insert ~SERVICE_TECH~ (this is the schedulable user that is selected in the Labor record)
•Select Details to insert ~DETAILS~
•Select No charge quantity to insert ~NO_CHARGE_QUANTITY~

From the Travel text area section:
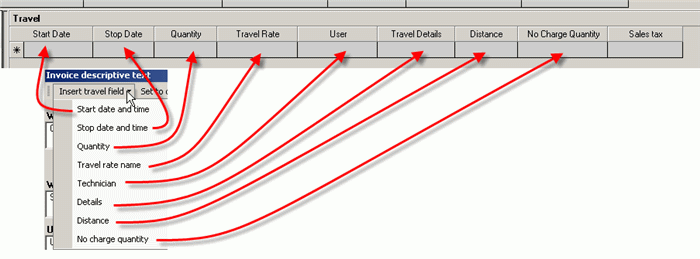
Screenshot below shows the correspondence of the service workorder Travel with the selection in the descriptive text template.
•Select Start date and time to insert the token ~TRAVEL_START~ to represent the Travel's record Start Date & Time of the invoiced workorder item into the Travel text area
•Select Stop data and time to insert ~TRAVEL_STOP~
•Select Quantity to insert ~TRAVEL_QUANTITY~
•Select Travel rate name to insert ~TRAVEL_RATE_NAME~
•Select Technician to insert ~TRAVEL_TECH~
•Select Details to insert ~TRAVEL_DETAILS~
•Select Distance to insert ~TRAVEL_DISTANCE~
•Select No charge quantity to insert ~TRAVEL_NO_CHARGE_QUANTITY~

From the Outside Service text area section:
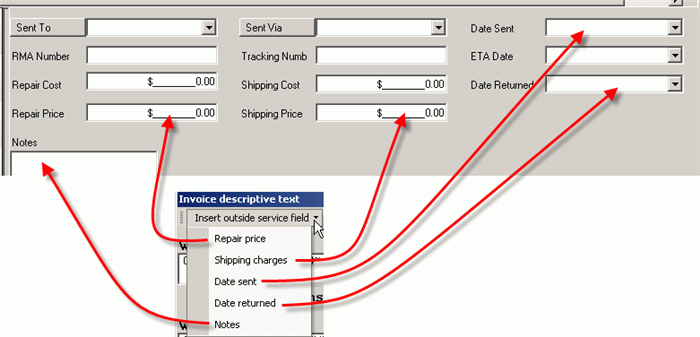
Screenshot below shows the correspondence of the service workorder Outside Service with the selection in the descriptive text template.
•Select Repair price to insert the token ~REPAIR_PRICE~ to represent the Repair Price field from the Outside Service section of the service workorder item into the Outside Service text area
•Select Shipping charges to insert ~SHIP_CHARGE~
•Select Date sent to insert ~SENT~
•Select Date returned to insert ~RETURNED~
•Select Notes to insert ~NOTES~

From the Expenses text area section:
Screenshot below shows the correspondence of the service workorder Expenses with the selection in the descriptive text template.
•Select Charges to insert the token ~CHARGES~ to represent the Charge Amount field from the Expenses record for the invoiced workorder item into the Misc.Expenses text area
•Select Summary to insert ~SUMMARY~
•Select Description to insert ~DESCRIPTION~
•Select Technician to insert ~TECH~

From the Loans text area section:
Screenshot below shows the correspondence of the service workorder Loans with the selection in the descriptive text template.
•Select Item loaned to insert the token ~ITEM~ to represent the Loan Item from the Loans section of the service workorder item that is invoiced into the Loans text area
•Select Charges to insert ~CHARGE~
•Select Loaned Date to insert ~LOANED~
•Select Returned Date to insert ~LOAN_RETURNED~
•Select Notes to insert ~LOAN_NOTES~
