Service workorder data fields that are selectable to be included via descriptive text in a QuickBooks Online invoice via QBOI
Where ever you see text that is preceded and followed by a ~ symbol in each of the text areas - these are referred to as tokens
Tokens in the descriptive text template denotes to QBOI to obtain the data for that token from the service workorder if applicable.
For example, ~W0#~ will be replaced by the service workorder number.
Each of the text areas corresponds to a section of a AyaNova service workorder.
If the service workorder data field is not listed here, than it can not be entered as descriptive text on a QB Online invoice via QBOI.
But if the data is needed to be seen by your client - it is suggested to either:
a. enter it manually in the QB Online invoice itself before providing to your client.
b. print out an AyaNova Detailed Completed Workorder report to accompany the invoice so that all details are provided to the client along with the invoice
c. have your client log in via their Customer Login via your optional add-on RI and/or your optional add-on WBI so they can view the full details of that workorder.
From the service workorder header fields text area section:
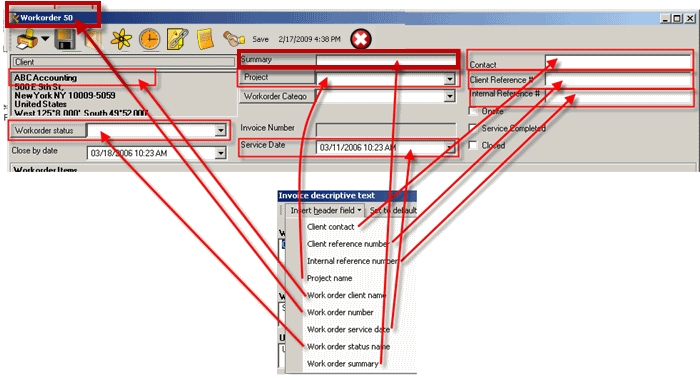
Screenshot below shows the correspondence of the service workorder header fields with the selection in the descriptive text template.
•Select Client contact to insert the ~CONTACT~ token to represent the data from the billable service workorder's Contact field into the workorder header fields text area
•Select Client reference number to insert ~CREF#~
•Select Internal reference number to insert ~OURREF#~
•Select Project name to insert ~PROJ~
•Select Workorder client name to insert ~CLIENT~
•Select Workorder number to insert ~WO#~
•Select Workorder service date to insert ~SERVDATE~
•Select Workorder status name to insert ~STAT~
•Select Workorder summary to insert ~DESC~

From the workorder items fields text area section:
Screenshot below shows the correspondence of the service workorder item fields with the selection in the descriptive text template.
•Select Workorder item summary to insert the ~ITEM_SUMMARY~ token to represent the data from the billable service workorder item's Item Summary field into the workorder items text area
•Select Workorder item service notes to insert ~ITEM_SERVICE_NOTES~
•Select Workorder item type to insert ~ITEM_TYPE~
•Select Workorder item request date to insert ~ITEM_REQUEST_DATE~
•Select Workorder item status to insert ~ITEM_STATUS~

From the Unit text area section:
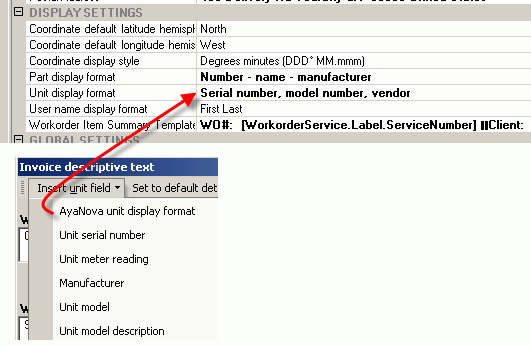
•Select AyaNova unit display format to insert the ~AYAFORMAT~ token to represent the Global Settings format of the selected unit in that billable service workorder into the Unit text area
•Select Unit serial number to insert ~UNIT_SN~
•Select Unit meter reading to insert ~UNIT_METER~ (note - only a meter reading that was entered via the meter reading steps as outlined in the AyaNova Help file How To enter a unit meter reading via a Service Workorder)
•Select Manufacturer to insert ~UNIT_MAKE~
•Select Unit model name to insert ~UNIT_MODEL_NAME~
•Select Unit model number to insert ~UNIT_MODEL_DESC_NUMBER~

From the Labor text area section:
Screenshot below shows the correspondence of the service workorder Labor with the selection in the descriptive text template.
•Select Start date and time to insert the ~SERVICE_START~ token to represent the Labor record's Start Date & Time into the Service text area
•Select Stop date and time to insert ~SERVICE_STOP~
•Select Quantity to insert ~SERVICE_QUANTITY~
•Select Rate name to insert ~RATE_NAME~
•Select Technician to insert ~SERVICE_TECH~ (this is the schedulable user that is selected in the Labor record)
•Select Details to insert ~DETAILS~
•Select No charge quantity to insert ~NO_CHARGE_QUANTITY~

From the Travel text area section:
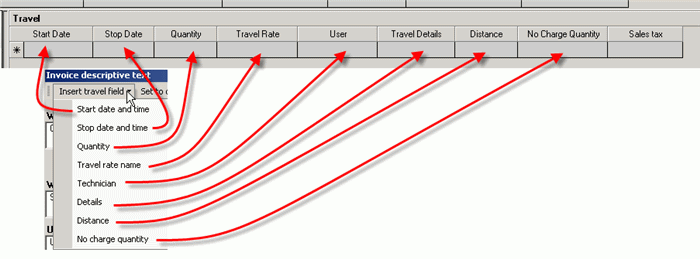
Screenshot below shows the correspondence of the service workorder Travel with the selection in the descriptive text template.
•Select Start date and time to insert the token ~TRAVEL_START~ to represent the Travel's record Start Date & Time of the invoiced workorder item into the Travel text area
•Select Stop data and time to insert ~TRAVEL_STOP~
•Select Quantity to insert ~TRAVEL_QUANTITY~
•Select Travel rate name to insert ~TRAVEL_RATE_NAME~
•Select Technician to insert ~TRAVEL_TECH~
•Select Details to insert ~TRAVEL_DETAILS~
•Select Distance to insert ~TRAVEL_DISTANCE~
•Select No charge quantity to insert ~TRAVEL_NO_CHARGE_QUANTITY~

From the Outside Service text area section:
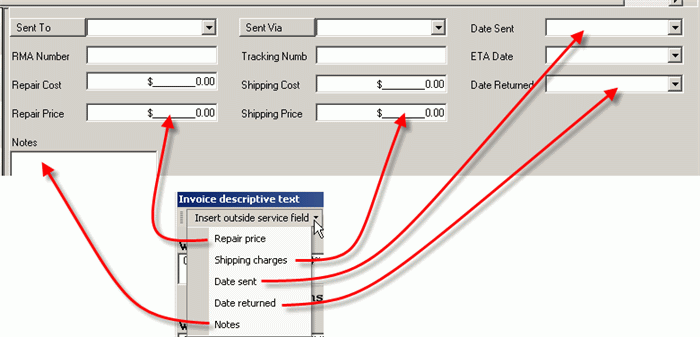
Screenshot below shows the correspondence of the service workorder Outside Service with the selection in the descriptive text template.
•Select Repair price to insert the token ~REPAIR_PRICE~ to represent the Repair Price field from the Outside Service section of the service workorder item into the Outside Service text area
•Select Shipping charges to insert ~SHIP_CHARGE~
•Select Date sent to insert ~SENT~
•Select Date returned to insert ~RETURNED~
•Select Notes to insert ~NOTES~

From the Expenses text area section:
Screenshot below shows the correspondence of the service workorder Expenses with the selection in the descriptive text template.
•Select Charges to insert the token ~CHARGES~ to represent the Charge Amount field from the Expenses record for the invoiced workorder item into the Misc.Expenses text area
•Select Summary to insert ~SUMMARY~
•Select Description to insert ~DESCRIPTION~
•Select Technician to insert ~TECH~

From the Loans text area section:
Screenshot below shows the correspondence of the service workorder Loans with the selection in the descriptive text template.
•Select Item loaned to insert the token ~ITEM~ to represent the Loan Item from the Loans section of the service workorder item that is invoiced into the Loans text area
•Select Charges to insert ~CHARGE~
•Select Loaned Date to insert ~LOANED~
•Select Returned Date to insert ~LOAN_RETURNED~
•Select Notes to insert ~LOAN_NOTES~
