Configuration of WBI differs depending on the operating system in use.
Below are first the steps if using Windows 7 and newer and then second if using older OS such as Windows XP Pro or Windows 2003
Steps to perform if Windows 7 and newer
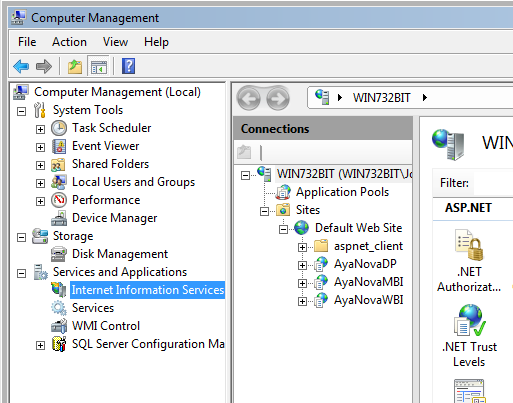
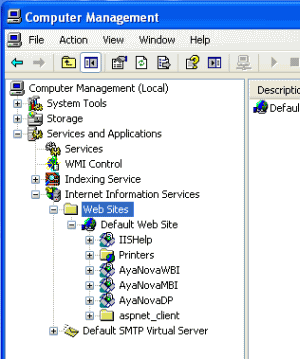
A. After installation has completed, open the IIS Manager and confirm that AyaNovaWBI is present
B. Confirm what the external static IP address is for your router/firewall (as your remote users will use that ip address, not a private internal ip)
C. Configure your router to forward outside Internet requests to the IIS server
Every model router is different so we can not provide specific directions here.
You will need to check your router documentation manual on how to configure forwarding
Basically, with most models you would bring up the software configuration for the router by connecting to the router via your web browser, go into Advanced settings, go into Forwarding settings, enter the internal IP address of the WBI server, enter the Port number outside Internet users would enter to be redirected to the WBI server (same port number the Default Web Site is set to use in Computer Management)
For example:
1. Your router's static Internet IP address is 333.222.101.12
2. The Default Web Site TCP Port is set to 6969
3. The WBI server's internal IP address is 192.168.1.100
4. You install and configure WBI to this computer
5. You configure your router to forward port 6969 to 192.168.1.100
6. Remote Internet users would enter the URL of http://333.222.101.12:8989/AyaNovaWBI/login.aspx to bring up the login page for accessing via WBI. (whereas if the port number is 80 (the default web server port) then it can be left off of the URL in the browser and it would be http://333.222.101.12/AyaNovaWBI/login.aspx)
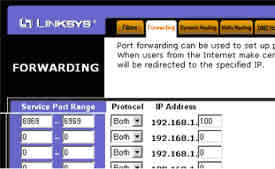
•in our example screenshot below for our example LinkSys router - the forwarding port we have set is 6969 for the database server’s internal IP address of 192.168.1.100
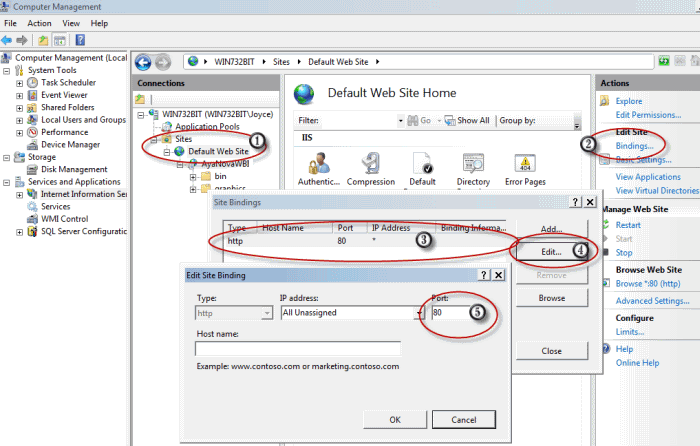
D. Confirm that IIS is configured for this same port #
•In our example screenshot below, the Port is 80 for the Default Web Site.
•So would need to edit the port for the Default Web Site to 6969 to match that set for the router if using that port number of 6969, or whatever port your router is set for
E. WBI uses the same config.txt that the AyaNova program uses to connect to the networked database.
•a. Again confirm that the latest version of AyaNova is already installed and working connected to the networked AyaNova database (you can login and see your data) on this computer prior to installing WBI. Check your version by select menu Help -> About AyaNova Once confirmed AyaNova and WBI are the latest, then continue.
•b. Use Windows Explorer to open C:\Program Files (x86)\Ground Zero Tech-Works Inc\AyaNova folder, and copy the config.txt file
•c. Move to the C:\Program Files (x86)\Ground Zero Tech-Works Inc\AyaNovaWBI\bin directory and paste the config.txt into this folder
•d. You will be asked to confirm overwriting the existing config.txt, click Yes.
•e. If you do not get asked, this may mean you are pasting to the wrong folder - check your steps and redo.
F. Also via your IIS Manager, confirm that your Default Web Site and the AyaNova remote access application(s) just installed are associated with an application pool that uses the managed piped mode Integrated (not Classic) and uses .NET v4.0 (later versions may say version 4.2, 4.3, 4.5 etc)
•This .NET v4.x application pools are created automatically for you when you installed the IIS components in Step #1 - RI Installation with .NET 4 installed
• Your version of Windows may have named the application pool ASP.NET v4.0 or it may have been named some other name such as DefaultApppPool or some other name. The name doesn't matter - what matters is that the application pool is associated with your Default Web Site and the AyaNova remote access components has:
•managed pipeline mode of Integrated
•.NET 4 Framework
•If your Application Pools via your IIS does not show an application pool with managed pipeline mode of Integrated and framework version of 4.x (x being whatever the latest version 4 that is available) then you need to reinstall (or check to make sure even is installed) the required IIS components as outlined in Step#1. A and redo your steps.
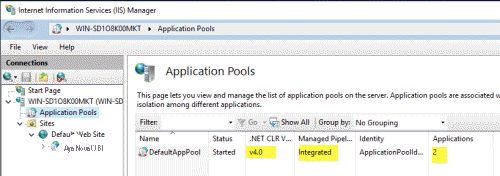
Example of Application Pools shown in IIS Manager on a Windows 2019 Server showing that it hs a v4.0 Integrated application pool that is linked to the AyaNovaWBI site as well as the Default Web Site (2 Applications):
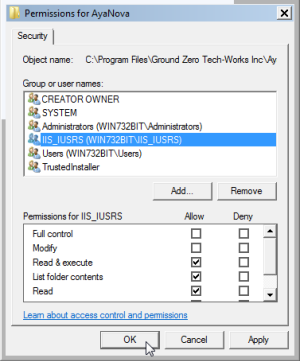
G. Check that IIS_Users has permissions
Right-click on Default Web Site -> Select Edit Permissions... -> Select the Security tab
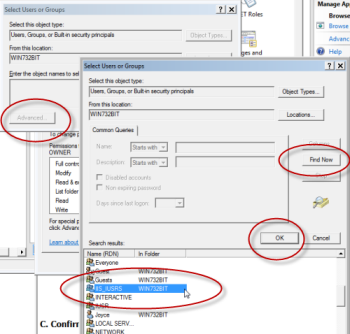
If IIS_Users is not listed, you will need to add.
Example screenshots taken such as click on Edit -> than Add... -> Advanced -> Find Now -> scroll down and click on IIS_USERS and OK till now showing.

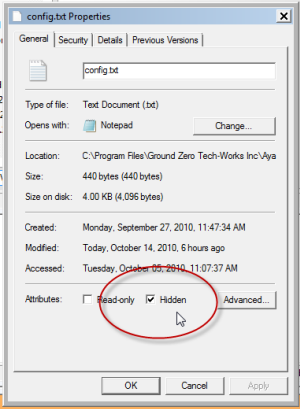
H. Additional access settings may want to be set so that external users can not view the contents of the config.txt file
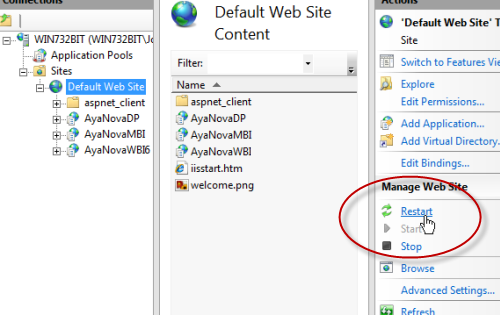
1. Switch to Content View for AyaNovaWBI
3. Right-click on the config.txt file and edit permissions
4. Check-mark Hidden
5. Restart the default web site
I. Continue to Step #3: WBI Server Testing
Steps to perform if using older OS such as Windows XP Pro or Windows 2003
A. Open the IIS Manager and confirm that AyaNovaWBI is present as an application site of Default Web Site
B. Determine the internal private IP address of this IIS server:
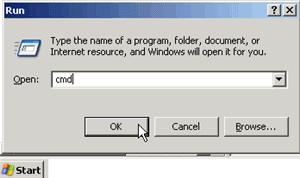
a. On this WBI server, open a DOS command prompt by selecting Start -> Run and typing in the following cmd and selecting OK
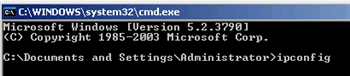
b. Type in the following ipconfig at the DOS prompt that appears
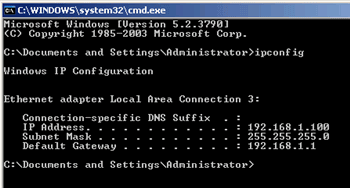
c. This will now display the Local Area Connection's IP Address as well as the Subnet Mask and Default Gateway.
d. Note down this IP Address as you will need this to perform internal testing and to identify which internal IP address to forward to via your router. In the screenshot below, the IP Address is 192.168.1.100 Your's will likely be different.
C.1 If you have a Static IP: (see C.2 below if you have a dynamic IP)
Confirm what the external static IP address is for your router/firewall (as your remote users will use that ip address, not a private internal ip) and configure your router to forward outside Internet requests to the IIS server via its internal private ip address
Check with your ISP what static IP address given to you
Every model router is different so we can not provide specific directions here.
You will need to check your router documentation manual on how to configure forwarding
Basically, with most models you would bring up the software configuration for the router by connecting to the router via your web browser, go into Advanced settings, go into Forwarding settings, enter the internal IP address of the WBI server, enter the Port number outside Internet users would enter to be redirected to the WBI server (same port number the Default Web Site is set to use in Computer Management)
For example:
1. Your router's static Internet IP address is 333.222.101.12 (this is the external ip address)
2. The Default Web Site TCP Port is set to 6969
3. The WBI server's internal IP address is 192.168.1.100
4. You install and configure WBI to this computer
5. You configure your router to forward port 6969 to 192.168.1.100
6. Remote Internet users would enter the URL of http://333.222.101.12:8989/AyaNovaWBI/login.aspx to bring up the login page for accessing via WBI. (whereas if the port number is 80 (the default web server port) then it can be left off of the URL in the browser and it would be http://333.222.101.12/AyaNovaWBI/login.aspx)
•in our example screenshot below for our example LinkSys router - the forwarding port we have set is 6969 for the database server’s internal IP address of 192.168.1.100
C.2 If you only have dynamic IP
You can certainly use a dynamic IP address for your public router/firewall, but of course as dynamic ip changes constantly, you and your staff would need to know what the changed IP address is every time it changes.
OR
If your company is unable to obtain a static IP address, a possible suggestion may be to follow http://forum.ayanova.com/t/yes-you-can-use-dns-and-your-dynamic-ip-address-to-set-up-remote-access/2311
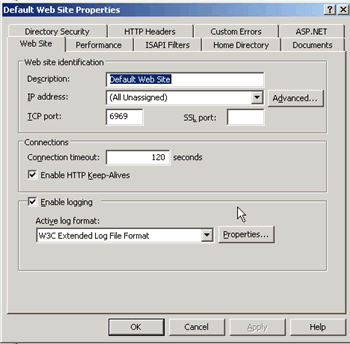
D. Confirm that the Default Web Site in IIS is configured for this same port #
•In our example, we have the TCP Port as 6969 for the Default Web Site because as the above example, we want to have remote users forwarded to port 6969 onto the server.
•You do not have to use 6969 as the TCP Port and you can leave it at it's default of 80 - this is just an example.
E. WBI uses the same config.txt that the AyaNova program uses to connect to the networked database.
•a. Again confirm that the latest version of AyaNova is already installed and working connected to the networked AyaNova database (you can login and see your data) on this computer prior to installing WBI. Check your version by select menu Help -> About AyaNova Once confirmed AyaNova is the latest, then continue.
•b. Use Windows Explorer to open C:\Program Files (x86)\Ground Zero Tech-Works Inc\AyaNova folder, and copy the config.txt file
•c. Move to the C:\Program Files (x86)\Ground Zero Tech-Works Inc\AyaNovaWBI\bin directory and paste the config.txt into this folder
•d. You will be asked to confirm overwriting the existing config.txt, click Yes.
•e. If you do not get asked, this may mean you are pasting to the wrong folder - check your steps and redo.
F. Confirm that both the Default Web Site and the AyaNovaWBI site are using Microsoft.NET Framework 4
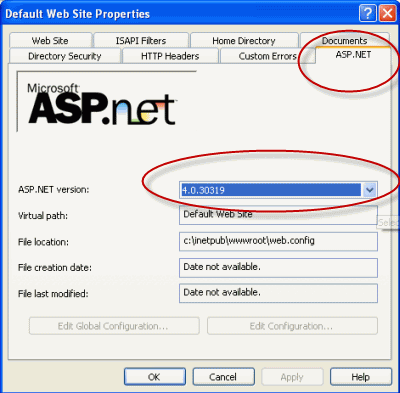
a. Right-click on the Default Web Site, select Properties. Click on the ASP.NET tab of this Default Web Site and make sure the .NET Framework selected is 4
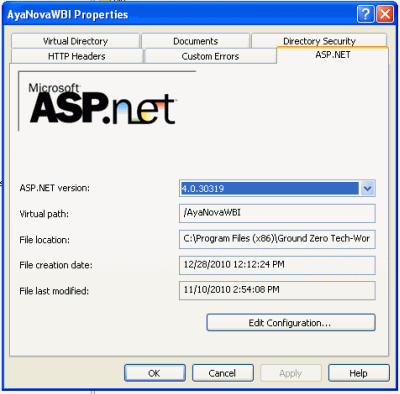
b. Right-click on the AyaNovaWBI site, and select Properties, view the ASP.NET tab and make sure the .NET Framework selected is 4
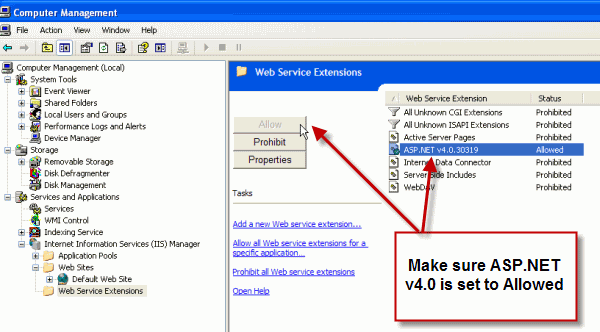
G. If using an older OS such as Windows 2003 or Windows XP 64 bit, select the Web Service Extensions and make sure ASP.NET v4.0 is set to Allowed (if not set to Allowed, will get 404 error Page Not Found when performing the initial testing on the server)
NOTE: If you do not see this extension listed, it may be because your ASP.NET needs to be re-registered to work with IIS again by running "%windir%\Microsoft.NET\Framework\version\aspnet_regiis.exe" -i where %winver% is the Windows directory for your operating system, and version represents the version number of the .NET Framework that you installed on your server. You must replace this placeholder with the actual version number when you type the command.
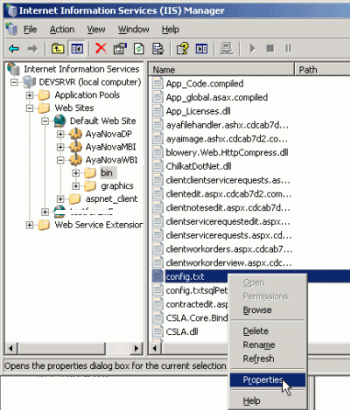
H. The following are additional rights settings you may want to set so that external users can not view the contents of the config.txt file
1. Open the IIS Manager or Computer Management
2. Right-click on config.txt that is within the folder of the AyaNovaWBI/bin site
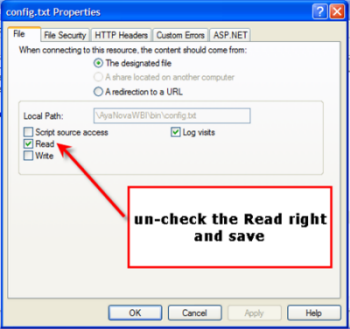
3. Select Properties
4. Un-check the Read right, and save.
I. Stop and Start the default web site
J. Continue to Step #3: WBI Server Testing