Each entry screen has menu options that are specific for that entry screen's object (i.e. client, head office, part, etc) you are viewing. Do note that not all entry screens have the same menu options. We have listed below menu options that are common to most object entry screens and what each is for.
If a menu option is grayed out or not showing, that would indicate either you do not have rights to access or perform the feature and need to have your security group rights edited, or that entry screen does not have that menu option.
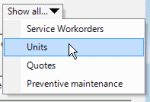
Show all...
This menu option provides quick access to all units of this client, all service workorders for this client, all quotes, and all PM's for this client
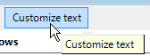
Customize text...
This menu option ONLY shows when logged in as the AyaNova Administrator.
Use the Customize text... menu option to localize labels of this entry screen on the fly or if accessed from the main menu bar, displays the labels of the main grids and main menu bar for quickly editing.
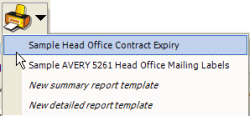 Print
Print
Selecting this menu option drops down to display the list of available reports for the displayed entry screen.
For example, the screenshot above is for the Head Office entry screen. Whereas reports available for a Service Workorder would be different.
See also:
![]() Plug-in
Plug-in
If this menu option shows, drop down to display available plug in's for this entry screen.
For example, if you have installed the import/export utilities and are viewing a client's entry screen, this drop down will list the ImportExport.csv plug-in utility for exporting this single client to a CSV file.
See also:
![]() Save & Exit
Save & Exit
This menu option saves any changes to this entry screen and closes the entry screen.
![]() Documents
Documents
This opens up the list of associated documents with this object. You can also associated new documents via this screen.
NOTE: If a menu item is grayed out and a line through it, that means the object has no records. For example, this Documents menu option is grayed out and a line through it ![]() - this way you can see at a glance there are no Documents entered for this workorder without having to open it.
- this way you can see at a glance there are no Documents entered for this workorder without having to open it.
See also:
![]() Wiki
Wiki
This will open up the Wiki page for this specific object where you can embed files / documents, write notes or embed images.
See also:
![]() Record History
Record History
This opens up the Record History window displaying the user that originally created this object, and date of creation; and the last user that modified this object and date of modification.
Do note that the fields are not updated until the object has been saved and closed. For example, if you have just created a new client, and have not yet selected Save or Save & Exit – the creator and creation date will be blank.
![]() Follow Up
Follow Up
A Follow Up is a Schedule Marker that is tied to a particular object that you want to follow up on at a later date.
Select this menu option to either add a follow up for this object, or view existing follow ups for this object.
Follow Ups are available for Clients, Head Offices, Contracts, Units, Service Workorders, Quotes, and Preventive Maintenance
See also:
How do I create and view Follow Up in a workorder?
![]() Save
Save
This saves any changes made to the object without closing the entry screen.
![]() Save & New
Save & New
This saves any changes made to the object and opens a new empty entry screen so that you can create a new object without having to go back to the grid and selecting New...
This is useful if you are entering a number of similar objects (such as parts).
![]() Duplicate
Duplicate
This makes a duplicate of the existing entries of this object and copies them to a new object entry screen.
For example, lets say you are entering a number of units for a client that are all same model, details etc except for the serial number. Save the first entry, and then select Duplicate. Edit its serial number. Save. Select Duplicate. Edit its serial number and so on.
See also:
How do I duplicate a Schedule Marker?
![]() Delete
Delete
This deletes the whole object. Note that only if you have rights to do so will this toolbar option be available.
Delete is a permanent option. You are given one warning and chance to cancel and there is no "undo" option. If a user ignores the warning and deletes an item they should not have, the only options are to re-enter it from scratch or restore the entire database from a backup copy.