Additional client entry screen menu options
![]() Client Note
Client Note
This opens up the Client Note grid screen where you can enter notes pertaining to that client selected within this workorder. Client Notes are accessible from the client entry screen's menu options as well as from any workorder for that client for entry and viewing only - there is no print ability for Client Notes.
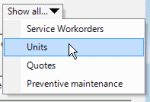
Show all...
This menu option provides quick access to all units of this client, all service workorders for this client, all quotes, and all PM's for this client
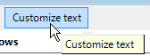
Customize text...
This menu option ONLY shows when logged in as the AyaNova Administrator.
Use the Customize text... menu option to localize labels of this entry screen on the fly or if accessed from the main menu bar, displays the labels of the main grids and main menu bar for quickly editing.
See also for more details:
Common entry screen menu options
Fields of the client entry screen
Active

If unchecked, client will appear only in Client grid screen, and not be listed in Client drop down selection lists any new service work orders, preventive maintenance, quotes or as a unit owner.
If this de-activated Client has any Preventive Maintenance workorders they will also be set to inactive.
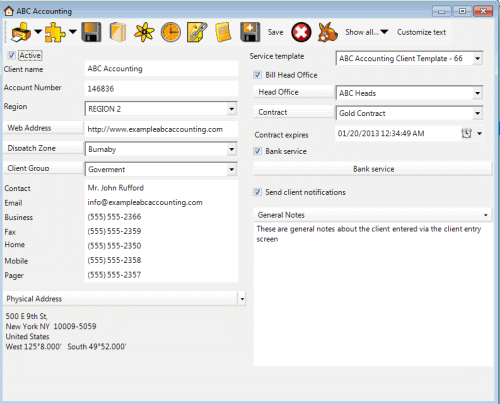
Client Name
This is a text field where you enter the name you want to give the client. This field is used to fill any list in AyaNova where you need to select a client and be identified in any Client column.
If the client is not a company, then typically you would type the last name followed by a comma, a space and then the first name like this: Smith, Joe.
Client names should be unique so that they can easily be selected from drop-down selection lists without having to open the Client entry screen to determine which client name is the one you want.
Unique names are not required but are recommended so they are easy to select from the Clients drop down list.
If you have branches of the same company with the same name to enter, we recommend you append to their name something descriptive so you can tell them apart when selecting them for work orders.
For example you could append the company name with the street name or city name or country or branch number if the client numbers their branches. For example: “First national bank #102”, “First national bank #343” etc.
Because it’s necessary to select a client very often in AyaNova you should enter client names here in a way that takes full advantage of the client list selection auto-select shortcut feature. This feature allows you to type the first few characters of a client’s name to select them so the first part of the name should be the most distinctive.
Account Number
The account number for your client may be obtained from your accounting software, and is another way of identifying your client in reports or via the Clients grid. This is a text field only and not tied to any particular accounting feature.
Region
If you select the default region, then this Client is available for all users that have access to Clients. Otherwise select a specific region for this client to restrict access to it and its workorders etc.
Also see: Regions
Website
![]()
If you click on the Website button to the left, it will open up your computers default web browser to that entered URL address. Entering the client’s web address also allows you to easily select it from the Client grid if this is a need in your service.
Dispatch Zone
By assigning a client to a dispatch zone, along with AyaNova scheduled users assigned to dispatch zones, you can quickly view scheduled users via the Schedule screen that service this zone and be able to assign more efficiently.
Assigning clients to dispatch zones also is useful for sorting and filtering clients within the various grids.
Clicking on the Dispatch Zone button opens the Dispatch Zones grid. This is useful so that you can quickly and easily add additional Dispatch Zones to select from, or edit existing as needed and as you have rights to.
Client Group
Assigning clients to client groups is useful for sorting and filtering clients within the various grids.
Clicking on the Client Group button opens the Client Groups grid. This is useful so that you can quickly and easily add additional Client Groups to select from, or edit existing as needed and as you have rights to.
Contact
Suggestion is to enter the first and last name of the main contact for this client in this field.
When a new workorder is created for this client, as a helpful function, the contents of this field is transferred to the Contact field in the workorder.
Enter in the main contacts email address here in proper email format if you plan on using the Client Notification feature and/or so that it may be used in a workorder report template.
This can then be used in conjunction with a detailed workorder report templates script to automatically "suck" this email address out and place it in the To: field when emailing a single report template for a workorder.
Refer to the AyaNova Support Forum https://forum.ayanova.com section Printing & Report Templates for additional sample report templates including those related for use with the client's email address.
Business, Fax, Home, Mobile, Pager
Enter appropriate phone numbers where indicated. These fields will be available in a detailed workorder report template.
Service Template
If you select a specific service template here, when you create a new workorder for this client, it will default to selecting that service template
Postal Address and Physical Address
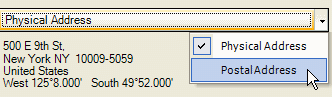
The Postal Address is the address where the client receives mail. The Physical Address is where they receive deliveries or where service is performed; where they are physically.
You can switch between these two addresses by clicking on the drop down arrow to display, and then clicking on either the Postal Address or Physical Address.
If presently viewing the Physical Address, the label Physical Address will have a checkmark beside it and be labeled in the button.
If presently viewing the Postal Address, the label Postal Address will have a checkmark beside it, and be labeled in the button.
The Physical Address defaults to showing as AyaNova is mostly concerned with where service is performed, and the physical address displays in the Clients grid, and within Service workorders, quotes and PM’s.
To edit the type of address, click on the button to bring up the Address entry screen.
![]()
Address screen menu options:
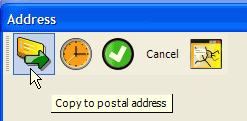
If viewing the Physical Address – the menu option will be Copy to the postal address. If viewing the Postal Address – this would be Copy to the physical address menu option. Makes it easier then having to enter twice, especially if the mailing address is exactly the same as the physical address where service is performed.
Once you have entered data, click once on the ![]() OK button to accept the entered information and close the screen.
OK button to accept the entered information and close the screen.
Select the ![]() Record History button to display history regarding the user that created or last modified this record. Do note that only history of saved information is displayed. If you have not yet closed the screen which saves it, you as a user and the date will not yet display.
Record History button to display history regarding the user that created or last modified this record. Do note that only history of saved information is displayed. If you have not yet closed the screen which saves it, you as a user and the date will not yet display.
![]() This opens your default Internet browser to MapQuest where the entered address is automatically entered so you can view on a map. Extended mapping capabilities are on the To Do list for future releases of AyaNova
This opens your default Internet browser to MapQuest where the entered address is automatically entered so you can view on a map. Extended mapping capabilities are on the To Do list for future releases of AyaNova
Note that if it was a Postal Address that was opened, that the Latitude and Longitude fields are grayed out. This is because Latitude and Longitude are physical attributes and only are available to display when the Physical Address button is selected. Use of Latitude and Longitude are on the To Do list for future features of AyaNova integrating with other mapping software.
Enter Latitude and Longitude fields using the apostrophe key on your keyboard. For example, if South 49°52.000' you would type in 49’52.000 and then tab off.
Service Template
![]()
If you want a service workorder template always preselected for this client, select here
Bill Head Office

If you check mark this field, you can use this in conjunction with a script in a Detailed style report template to determine whether to display the Head Office’s postal address on a report for a service workorder, or the client’s address. This is useful if the head office is sent the completed workorder for payment, whereas a dispatch report would have the clients physical address as that is where service would be performed.
Refer to the AyaNova Support Forum https://forum.ayanova.com section Printing & Report Templates for additional sample report templates including those related for use with Bill Head Office.
Head Office
Assigning a client to a specific Head Office is for reporting purposes and/or filtering purposes only and is not required.
If the Head Office is not in the drop down list and no Head Office has been selected as the image above, then with the drop down selection list blank, click on the Head Office button to open up a new head office entry screen so that you can enter the Head Office details, save, close and then select it from this list.
Or if the Head Office is selected from the drop down list, you can open up the Head Office entry screen displaying that head office information by clicking on the Head Office button
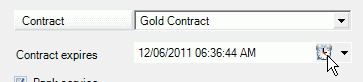
Selecting a contract will automatically apply that contract’s settings on rates to be used and part discounts to service workorders where this client is selected. You can also see right away in a service workorder that this client has a contract as the Contract icon ![]() will display in the toolbar menu of the service workorder.
will display in the toolbar menu of the service workorder.
For example, if have selected a contract that restricts specific rates to be used, only those rates will be available for selection in a service workorder.
Or for example, if have selected a contract that applies a discount to parts, when parts are selected within a workorder item, this discount will automatically be entered.
You can quickly view the specifics of a contract by selecting it from the drop-down selection list, and then clicking on the Contract button to open the Contract entry screen.
If the contract desired is not in the drop down list and no contract has been selected as the image above, then with the drop down selection list blank, click on the Contract button to open up a new Contract entry screen so that you can enter the Contract details, save, close and then select it from this list. Refer to the section on Contracts further in this manual.
Contract Expires
If the contract has expired, it will not show the Contract icon within a service workorder and the Contract settings will not be enforced.
If there is no contract expiry date, it will not show the Contract icon within a service workorder and the Contract settings will not be enforced.
Entering the contract expiry date is useful to:
•Filter the Clients grid by Contract expiry Date to view at a glance which contracts are coming up on expiry.
•Run a report of contract expiry dates so that you can see at a glance which will expire soon and make sure to renew them
•So you can be automatically notified before the expiry date to remind your client to renew
Bank Service

If checked, this displays the Bank Service button to open the Banking grid for this client
Banked service allows you to manually enter in prepaid amounts, and to automatically apply against the balance from service workorders.
See also for more details:
Send Client Notifications
![]()
If check-marked, then if the Region this client is a member of has Client notifications set up, then this client will receive those set up when that event occurs.
See also for more details:
Regions - Client Notifications
General Notes
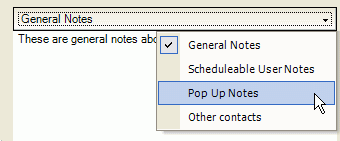
These might be general information about the client that you wish to maintain with the client record.
Note that if you are viewing the General Notes the label General Notes will display on the button, as well as the drop down will show a checkmark next to General Notes.
Schedulable User Notes
If you have standing instructions for scheduled users that perform service for this client, you may wish to enter them here rather than re-entering in every service workorder for this client.
The Scheduled User Notes will display along with the client name, address and contact information in the service workorder entry screen and is selectable within Detailed format report templates.
Note that if you are viewing the Schedulable User Notes the label Schedulable User Notes will display on the button, as well as the drop down will show a checkmark next to Schedulable User Notes.
Popup Notes
Popup notes automatically “popup” whenever a service workorder for this client is opened whether a new service workorder, or viewing an existing service workorder.
A example of use would be the accounting department wants to indicate to dispatch when taking any service requests to remind the client about outstanding payments. As the popup will popup when the dispatch creates a new service workorder, this reminds the dispatch right then to talk with the client about this.
Other Contacts
Enter additional contacts information in this text box.
See also:
Fields from the Client entry screen that are available in a detailed service workorder report template
•Account Number
•Postal Address, City, StateProv, Country, PostalCode
•Physical Address, City, StateProv, Country, PostalCode, Latitude, Longitude
•Client Name
•Client Group
•Client Contact
•Dispatch Zone
•Email, Business, Fax, Home, Mobile, Pager
•Other Contacts
•Region
•Schedulable User Notes