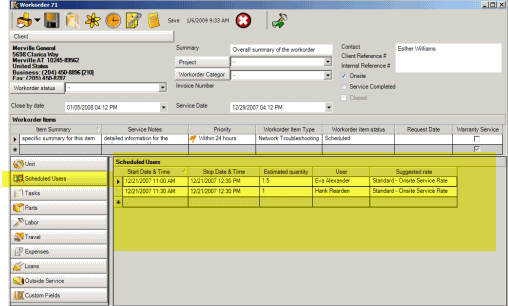
The Scheduled Users sub-screen
Additional information about this Scheduled Users subsection
Fields of the Scheduled Users subscreen
The Scheduled Users sub-screen:
•Identifies one or multiple users scheduled to perform the service in this workorder item
•Identifies start date and time, stop date and time
•Identifies suggested service rate and estimated hours of service
•Provides ability to copy this information to a Labor item as time saving feature
Additional information about this Scheduled Users subsection:
Scheduled users for this workorder item are selected here. What is selected here shows on the graphical Schedule Screen.
You can schedule as many different users as needed.
The scheduled user is assigned to the workorder item, not to the workorder as a whole. In this way you could have different scheduled users for different workorder items within a single workorder.
If your workorder has only one workorder item, then by default the scheduled users are assigned to that workorder item. And if you have more than one workorder item, you can assign different scheduled users to the different workorder items as needed.
If you do not want the Scheduled Users subsection to show in the entry screen for users of a certain security group, just set the security group Object.WorkorderItemScheduledUser to Forbidden
You can pre-set via the Global Settings field Scheduled Default Time what time you want a new record created through the service workorder or quote or PM to default to - saving yourself time in selection.
Scheduled users can be automatically notified when newly scheduled, or when the scheduled date is near.
See Also:
Moving and sorting columns in a grid
The graphical Schedule screen requires at minimum the following three fields to be able to correctly display for a scheduled user.
1.Start Date & Time
2.Stop Date & Time
3.User
See also:
Fields of the Scheduled Users subscreen:

Start Date & Time and Stop Date & Time
These columns are where you would indicate the start and the stop date and time for the selected scheduled user.
As a time saving feature, when you enter a start date and time and tab off of it, the Stop Date & Time will automatically default to the time range set in Global Settings for Scheduled / Labor Default Minutes after the Start Time; and the Estimated Quantity will automatically be derived from the start and stop time.
And another time saving feature is the Global Settings for Scheduled Default Time. If you almost always have your techs scheduled at a set start time (i.e. all jobs start at 8am) than you can set it in that Global Setting so that time is always the default when you create a new scheduled user record.
You can easily edit these fields as needed by placing your mouse in the fields and editing.
See also:
If an exclamation mark appears on the left of a row that indicates that there is a potential issue with the entered information such as the Stop Date being before the Start Date. Read what it says and fix.

Estimated Quantity
This column as a time saving feature, automatically enters the number of hours derived from the Start and Stop Date & Time. You can of course edit it as needed.
The Estimated Quantity field is also useful if no date and time are selected, but the dispatcher wants to advise the scheduled user of an approximate length so they can schedule themselves appropriately.
The Estimated Quantity field is also useful if you use the Convert Scheduled User to Labor menu option, as that menu option will pre-enter in the estimated hours into the actual hours, saving double-entry.
This is a drop down selection of schedulable users that are active and can be selected. Selecting a user and setting the corresponding Start Date & Time and Stop Date & Time will then show the workorder item within the Schedule screen for this user, as well as on the Scheduled List grid.
If a user does not display in this drop down selection, it may be because the user is not set as a scheduled user, nor as active.
See also Users section of this Help docs
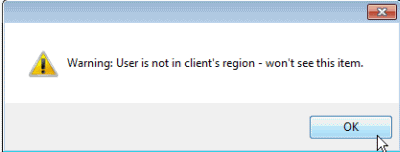
If the user selected is a member of a different region than the client, a warning message will pop letting you know that user when logged in won't be able to see the service workorder because this client is a member of a different region. Also review the Regions section of this Help docs

Suggested Rate
Use the drop down arrow when you place your mouse in this column to select the suggested rate that the service is to be billed at. This is useful if the dispatcher wants to advise the scheduled user of the type of rate to use. This is also useful if you use the Convert Scheduled User to Labor, it will pre-enter in the estimated rate into the actual rate, saving double-entry.
If this client in addition to the “regular” rates for selection also may have a contract or agreement to receive specific rates for certain services, it would be suggested to set up a Contract selected in that client’s entry screen, so that those specific rates will also be available for selection in addition to “regular” rates.
Or if this client would only ever be charged a specific rate or rates, it is suggested to assign a Contract to this client, specify Limit to Contract Rates Only and set contract rates that would be only be selectable. Refer to the Contracts section for more information.
See also: