In this tutorial example, we will go through a very basic work-flow of creating a Preventive Maintenance order, and then having the AyaNova Generator automatically generate a service workorder from that PM the next day.
Today we will make the PM, and then tomorrow you will check and confirm that the service workorder was automatically generated from the PM.
•It is highly recommended that you review this Help file's entire section on Preventive Maintenance and Service Workorders for complete overview , suggestions on use, tips on use and more.
Today - make the PM
1.Create a new preventive maintenance order for the client Merville General
•Refer to the many different ways to create a PM
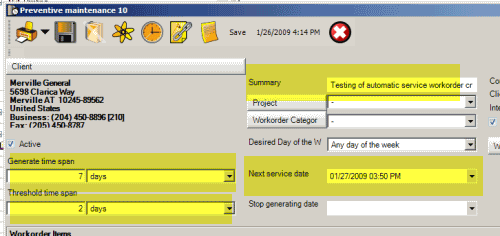
2.Enter in the following text into the Summary field at the top - Testing of automatic service workorder creation from PM
3.As per the PM entry screen details on its fields, enter in the following PM specific required fields
•Active - this must be check-marked for this PM to be able to have a service workorder generated from it
•Generate Time Span - this field is where you dictate how often the service date is repeated - enter 7 days
•Threshold Time Span - this is where you dictate how far in advance of the service date you wish the workorder to be generated - enter 2 days
•Next Service Date - this is where you indicate the date against which the other fields refer to when to generate and how far in advance to generate - select tomorrows date
•With the above field settings, this PM will automatically generate a service workorder 2 days before its Next Service Date, and then this PM will automatically update its Next Service Date to 7 days later (as per the Generate Time Span) so that it is ready for the next time it is to be generated from.

4.You can create more than one workorder item, select a unit for each workorder item, schedule users for each workorder item, etc, and this data will be copied to the service workorder that is generated. As the PM's workorder items, Scheduled Users subsection, Labor subsection etc all are the same as a Service Workorder, refer to the Service Workorder section on these:
•Unit
5.Create a Scheduled User record selecting a Start Date & Time that has a different time than that of the Next Service Date, even a different date. Enter in a Stop Date & Time an hour later, etc.

6.Select the ![]() Save menu option. Note the PM #. Exit out of the PM entry screen.
Save menu option. Note the PM #. Exit out of the PM entry screen.
7.From the PM grid you can now see this newly created PM - such as its Next Service Date, etc. Press the ![]() Refresh menu option on the PM grid if not there.
Refresh menu option on the PM grid if not there.

Tomorrow - AyaNova will, via its Generator, automatically generate a workorder for you because of the PM settings you made:
1.The next day, confirm that the Generator is running successfully depending on what configuration of AyaNova you have:
A. Default single computer installation
•In its default stand-alone single computer use, no additional configuration is needed to have the Generator run except that:
•you must be logged into AyaNova as a user other then the AyaNova Administrator.
•the user you are logged into AyaNova as must be a member of a security group that has minimum Read/Write rights to Object.Workorder and Object.WorkorderPreventiveMaintainance and Object.WorkorderService
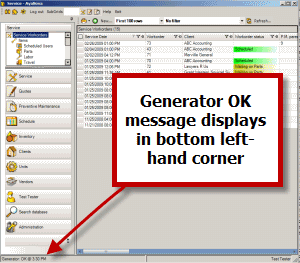
•When you log into AyaNova that is in the default stand-alone single computer configuration, you can see that the Generator is running successfully via the message in the bottom left-hand corner


B. Network configuration
•The network Generator must be installed, configured and confirmed running correctly as per the network Generator installation steps
2. Now that it is the next day, log into AyaNova and view the Service Workorders grid.
•Press the Refresh ![]() menu option just to make sure you are viewing the latest created workorders
menu option just to make sure you are viewing the latest created workorders
•Pin the Workorder # column in the Service Workorder grid, and sort it so that the last created workorder is listed first at the top of the list.
•Now pin the column P.M. Parent so that it is the second column listed
•You will see that the P.M. # that you made yesterday is listed as the P.M. Parent of the newly created service workorder.

3.Open up this workorder and observe that its Service Date is what was set when you created the PM yesterday, and its other fields are also set appropriately.
4.Now view the Preventive Maintenance grid. Press the Refresh ![]() menu option just to make sure you are viewing the latest created/edited preventive maintenance orders.
menu option just to make sure you are viewing the latest created/edited preventive maintenance orders.
5.In this grid, you will note that the Next Service Date of the PM you created yesterday has now changed to a week from now - it is no longer today's date because a service workorder has been generated from this PM, so this PM is then updated for the next date it is to generate a service workorder for, which is a week from now.

6.Open up this Preventive Maintenance and check the Scheduled User record - note it too has been updated the same amount as that of the Next Service Date - it too has been updated to be 7 days more than what it was before because that is what your Generate Time Span was set for.
Congratulations on completing this tutorial. In this tutorial we learned how to create a PM, and automatically generate a service workorder from this PM.
"When" a Service Workorders will be created for actual PM's that you make, will of course depend on what you set in each PM's Generate Time Span, Threshold Time Span and Next Service Date.
NOTE: If an exception occurs when the PM source workorder is attempted to be saved after the service wo is generated, then AyaNova will automatically delete the service wo just created, generate an error message and will send to the administrator account via memo. This prevents infinite workorders being generated as well as advises the AyaNova Administrator account of an issue.