AyaNova installation - Linux desktop
Please read through all the instructions below before proceeding with installation to be sure everything is available and ready.
The "desktop" installation is appropriate for a single user of AyaNova on a Linux x64 Desktop OS computer accessed with local browser.
Linux distributions
These instructions were compiled and tested on an Ubuntu 22.04 Desktop OS however any Linux x64 distribution should work provided the ASP.NET Core framework can be installed to it.
You may need to "translate" these instructions into your Linux distribution's package manager and shell equivalent to the Apt package manager and Bash shell script commands shown here.
System requirements
- OS : Linux x64 desktop operating system supported by ASP.NET Core
- Internet connection : required to install license and to automatically download the Chrome report rendering engine
- Disk space: minimum 2GB of free disk space
- RAM : 1GB (minimum), 2+ GB (recommended)
- Modern web browser with Javascript enabled
- Curl package installed (
sudo apt install curl) - Unzip package installed (
sudo apt-get install zip unzip)
Installation procedure
1. ASP.NET Core runtime
AyaNova requires the ASP.NET Core runtime version 8.X.x and Microsoft provides a step by step guide to install it properly on each version of Linux.
Install the "ASP.NET CORE RUNTIME" (NOT SDK VERSION) using this guide for your specific OS version https://docs.microsoft.com/en-us/dotnet/core/install/linux
There are different procedures for different versions of Linux so be sure to read through the instructions carefully.
There are three different versions of .net core listed, be sure you select the "ASP.NET Core Runtime" version.
Confirm ASP.NET Core runtime is installed and available before proceeding to the next step:
The AspNetCore runtime should be displayed with version 8.x.x, for example:
Microsoft.AspNetCore.App 8.0.3 [/usr/lib/dotnet/shared/Microsoft.AspNetCore.App]
Microsoft.NETCore.App 8.0.3 [/usr/lib/dotnet/shared/Microsoft.NETCore.App]
If you do not see '8' as the first major version digit (the rest may vary) go through the installation steps above again.
2. PostgreSQL server
AyaNova requires access to a PostgreSQL database server version 12 or newer. If you do not have a PostgreSQL server already available then it must be installed to a location visible to the AyaNova server (same computer or a local computer on the same network).
If your package manager supports PostgreSQL 12 or newer then by all means use that however if you need to install directly start here https://www.postgresql.org/download/linux/
3. Set the PostgreSQL password
If you are installing a local copy of PostgreSQL for the first time to use with AyaNova a password will need to be set for secure access. PostgreSQL on linux defaults to no password and must be secured. If you have an existing PostgreSQL server then you can skip this step but will need a PostgreSQL server password in a later step.
Open a PostgreSQL psql console as the postgres user:
Set your desired password:
If successful psql will display "ALTER ROLE" in response and you can close the psql console by typing \q to quit.
Warning: Be careful about using special characters for your Postgres connection string, particularly the password and database name, we've encountered issues with the automatic internal backup failing due to a @ or $ symbol in the password. On some platforms when AyaNova attempts to run the backup utility it may fail if that operating system does not support certain special characters found in the password as they may interfere with the "shell" command called to perform the backup.
4. Create directorys for AyaNova
AyaNova requires two directorys to be created, one to hold the AyaNova binary and other AyaNova server and web application files and one to hold the AyaNova data. AyaNova will need to write to both these locations so be sure you choose locations with appropriate permissions.
From the terminal:
Create the data directory, for desktop linux we recommend your user home directory and AyaNova defaults to '~/.ayanova-data' in it's configuration, however you can use any location that you have write access to.
Create the AyaNova binary files directory. For desktop linux we recommend /opt/ayanova.
5. Download / unzip and run the AyaNova binaries archive
The following shell script will automatically download and unzip the latest AyaNova files then start the server.
You must have the Curl and Unzip utilities installed before running this command.
From a terminal window run the following commands:
cd /opt/ayanova && \
sudo curl -O https://www.ayanova.com/download/ayanova-linux-x64-desktop.zip && \
sudo unzip -o ayanova-linux-x64-desktop.zip && \
sudo chmod 777 ./AyaNova
If there is an issue or error break apart the commands and execute each one individually to find the error.
6. Configure server
The server must be configured before it will be able to start properly and find the database server.
The AyaNova bin directory has a config.json file which is AyaNova's initial source for configuration settings required for the server to start. It is necessary to edit this file (or provide an alternative source of configuration and specify the password to connect to the PostgreSQL server. For example, if editing the default config.json file:
{
  "AYANOVA_USE_URLS": "http://*:7575",
  "AYANOVA_DB_CONNECTION": "Server=localhost;Username=postgres;Password=YOUR_PASSWORD_HERE;Database=AyaNova;",
  "AYANOVA_DEFAULT_TRANSLATION": "en",
  "AYANOVA_DATA_PATH": "~/.ayanova-data",
  "AYANOVA_LOG_LEVEL": "Info"
}
The AYANOVA_DB_CONNECTION property must be edited and where it has "YOUR_PASSWORD_HERE" substitute the actual PostgreSQL password to be used that was previously set. If the database server is located on a different computer then the Server= connection string property must be set to the address of that computer.
The AYANOVA_USE_URLS property specifies which TCP / IP Port that AyaNova server should listen on for connections from web browsers. The default value is port 7575 which should be free in most cases, however if you need to use an alternate port due to conflict it must be set here. We recommend using the default 7575 to avoid current or future confusion or conflict with other servers that may be installed or present elsewhere on the network.
Edit the config.json file using Nano text editor:
Make changes and save with ctr-x and type y to answer "Save modified buffer?" prompt.
7. Boot and test AyaNova server
Start AyaNova from a terminal window (ctrl-alt-t) in the AyaNova server files directory /opt/ayanova/. AyaNova will not start if you attempt to run it from another directory.
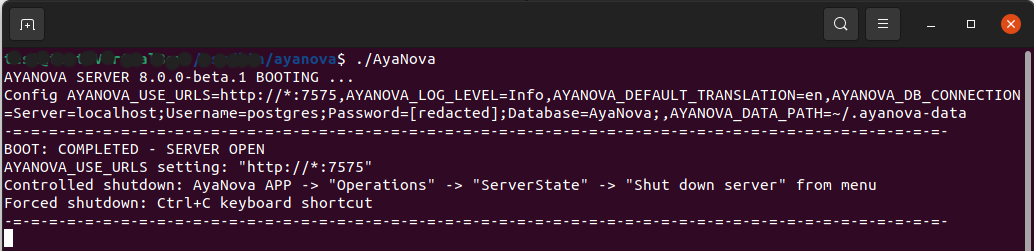
You should see an output in the terminal that indicates the AyaNova server version and that it is booting. Any problems found that prevent boot up will be displayed here.
If all is well then the console window will display "BOOT: COMPLETED - SERVER OPEN" as well as some other configuration data:
8. Login to AyaNova web app
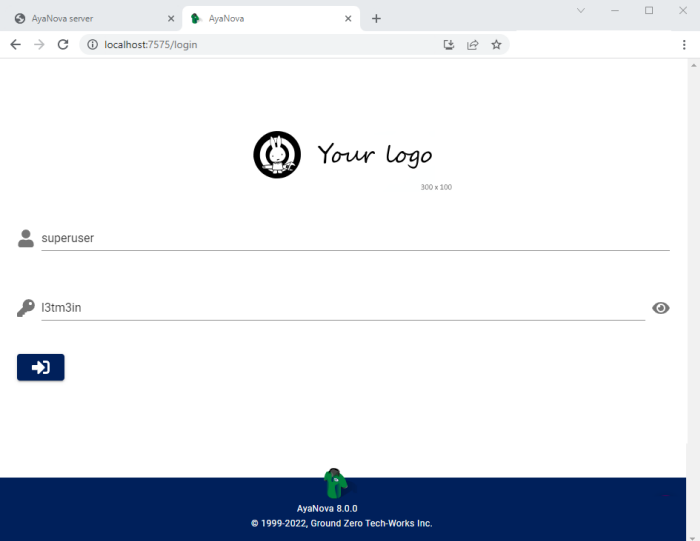
Open your web browser and navigate to the AyaNova server URL. Assuming the default port of 7575 is in use then the URL would be http://localhost:7575.
You should see the license page once only as this is the first time opening this database, then, after agreement, the normal login page:
Installation is now completed.
Starting and stopping AyaNova server
To shut down the AyaNova server cleanly use the AyaNova web app form accessed from Server Operations -> Server State and the menu item Shut down server.
Alternatively you can hard shut down AyaNova using the ctrl-c key combination in the terminal console window where AyaNova is running however this is not recommended.
To start the server from a terminal:
Report rendering first time delay
The very first time a report is rendered in AyaNova there may be a delay while a "headless" Chrome browser report rendering engine is installed if you do not already have Chrome installed.
Reporting Fonts / layout
All stock reports included with AyaNova are designed to layout correctly as long as the specified fonts are available. If you find the layouts are broken on the stock reports or don't align properly be sure that the fonts-liberation package is installed.
Getting started and using AyaNova
The next step is to login, request or install a license and if are trying out AyaNova for the first time follow the evaluation trial guide.
To ensure AyaNova runs smoothly and data is safe and secure be sure to look over the Server operations configuration and maintenance guide.
For Business administration and setting things up from a business perspective, review the Getting started - Set up for production use step in our Getting started guided tour.