Customer units
The Customer Units form is used to edit Customer Units available in AyaNova which are the Customer owned items you will be servicing and tracking in AyaNova.
When you provide service for a Customer that involves a particular item that may be serviced again in future you will want to create a Customer Unit record for it.
A Unit may not necessarily be equipment, it is anything you want to track and report on for service. For example some AyaNova users service apartments so they enter Apartments as the Customer Unit. Others service computers so they enter a particular computer as the Unit.
Customer Units can be selected in AyaNova in the following places:
- Customer Unit "Parent Unit"
- Customer Unit "Replaced by Unit"
- Customer service request "Unit"
- Loaner unit "Shadow unit"
- Unit meter reading
- Work order / Quote / PM item "Unit"
- Work order / Quote / PM item outside service "Unit"
Authorization Roles required
Many roles can select this object on other records where approriate. Editing or viewing this object in detail is only available to Users with the following roles:
Full access
- Accounting
- Business administration
- Service manager
- Service technician
Read only access
- Business administration - restricted
- Service manager - restricted
- Sales
- Sales - restricted
Import / Export
Units can be imported into AyaNova and exported out of AyaNova.
How to access Customer Units
Customer Units are accessed in the following ways:
- From the
Servicenavigation drawer Customer Units data table item - By clicking on the open record icon in any Customer Unit autocomplete list on any other form where Customer Units can be selected
- From any data table column showing Customer Units
- From the Customer Units menu item in a Customer's edit form which will open a data table of Customer units filtered to only show Units for that Customer
Customer Unit data table
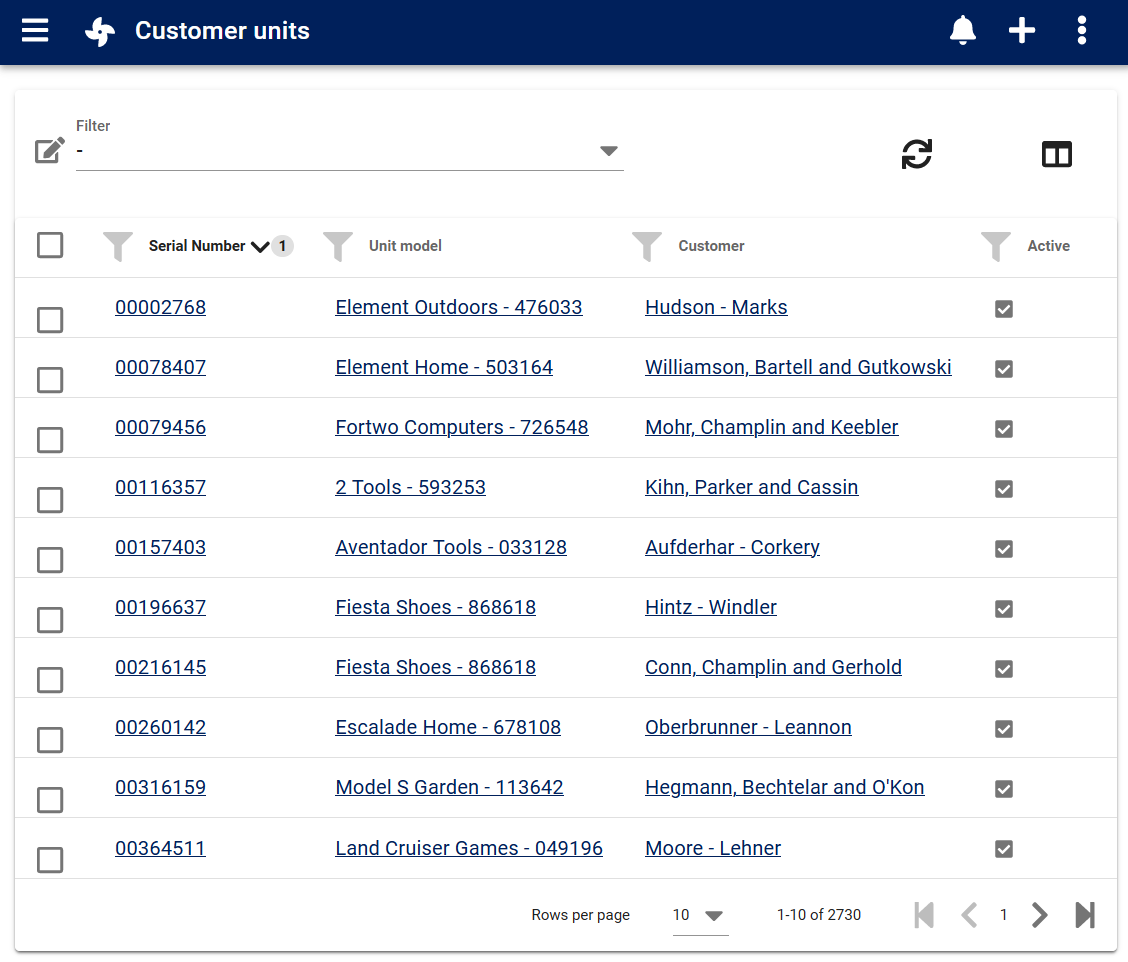
The Customer Units data table lists all the Customer Units available, provides the '+' link to create a new Customer Unit.
Table menu options
In addition to the common data table menu options, the Customer Unit form also has these unique menu options:
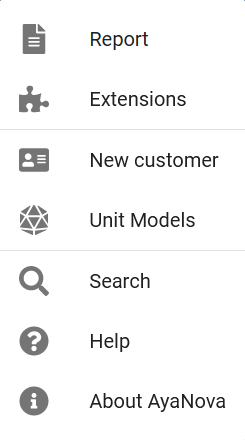
New Customer menu option
Click on this option to create a new Customer record.
Use this option prior to creating a new Unit if a new Customer is required.
Unit models menu option
Click on this option to be taken the the Unit models data table
Customer Unit edit form
The Customer Unit edit form provides all the standard edit form functionality and the following fields:
Unit tab
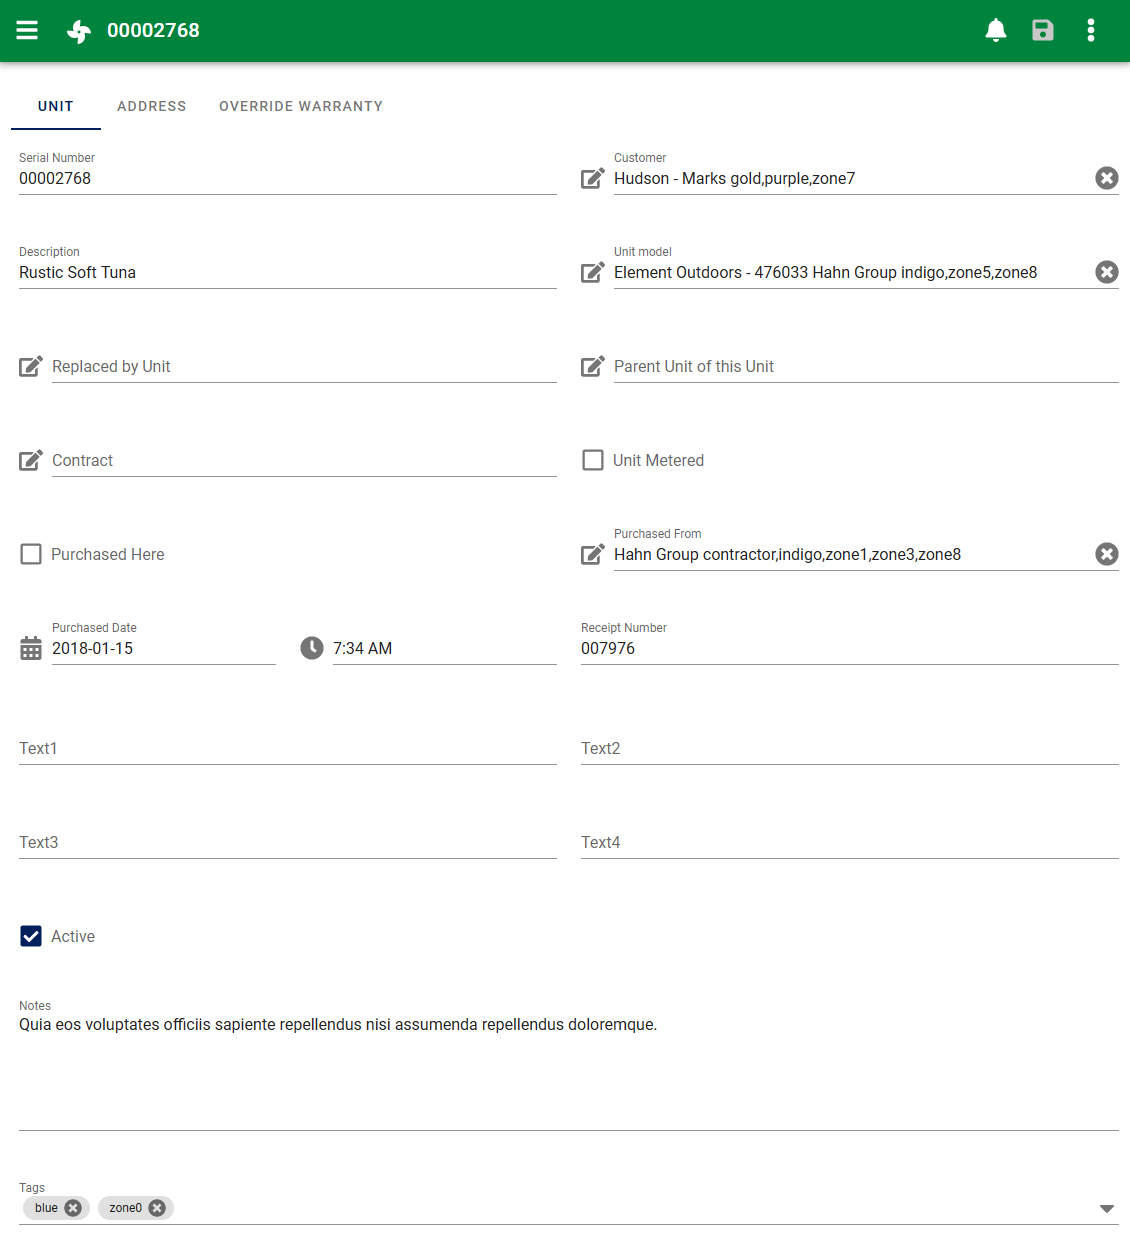
Serial number
This is the primary identifier of the Customer Unit as it's displayed in forms and reports and when searching for a Customer Unit to select in autocomplete lists.
A Customer Unit serial number must be unique from all other Customer Units of the same Unit model entered. It's ok for two Customer Units to have the same serial number as long as their Unit Model differs.
Keep in mind that this is the identifier that Customers may sometimes see on reports if provided to them.
This is the only required field on the Customer Unit form. All other fields are optional and can be hidden if not required.
You could have many units entered into the AyaNova database with the same Unit Model and manufacturer, the serial number is what identifies each unit individually.
A serial number can be any combination of letters / symbols or numbers that you can type on your keyboard.
If a unit that you want to track does not have a serial number you will have to make one up for it. Some of our clients who manufacture their own equipment will assign serial numbers to units and either etch or tag the unit in some way to mark it with the serial number.
Sometimes a unit that does not have a serial number is part of another unit that does have a serial number.
For example a wheel on a bicycle may not have a serial number, but the bicycle does. In this case when you create a unit record for that bicycle's front wheel, you might want to enter the serial number like this “123abc-front wheel” Where 123abc is the serial number of the main unit, in this case a bicycle.
The reason to put the serial number first is to make it faster to select from a unit selection list. Since all drop down lists in AyaNova will automatically scroll down to the relevant area based on the first few letters that you type. Putting the serial number first will cause all units that start with the same serial number to be grouped together making selection easier. (i.e. There are many different “front wheels” but only one that starts with that particular serial number)
How a unit is displayed in drop down lists for selection in preventive maintenance, quotes and service work order items is determined by the Administrative Global Settings for Autocomplete list template and you can add other fields from the Customer Unit to the autocomplete list search feature if they make sense for your business. For example, you may want to include Unit Model names or manufacturers to make it easier to find a particular Unit.
Customer
The Customer that owns this Unit.
If a Customer transfers equipment to another of your Customers you can change the owner by changing the selection in this box.
If the Unit is owned by yourself, and you want to be able to maintain equipment service history, it is recommended to create a Customer that is your company, and assign units to that Customer.
Description
Use this field to enter an extended description of a Unit if it has not been assigned a Unit Model.
This field’s purpose is to provide a human understandable description of a unit so that it’s easily identified on printed reports and various areas of the program.
If you were to not select a model and also not provide a description the only identification of a Unit would be its serial number.
Normally you would always assign a Unit Model instead of using this field because you only have to enter a Unit Model record once and can then select it quickly and easily.
If you use this description field instead you would need to retype a full description for every Unit you enter.
It is recommended that this field only be used in cases where a Unit is unique and there is only one of them that will ever be entered in AyaNova. Otherwise you will be doing a lot of double entry.
Unit Model
The purpose of Unit Models is to keep important service related information that applies to all Units of the same Unit Model together and to save the amount of entry required for each Unit as well as track warranty information.
To take advantage of many time saving features throughout AyaNova you should always assign a Unit to a Unit Model. This makes it easier to select from autocomplete selection lists, as well as filtering in the Unit List grid, as well as displaying on reports.
If you are entering a Unit and discover there is no model entry for it, you can quickly add one on the fly by not selecting any Unit model, and clicking on the open record button on the autocomplete list to open up a new and empty Unit Model entry screen. Enter the details of the Unit model, save and the model will now appear in the autocomplete selection list.
Or if you need to edit a Unit Models, select it from the autocomplete list, and then click on the open record button to open the Unit Model entry screen with this Unit model's information.
Remember that you only need to enter a Unit Model record once, after that it can be quickly selected when entering a Unit and the information is then useful throughout the program and on reports.
If a Unit has a Unit model selected, as well as the Purchased Date entered, you will be able to take advantage of the warranty information that will appear within a Work order when the Unit is selected for service.
Replaced by unit
This field is used to record the replacement for a Unit for informational purposes if this Unit is set to inactive.
Parent Unit
Used to group Units into a master and sub Unit relationship. If a Unit is part of another Unit select the other Unit from this list.
You can filter the Unit data table by the Parent Unit of this Unit to display all Units that are in essence sub-units of a master Unit – the Parent Unit.
Do note that this is for informational purposes only. Setting this does not allow selection of the parent Unit in a work order to affect sub-units.
Contract
You can select a Contract for a Customer Unit in AyaNova to be applied to Work orders, Quotes and Preventive maintenance orders when selected.
Contract expires
When a Contract is selected the Contract expires field will be visible. This field controls the time period for which a contract is considered valid and once this date has passed the Contract will no longer be automatically applied.
See the Contract documentation for further details.
Unit metered
If checked this indicates that the Unit will have meter readings tracked and displays the Meter reading button to open the Meter Reading data table.
Meter reading button

If the Unit metered checkbox is checked, the Unit meter reading button will appear beside the checkbox.
Clicking on this button will open the Meter readings form where you can view past meter readings or make a new one.
You can also add a meter reading from a work order's Unit area.
When a meter reading is added from a work order, the meter reading record is automatically set with a link back to the work order where the Unit meter reading was entered and this work order link displays in the Meter readings data table.
Purchased here
This is a flag to indicate the Unit was sold by your service company originally to ease reporting or finding appropriate paperwork for warranty or other tracking purposes.
This field in combination with the purchase date and sales receipt number give you all the information you need to quickly get an internal copy of a sales receipt for warranty processing purposes.
Purchased from
This field is provided to help when it's necessary to contact the seller for warranty or other tracking and reporting purposes.
This field in combination with the purchase date and sales receipt number give you all the information you need to quickly get a copy of a sales receipt for warranty processing purposes.
For example: if you want to get a copy of the receipt and all fields are filled out correctly, you can go to the unit entry screen, select the unit, note the receipt number and purchase date and then click on the Purchased from hyperlink to view the phone and contact information of the organization that sold the unit to contact them and get a copy of the invoice / receipt.
Purchased date
Date of when this unit was purchased.
This is used to determine warranty time left based on warranty information within the Unit Model or the overridden warranty terms.
And this information is then available within the work order so you can see at a glance at the time of workorder creation whether the unit falls under warranty or not.
If a unit has a unit model selected, as well as the Purchased Date entered, you will be able to take advantage of the warranty information as laid out in the Unit Model that will appear within the work order.
Refer also to the section on the service workorder item Unit sub-screen.
Receipt number
This field is provided for warranty related purposes. Sometimes you need to provide a copy of a sales receipt when processing a warranty claim. It could be your own sales receipt or another company’s if the unit was purchased elsewhere.
Text 1, 2, 3, 4
These optional fields are provided in addition to the regular form custom fields to enter additional information about this unit if desired. Use the customize form feature to hide / show and set the label each field as required.
These four fields are available for reporting.
Active
Customer Units that are set to Active can be selected on new objects that use Customer Units.
Customer Units not set to Active will still show in older records but can not be selected for new records; this is how you retire a Customer Unit from use.
(If you retire a Unit and it has a replacement you can select that in the replaced by unit field provided for that purpose)
Notes
General notes about this record for internal staff use. Notes can also be reported on if desired. These notes are only visible in this form.
Custom fields
If the form has been customized and custom fields enabled for this object they will display here.
Tags
Optional tags control for categorizing, searching, selecting and notification filtering.
Wiki
Optional wiki control.
Attached files
Optional attachments control.
Address tab
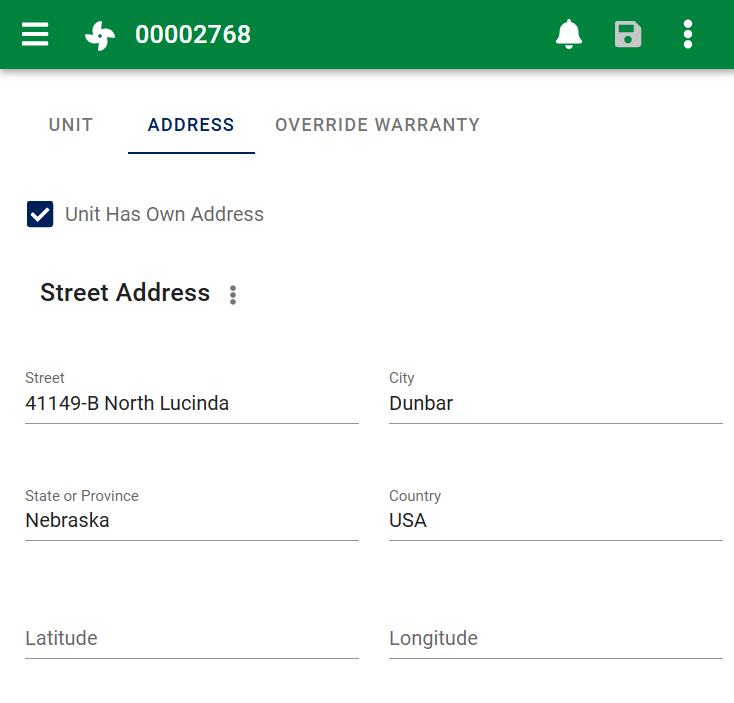
This area has the Street address portion only (no postal address) of the standard AyaNova object Address control.
Sometimes a Unit will have it's own address or geographical coordinates distinct from the Customer's address. This area of the Unit form allows you to enter a custom address for this particular Unit. This address can be selected on a Work order in place of the Customer or Head office's address.
Override warranty tab
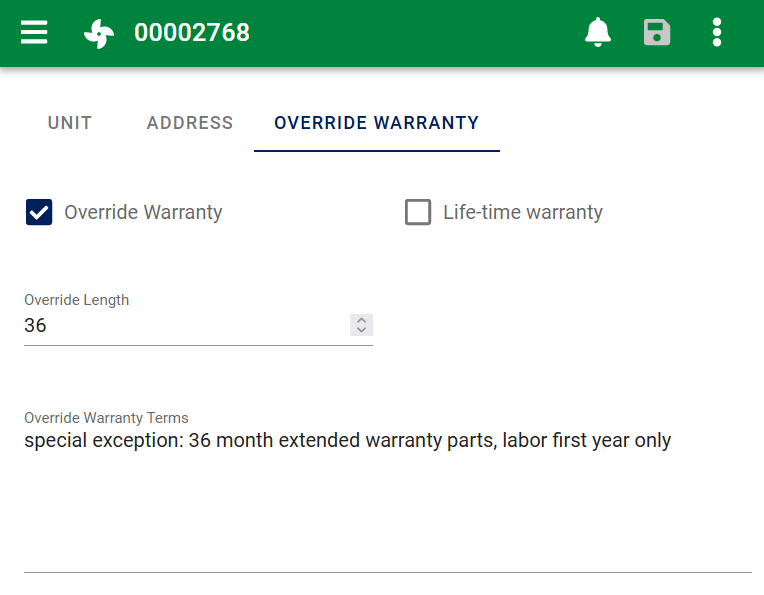
Normally a Customer Unit will follow the warranty length and terms for it's selected Unit model, however in some cases you may need to make special exceptions or there is no unit model suitable or necessary, in that case this section is used to enter unique warranty terms and length for this single Unit only.
Override warranty
This checkbox when selected enables the other fields in this tab.
If Override Warranty is not check-marked, the warranty length and terms of the Unit Model are used in conjunction with the Purchased Date of this unit.
If Override Warranty is check-marked, this means that the Unit Model's warranty terms are ignored. Instead the specific Override warranty settings of this unit's entry screen are used.
Life time warranty
Indicates that the warranty does not expire and has no set warranty length.
Override length
Warranty Length is in months. For example, if the warranty period for this unit model is 3 years, enter in 36 (12 months X 3 years = 36 months).
Used not only for information purposes but in conjunction with the service work order, when a unit of this model is selected for service on a work order, AyaNova will use this value when a warranty info check is selected to see if it’s under warranty still based on this information and the purchase date on the unit screen so you can easily see at a glance when entering without the need to open up the individual Unit entry screen.
Override Warranty terms
This is where you would enter any information necessary to process a warranty as well as any special terms of the warranty such as parts only or labor only etc.
Menu options
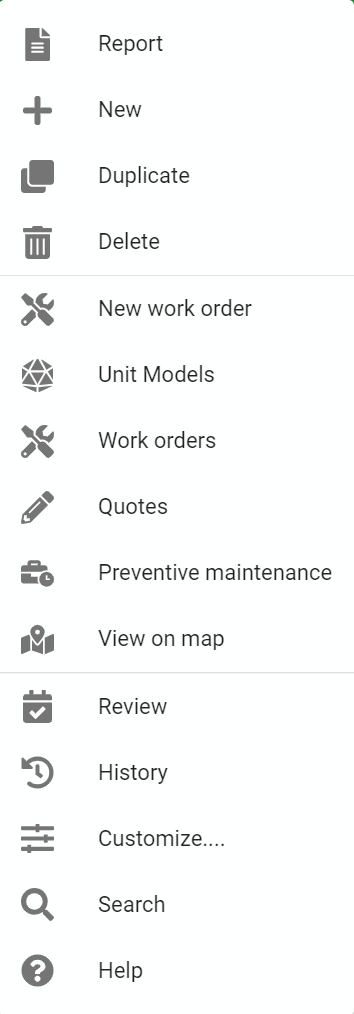
In addition to the common edit form menu options, the Customer Unit form also has these unique menu options:
New Work order
Click on this option to directly start a new work order with this Unit and it's Customer selected.
Unit models
This is a shortcut to open the Unit models data table.
Work orders
This is a shortcut to create or view prior work orders for this Customer Unit and opens the Work order list data table pre-filtered to only show records for this Customer Unit.
Quotes
This is a shortcut to create or view prior Quote records for this Customer Unit and opens the Quote list data table pre-filtered to only show records for this Customer Unit.
Preventive maintenance
This is a shortcut to create or view prior Preventive maintenance records for this Customer Unit and opens the PM list data table pre-filtered to only show records for this Customer Unit.