AyaNova installation - linux server
Please read through all the instructions below before proceeding with installation to be sure everything is available and ready.
These instructions assume shell access to a Linux server and a working knowledge of Linux adminstration tasks.
The "SERVER" installation configuration is appropriate for use both within a private office network or from the internet.
Once the AyaNova server is up and running users can access it with their web browsers pointed to the address of the AyaNova server.
No installation is required at the user end to access the AyaNova web app with a supported browser.
These instructions are targeted towards getting a new Linux server installation of AyaNova up and running in a simple and quick manner and assume the server is physically secure. If you have existing Linux infrastructure and / or are a larger organization or have special security considerations be sure to use these instructions as a guide only and modify to suit your specific needs.
Linux distributions
These instructions were compiled and tested on an Ubuntu 22.04 and 24.04 lts server OS however any Linux x64 distribution should work provided the ASP.NET Core framework can be installed to it. We strongly recommend using an LTS long term support release of Linux in order to minimize business disruption of the non lts versions that need to be upgraded more frequently.
Hosted linux
There is no significant difference in setup between a linux server physically on premise or hosted from a hosting provider with SSH shell access.
The largest demand put on an AyaNova server is report rendering so if it will be common to render reports with dozens or hundreds of pages you will find that more memory and CPUs will be beneficial.
However a small shop that renders smaller page count reports can often be served with a 2GB memory single CPU virtual server. Since it's easy to scale up a virtual server we recommend starting with the minimum requirements and scaling up as necessary.
The hosting providers CPU and memory monitoring tools will be helpful here to determine if more resources are required.
AyaNova web app system requirements
An up to date modern web browser (not Internet Explorer) with Javascript enabled on any device with a minimum display width of 360 pixels. While other browsers may work, we test AyaNova on the most recent two releases of Chrome, FireFox, Safari and Edge on Windows, Android and Apple platforms.
System requirements
- OS : Linux x64 operating system supported by ASP.NET Core 8.x
- Internet connection : required to install license and to automatically download the Chrome report rendering engine
- Disk space: minimum 2GB of free disk space
- RAM : 1GB (minimum), 2+ GB (recommended)
- Sufficient swap space if a low memory server is used ( < 4gb)
- Modern web browser with Javascript enabled
- Static IP address if AyaNova will be used from the internet
- Domain or subdomain name if AyaNova will be used from the internet
- Curl package installed (
sudo apt install curl) - Unzip package installed (
sudo apt-get install zip unzip) - Time zone set correctly in Linux (ensures backup and other automated operations happen at the expected time)
Recommendations
- Unattened upgrades : off. We recommend turning off unattended upgrades and setting yourself a schedule to manually upgrade and restart the server at a convenient time for the business. In some cases unattended upgrades of the .net runtime or it's dependencies can cause issues with the .net runtime and the operation of the AyaNova server until the linux server is next rebooted.
Installation procedure
1. Swap space configuration
If your server has 2 GB of RAM or less or will be rendering many reports simultaneously it's important to set a swap file to ensure your server doesn't completely run out of memory during report rendering. Report rendering is memory intensive and it's easily possible to completely run out of memory, particularly on a 2GB or less RAM scenario with no swap space available which can crash the server or render it completely unresponsive.
Swap memory should be considered a stopgap emergency measure only and not relied upon regularly to ensure sufficient memory. If the swap file is being accessed regularly it's a clear indication that more ram needs to be installed or allocated.
We recommend double the size of ram allocated to swap space so if you have 1GB of ram then a 2GB swap space is appropriate.
2. Install ASP.NET Core runtime
AyaNova requires the ASP.NET Core runtime version 8.x and Microsoft provides a step by step guide to install it properly on each version of Linux.
Install the "ASP.NET CORE RUNTIME" (NOT SDK VERSION) using this guide for your specific OS https://docs.microsoft.com/en-us/dotnet/core/install/linux
There are three different versions of .net core listed, be sure you select the "ASP.NET Core Runtime" version.
There are different procedures for different versions of Linux and there may be a step before the actual installation to add the microsoft package repository so be sure to read through the instructions carefully.
Confirm ASP.NET Core runtime is installed and available before proceeding to the next step:
The AspNetCore runtime should be displayed with version 8.x.x, for example:
Microsoft.AspNetCore.App 8.0.3 [/usr/share/dotnet/shared/Microsoft.AspNetCore.App]
Microsoft.NETCore.App 8.0.3 [/usr/share/dotnet/shared/Microsoft.NETCore.App]
If you do not see an '8' as the first digit of the version number (the rest may vary) go through the installation steps above again.
3. Install PostgreSQL server
AyaNova requires access to a PostgreSQL database server version 12 or newer. If you do not have a PostgreSQL server already available then it must be installed to a location visible to the AyaNova server (same computer or a local computer on the same network).
If your package manager has PostgreSQL version 12 or newer then you can go that route or install directly:
To install PostgreSQL directly start here https://www.postgresql.org/download/linux/
4. Set the PostgreSQL password
If you are installing a local copy of PostgreSQL for the first time to use with AyaNova a password will need to be set for secure access. PostgreSQL on linux defaults to no password and must be secured. If you have an existing PostgreSQL server then you can skip this step but will need a PostgreSQL server password in a later step.
Open a PostgreSQL psql console as the postgres user:
Set your desired password:
If successful psql will display "ALTER ROLE" in response and you can close the psql console by typing \q to quit.
Warning: Be careful about using special characters for your Postgres connection string, particularly the password and database name, we've encountered issues with the automatic internal backup failing due to a @ or $ symbol in the password. On some platforms when AyaNova attempts to run the backup utility it may fail if that operating system does not support certain special characters found in the password as they may interfere with the "shell" command called to perform the backup.
5. Install Chrome browser support libraries
AyaNova uses a "headless" Chrome browser to render report templates. Server versions of Linux do not have the required support libraries for Chrome to render reports so they must be installed in advance.
These examples below are tested with Ubuntu LTS releases; your distro may require different files or the requirements may change for Chrome over time. If in doubt, run a report and if you see an error check the server log and if a library is missing causing Chrome to fail the error in the log will show the missing library file that will need to be installed if that is the issue.
Ubuntu 22.04 Chrome support libraries
sudo apt-get install -y libatk1.0-0 libatk-bridge2.0-0 libcups2 libxcomposite1 libxdamage1 libxfixes3 libxrandr2 libgbm1 libxkbcommon0 libpango-1.0-0 libcairo2 libasound2 fonts-liberation
Ubuntu 24.04 Chrome support libraries
sudo apt-get install -y libatk1.0-0t64 libc6 libcairo2 libdbus-1-3 libexpat1 libfontconfig1 libgcc-s1 libgdk-pixbuf2.0-0 libglib2.0-0t64 libgtk-3-0t64 libnspr4 libpango-1.0-0 libpangocairo-1.0-0 libstdc++6 libx11-6 libx11-xcb1 libxcb1 libxcomposite1 libxcursor1 libxdamage1 libxext6 libxfixes3 libxi6 libxrandr2 libxrender1 libxss1 libxtst6 ca-certificates fonts-liberation libnss3 lsb-release libgbm-dev xdg-utils \
sudo apt-get update \
sudo apt-get install -y libatk-bridge2.0-0t64 libcups2t64 libxcomposite1 libxdamage1 libpangocairo-1.0-0 libxfixes3 libxrandr2 libgbm1 libcairo2 libpango-1.0-0 libasound2t64 wget
Fonts / layout
All stock reports included with AyaNova are designed to layout correctly as long as the specified fonts are available. If you find the layouts are broken on the stock reports or don't align properly be sure that the fonts-liberation package is installed to your server.
6. Create directories for AyaNova
AyaNova requires several directories to be created: the AyaNova binary and other server and web application files, AyaNova data and the folders to contain a local copy of the Chrome browser for report rendering.
Create the AyaNova binary files directory. We recommend /var/ayanova:
Create the data directory. AyaNova will automatically create subfolders under this folder that it manages. We recommend the default AyaNova uses '/var/ayanova/data' in it's default configuration so you don't need to modify the configuration file:
Create the Chrome binary directories:
7. Download and unzip the AyaNova binaries archive
The following shell script will automatically download and unzip the latest AyaNova server files.
You must have the Curl and Unzip utilities installed before running this command.
From a terminal window run the following commands:
cd /var/ayanova && \
sudo curl -O https://www.ayanova.com/download/ayanova-linux-x64-server.zip && \
sudo unzip -o ayanova-linux-x64-server.zip
If there is an issue or error break apart the commands and execute each one individually to find the error.
8. Server configuration
The server must be configured before it will be able to start properly and find the database server.
The AyaNova bin directory has a config.json file which is AyaNova's initial source for configuration settings required for the server to start. It is necessary to edit this file (or provide an alternative source of configuration and specify the password to connect to the PostgreSQL server. For example, if editing the default config.json file:
{
  "AYANOVA_USE_URLS": "http://*:7575",
  "AYANOVA_DB_CONNECTION": "Server=localhost;Username=postgres;Password=YOUR_PASSWORD_HERE;Database=AyaNova;",
  "AYANOVA_DEFAULT_TRANSLATION": "en",
  "AYANOVA_DATA_PATH": "/var/ayanova/data/",
  "AYANOVA_LOG_LEVEL": "Info"
}
The AYANOVA_DB_CONNECTION property must be edited and where it has "YOUR_PASSWORD_HERE" substitute the actual PostgreSQL password to be used that was previously set. If the database server is located on a different computer then the Server= connection string property must be set to the address of that computer.
The AYANOVA_USE_URLS property specifies which TCP / IP Port that AyaNova server should listen on for connections from web browsers. The default value is port 7575 which should be free in most cases, however if you need to use an alternate port due to conflict it must be set here. We recommend using the default 7575 to avoid current or future confusion or conflict with other servers that may be installed or present elsewhere on the network.
Optional but recommended: Add a 32 character AYANOVA_JWT_SECRET property to the configuration if you want to ensure that logged in User's session can survive a restart of the AyaNova server. If this is not set AyaNova will invalidate all login tokens any time the server restarts by generating a new random JWT secret on boot.
{
  ...existing properties...
  "AYANOVA_LOG_LEVEL": "Info",
  "AYANOVA_JWT_SECRET": "1111111MyRandom32CharacterSecret"
}
Edit the config.json file in your favorite editor, here we'll use Nano:
Make changes and save with ctr-x and type y to answer "Save modified buffer?" prompt.
9. Set ownership and permissions
AyaNova will be assumed for these instructions to run as www-data.
Give www-data ownership of the ayanova directory:
Set permissions to read / write for the AyaNova data directory:
Set permissions to read / write / execute for the .Chrome directory:
Set permissions to read / write / execute for the .ChromeHeadlessShell directory:
Set permissions for the AyaNova folder
10. Create and install a service to run AyaNova automatically
As AyaNova is a server application running on a server operating system it needs to start automatically when the Linux server boots and restart automatically in the (unlikely) event that it crashes.
Create the ayanova.service file:
Paste or re-create the following contents of the service file (edit as necessary if not using defaults):
[Unit]
Description=AyaNova server

[Service]
WorkingDirectory=/var/ayanova
ExecStart=/usr/bin/dotnet /var/ayanova/AyaNova.dll
Restart=always
# Restart service after 10 seconds if it crashes:
RestartSec=10
KillSignal=SIGINT
SyslogIdentifier=ayanova-server
User=www-data
Environment=ASPNETCORE_ENVIRONMENT=Production
Environment=DOTNET_PRINT_TELEMETRY_MESSAGE=false

[Install]
WantedBy=multi-user.target
Make the changes and save with ctr-x and type y to answer "Save modified buffer?" prompt.
Enable the service:
11. Start and confirm AyaNova server
Start the server service
Confirm the AyaNova service is running by first waiting for about 20 seconds after the last step for AyaNova to boot up then viewing the service status:
You should see in the service status display the AyaNova server version and that it is booting. Any problems found that prevent boot up will be displayed here.
Note that the first boot of AyaNova may require a few seconds to fully open before you will see server open message below. If you view the status too soon you may not see it get to BOOT: COMPLETED yet. In that case type q to quit and then show status again.
If all is well the status will display "BOOT: COMPLETED - SERVER OPEN" as well as some other configuration data:
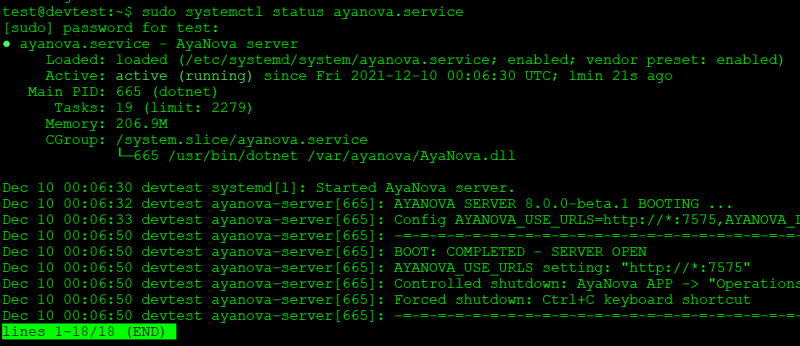
To exit the status display type q and enter to quit.
Local network access only
If users are accessing AyaNova only on a private local area network no more installation steps are required and AyaNova should be ready for use. Assuming the default port of 7575 is in use then the URL would be similar to:
http://YOUR_LOCAL_NETWORK_AYANOVA_SERVER_IP_ADDRESS:7575
If users will need to access AyaNova from the internet continue to the next step Internet access otherwise you can skip it and move on to Getting started and using AyaNova below.
Internet access
If users will be accessing AyaNova from the internet a few extra requirements are necessary to ensure security. The following items will be required to configure AyaNova on a linux server for internet access:
Static IP address
A static IP address is required to host AyaNova on the internet. If you have a virtual or physical server through a server hosting provider then you will already have a static IP address. If you are hosting your own server on premise on a private office network connecting to the internet via an Internet Service Provider you will need to ensure your ISP has provided you with a static IP address and if they haven't you will need to request a static IP address and have that address on hand before proceeding.
Registered domain name
An internet domain name is required to get an SSL certificate for secure encrypted communications between the AyaNova server and the end user across the internet. An entry will need to be made in your DNS record for your domain to provide a name to access the AyaNova server and it must point to the static IP address of your router or server. If the only service on your domain will be AyaNova then you can use the root domain name i.e. example.com or www.example.com but it's more common to use a subdomain specifically for AyaNova, i.e. ayanova.example.com.
This DNS record needs to be in place and active before proceeding and can take minutes to hours to propagate so be sure to do this as soon as possible.
SSL certificate
These instructions will assume use of a free SSL certificate from LetsEncrypt. If you already have an SSL certificate adapt these instructions to match your situation.
Reverse proxy server
We will provide instructions for using the free and open source NGINX as a reverse proxy server, if you already have another server capable of being a reverse proxy (such as Apache) you will need to adapt these instructions to match your situation.
A. Install NGINX
Install NGINX to be the reverse proxy server:
The server's firewall may need to be adjusted. Firewall configuration is beyond the scope of this installation guide, be sure you have a firewall in place and set correctly, we will outline the requirements as they relate to AyaNova itself.
Port 80 http will need to be open for requesting SSL certificates from LetsEncrypt and port 443 https will need to be open for ongoing access.
AyaNova itself does not require any port to be open to the outside world other than HTTPS port 443 for the reverse proxy server.
For hosted linux through a cloud provider the firewall may be set in the cloud networking control panel and there then would be no firewall required at the server itself and you can skip this step, otherwise ufw is commonly used.
NGINX registers itself as a service with ufw on installation so if ufw is active on your server it can be adjusted to work with NGINX as follows:
First confirm ufw is active:
If the response is status: inactive then there is no need to configure ufw further however be sure you have a firewall of some kind in place.
If ufw is active confirm it knows about NGINX:
You should see NGINX listed in the available applications list.
Enable NGINX under ufw:
Configure NGINX site for AyaNova
NGINX needs to be configured to reverse proxy to AyaNova server.
If you are already using NGINX then examine the following and adapt it to your existing configuration, if you have no existing NGINX services skip to the next section to create one for AyaNova.
Existing NGINX services
If you are already using NGINX for other services then a site configuration file entry will need to be made to reverse proxy AyaNova with appropriate settings for your site. We cannot provide details for that as it must work with your existing NGINX configuration, however here is an example of the AyaNova specific parts only taken from a working site that uses Let's Encrypt certificates to give an idea of what is required:
server {
        server_name   ayanova.example.com www.ayanova.example.com;
    location / {
        add_header Strict-Transport-Security "max-age=31536000; includeSubDomains; preload" always;
        add_header X-XSS-Protection "1; mode=block" always;
        add_header X-Content-Type-Options "nosniff" always;
        add_header X-Frame-Options "SAMEORIGIN" always;
        add_header Referrer-Policy "strict-origin" always;
        gzip on;
        gzip_vary on;
        gzip_min_length 10240;
        gzip_proxied expired no-cache no-store private auth;
        gzip_http_version 1.1;
        gzip_types  application/javascript text/css application/json text/plain;


        proxy_pass         http://127.0.0.1:7575;
        proxy_http_version 1.1;
        proxy_set_header   Upgrade $http_upgrade;
        proxy_set_header   Connection keep-alive;
        proxy_set_header   Host $host;
        proxy_cache_bypass $http_upgrade;
        proxy_set_header   X-Forwarded-For $proxy_add_x_forwarded_for;
        proxy_set_header   X-Forwarded-Proto $scheme;
        proxy_connect_timeout       3600;
        proxy_send_timeout          3600;
        proxy_read_timeout          3600;
        send_timeout                3600;
        # Note: the client_max_body_size setting controls the maximum upload size for attachments in AyaNova
        # it is a good security precaution to set this value only as high as absolutely needed by your staff for
        # file attachment uploads
        # AyaNova can handle up to 10GB maximum so the highest setting allowed here would be:
        # client_max_body_size 10GB;
        client_max_body_size 25M;
    }

    listen 443 ssl;
    ssl_certificate /etc/letsencrypt/live/ayanova.example.com/fullchain.pem; # managed by Certbot
    ssl_certificate_key /etc/letsencrypt/live/ayanova.example.com/privkey.pem; # managed by Certbot
    include /etc/letsencrypt/options-ssl-nginx.conf; # managed by Certbot
    ssl_dhparam /etc/letsencrypt/ssl-dhparams.pem; # managed by Certbot

}
Completely new NGINX service for AyaNova only
If this is a new install dedicated to AyaNova only and no existing NGINX services or websites will be impacted then replace the default NGINX configuration file as follows:
Switch to the NGINX configuration directory:
Make a backup copy of the existing default config file to your HOME directory just in case:
Open the existing default config file in an editor, replace it's contents entirely with the following configuration and save:
If using Nano text editor:
delete all text and replace it with this text:
server {
    listen        80;
    #server_name   ayanova.example.com;
    location / {
        add_header Strict-Transport-Security "max-age=31536000; includeSubDomains; preload" always;
        add_header X-XSS-Protection "1; mode=block" always;
        add_header X-Content-Type-Options "nosniff" always;
        add_header X-Frame-Options "SAMEORIGIN" always;
        add_header Referrer-Policy "strict-origin" always;
        gzip on;
        gzip_vary on;
        gzip_min_length 10240;
        gzip_proxied expired no-cache no-store private auth;
        gzip_http_version 1.1;
        gzip_types  application/javascript text/css application/json text/plain;

        proxy_pass         http://127.0.0.1:7575;
        proxy_http_version 1.1;
        proxy_set_header   Upgrade $http_upgrade;
        proxy_set_header   Connection keep-alive;
        proxy_set_header   Host $host;
        proxy_cache_bypass $http_upgrade;
        proxy_set_header   X-Forwarded-For $proxy_add_x_forwarded_for;
        proxy_set_header   X-Forwarded-Proto $scheme;
        proxy_connect_timeout       3600;
        proxy_send_timeout          3600;
        proxy_read_timeout          3600;
        send_timeout                3600;
        # Note: the client_max_body_size setting controls the maximum upload size for attachments in AyaNova
        # it is a good security precaution to set this value only as high as absolutely needed by your staff for
        # file attachment uploads
        # AyaNova can handle up to 10GB maximum so the highest setting allowed here would be:
        # client_max_body_size 10GB;
        client_max_body_size 25M;
    }
}
Note that the server name is intentionally commented out with a # symbol for now. In a later step you will uncomment it and replace the example domain with the one registered previously.
In a later step the Let's Encrypt Certbot will automatically update this file with the correct settings for ongoing use, this is only the initial configuration to allow Let's Encrypt access.
Confirm that NGINX sees the configuration as valid:
You should see a response similar to this:
nginx: the configuration file /etc/nginx/nginx.conf syntax is ok
nginx: configuration file /etc/nginx/nginx.conf test is successful
Restart NGINX so the new configuration takes effect:
B. Confirm DNS has propagated
Confirm that you can now navigate to AyaNova web app login page through un-encrypted HTTP via the domain name configured earlier. i.e. http://ayanova.yourdomain.com or http://yourdomain.com if not using a subdomain.
Once DNS has propagated and you see the AyaNova web app login page (or license agreement page) over unecrypted HTTP it's time for the next step.
NOTE: In some cases the browser may not allow you to open an unecrypted HTTP site and will keep attempting to open with HTTPS instead, if this is the case and you don't receive an error about the domain being unknown then it's probably safe to just skip to the next step.
If DNS has propogated but you see an NGINX error page instead, confirm that AyaNova server is up and running and re-check the NGINX configuration.
C. Add domain name to NGNIX config
Open the NGINX config file previously modified again in your editor, remove the # symbol that is commenting out the server_name line and replace the server name example.com with your domain and or subdomain names previously registered, save and exit.
D. SSL Certificate through Let's Encrypt
Install the Let's Encrypt Certbot application and it's NGINX handler at the server:
Request a certificate from Let's Encrypt for the domain or subdomains previously registered and set in the NGINX config file:
(Each separate server name and dns record can be appended to the command line with -d [YOUR_DOMAIN])
Accept the prompts choose the option to redirect to https. Certbot will re-write the default config file to properly include the https ports and SSL certificates.
If you get the following error you may have forgot to add the domain name to NGINX config:
Could not automatically find a matching server block for ayanova.example.com. Set the `server_name` directive to use the Nginx installer.
The NGINX default config file will now have new entries looking something like this:
server {
        server_name   ayanova.example.com;
    location / {
        add_header Strict-Transport-Security "max-age=31536000; includeSubDomains; preload" always;
        add_header X-XSS-Protection "1; mode=block" always;
        add_header X-Content-Type-Options "nosniff" always;
        add_header X-Frame-Options "SAMEORIGIN" always;
        add_header Referrer-Policy "strict-origin" always;
        gzip on;
        gzip_vary on;
        gzip_min_length 10240;
        gzip_proxied expired no-cache no-store private auth;
        gzip_http_version 1.1;
        gzip_types  application/javascript text/css application/json text/plain;

        proxy_pass         http://127.0.0.1:7575;
        proxy_http_version 1.1;
        proxy_set_header   Upgrade $http_upgrade;
        proxy_set_header   Connection keep-alive;
        proxy_set_header   Host $host;
        proxy_cache_bypass $http_upgrade;
        proxy_set_header   X-Forwarded-For $proxy_add_x_forwarded_for;
        proxy_set_header   X-Forwarded-Proto $scheme;
        proxy_connect_timeout       3600;
        proxy_send_timeout          3600;
        proxy_read_timeout          3600;
        send_timeout                3600;
        # Note: the client_max_body_size setting controls the maximum upload size for attachments in AyaNova
        # it is a good security precaution to set this value only as high as absolutely needed by your staff for
        # file attachment uploads
        # AyaNova can handle up to 10GB maximum so the highest setting allowed here would be:
        # client_max_body_size 10GB;
        client_max_body_size 25M;
    }

    listen 443 ssl; # managed by Certbot
    ssl_certificate /etc/letsencrypt/live/ayanova.example.com/fullchain.pem; # managed by Certbot
    ssl_certificate_key /etc/letsencrypt/live/ayanova.example.com/privkey.pem; # managed by Certbot
    include /etc/letsencrypt/options-ssl-nginx.conf; # managed by Certbot
    ssl_dhparam /etc/letsencrypt/ssl-dhparams.pem; # managed by Certbot

}
server {
    if ($host = ayanova.example.com) {
        return 301 https://$host$request_uri;
    } # managed by Certbot


    listen        80;

    server_name   ayanova.example.com;
    return 404; # managed by Certbot


}
Certbot will also install a systemd timer event which will auto-renew the SSL certificate if it is within 30 days of expiration. Certificates are valid for 90 days currently with Let's Ecrypt.
E. Confirm AyaNova can be accessed securely
Confirm that you can now navigate to AyaNova web app login page through encrypted HTTPS via the domain name configured earlier. i.e. https://ayanova.yourdomain.com or https://yourdomain.com if not using a subdomain.
You should now see the login (or license agreement) page through an encrypted SSL connection and AyaNova is ready for use.
Getting started and using AyaNova
The next step is to login, request or install a license and if are trying out AyaNova for the first time follow the evaluation trial guide.
To ensure AyaNova runs smoothly and data is safe and secure be sure to look over the Server operations configuration and maintenance guide.
For Business administration and setting things up from a business perspective, review the Getting started - Set up for production use step in our Getting started guided tour.
Report rendering first time delay
The very first time a report is rendered in AyaNova there will be a delay while the Chromium browser report rendering components are installed.