Work orders
The Work order form is used to schedule and record services provided to a Customer.
Guided tour: creating a work order
If you are just getting started with AyaNova, we have a Guided tour on how to create a work order.
Work order structure

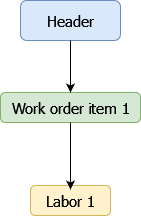
A work order in AyaNova is a tree-like structure with a Header section at the top and a collection of one or more work order items below the header.
Each work order item in turn can optionally contain any of 10 different types of service related "grand child" objects such as collections of zero or more Parts, zero or more Labor items etc.
The work order interface is designed so that different types of items can be added if required or left out if not used. For example, if you do not have Expenses or Travel to track they can be left out and will not appear anywhere on the work order.
A work order can be as simple:
or as complex as required:

Authorization Roles required
Many roles can select this object on other records where approriate. Editing or viewing this object in detail is only available to Users with the following roles:
Full access
- Accounting
- Business administration
- Service manager
- Service technician
Limited access roles
- Service technician - restricted
- Subcontractor
- Subcontractor - restricted
Read only access
- Business administration - restricted
- Service manager - restricted
- Sales
- Sales - restricted
A Work order also has some special restrictions:
Cost restrictions
Loan unit, Travel rate and Labor costs are only visible on the work order to Users with the following roles:
- Accounting
- Business administration
- Service manager
- Service manager restricted
Part costs are only visible on the work order to Users with the following roles:
- Accounting
- Business administration
- Inventory
- Inventory - restricted
Costs to restricted users are not only hidden in the work order user interface but are also sent as zeros in the data from the server when a restricted user fetches a work order object from the AyaNova server.
Cost restrictions also apply to reporting so a report with cost fields on it will show those values as zero if the current user is restricted from seeing costs.
There are several reporting flags available for adjusting the display of the report template to hide or show elements depending on the what the User is permitted to view.
Negative part quantity restrictions
No User is permitted to enter negative amounts in Work order item Part records except for Users with the Inventory role.
Only parts that were previously consumed on a work order but unusued and later returned should be entered here as negative quantities, in all other cases an inventory adjustment should be made to manually increase inventory.
Limited access role rights
Limited access roles have further special restrictions to limit what they can see and interact with to the minimum required to do their job:
- No access to the
Servicenavigation drawer items so they will only be able to see and open work orders from their personal schedule form - No access to any work order items where they are not one of the selected Scheduled users
- No or partial only access to specific areas of the work order form (in the table below)
Limited access roles are restricted in what they can see and do on the work order form:
✔️ can partially edit if they're selected on the record; not all fields visible
❌ no access / not visible
👓 Read only
| Feature | Service technician - restricted | Subcontractor | Subcontractor - restricted |
|---|---|---|---|
| Header | 👓 1 | 👓 2 | 👓 3 |
| Work order items | ✔️ | ✔️ | ✔️ |
| Units | 👓 | 👓 | ❌ |
| Scheduled users | 👓 4 | 👓 4 | 👓 4 |
| Tasks | ✔️ | ✔️ | ✔️ |
| Parts | 👓 | 👓 | ❌ |
| Labor | ✔️ | ✔️ | ✔️ |
| Travel | ✔️ | ✔️ | ✔️ |
| Expense | ✔️ | ❌ | ❌ |
| Loan units | 👓 | 👓 | ❌ |
| Outside service | ❌ | ❌ | ❌ |
- View entire header but only change Status
- View only the header Customer name, Address and Contact fields
- View only the header Customer name and Contact fields
- Convert to Labor menu item available
How to access Work orders
Work orders are accessed in the following ways:
- From the Personal schedule form when scheduled on a work order
- From the Service schedule form for any User scheduled on a work order
- From the
Servicenavigation drawerWork ordersitem to open the Work orders data table - From any data table column showing Work orders such as the Customers Last work order column
Work orders data table
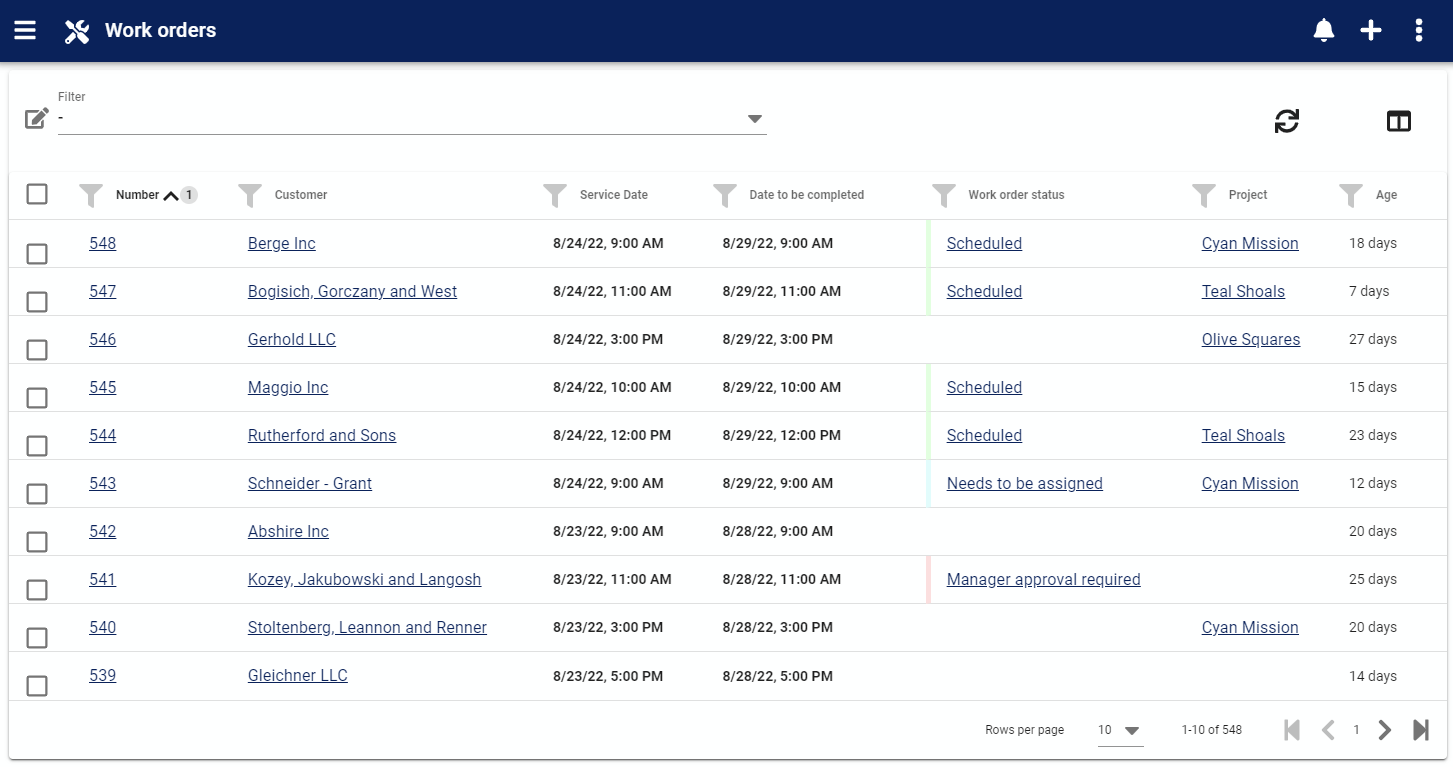
The Work orders data table lists all the Work orders entered in the system, provides the '+' link to create a new work order.
Table menu options
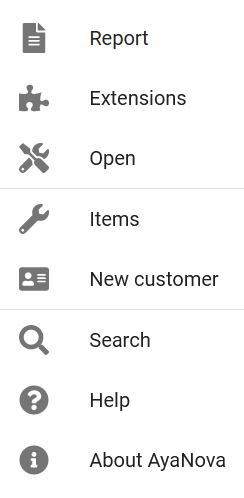
In addition to the common data table menu options, the Workorders table form also has these unique menu options:
Items
Click on this option to drill down into the individual Work order Items data table and also access the data table lists of all sub items such as Parts, Labor etc for each Work order Item.
New Customer menu option
Click on this option to create a new Customer record.
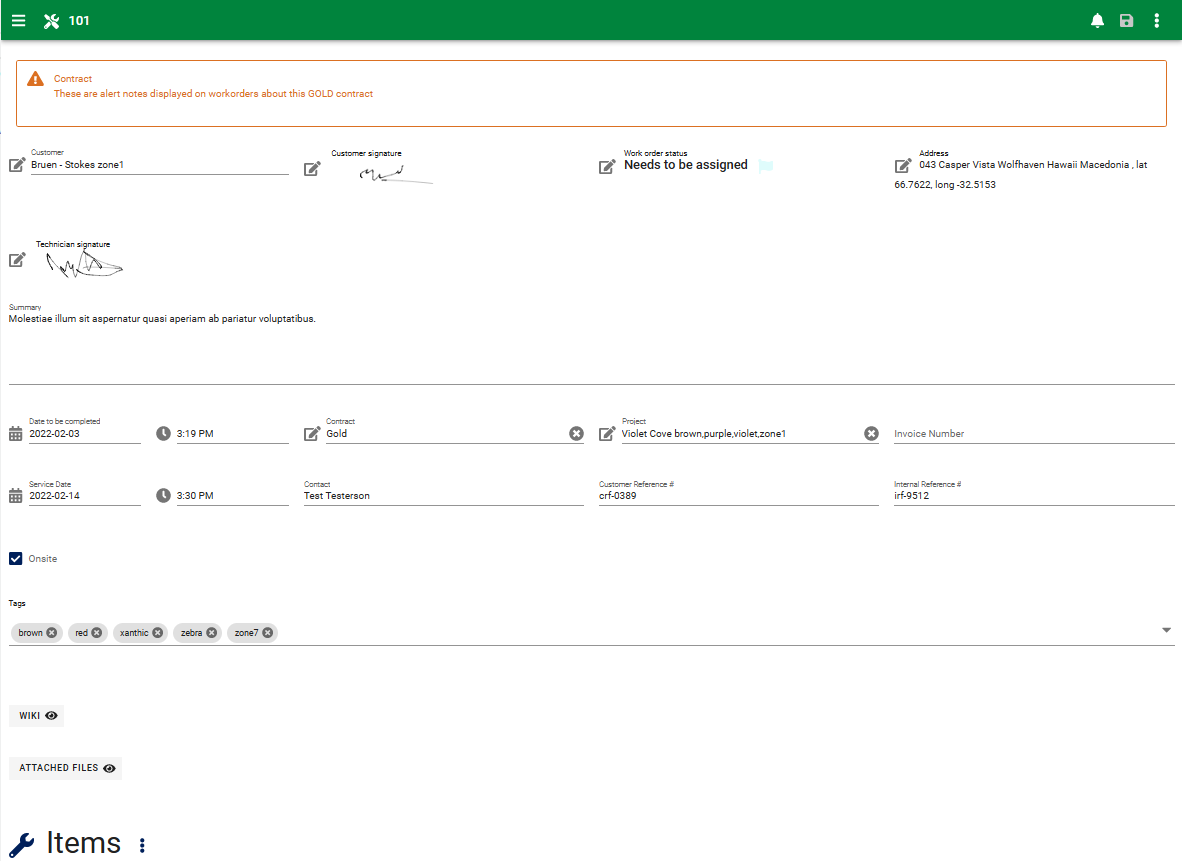
Work order edit form
Note - the image below is a work order with every optional section included, don't worry, most work orders aren't this complex and sections not used won't even display. You can also customize this form and remove any fields or entire sections you don't need.
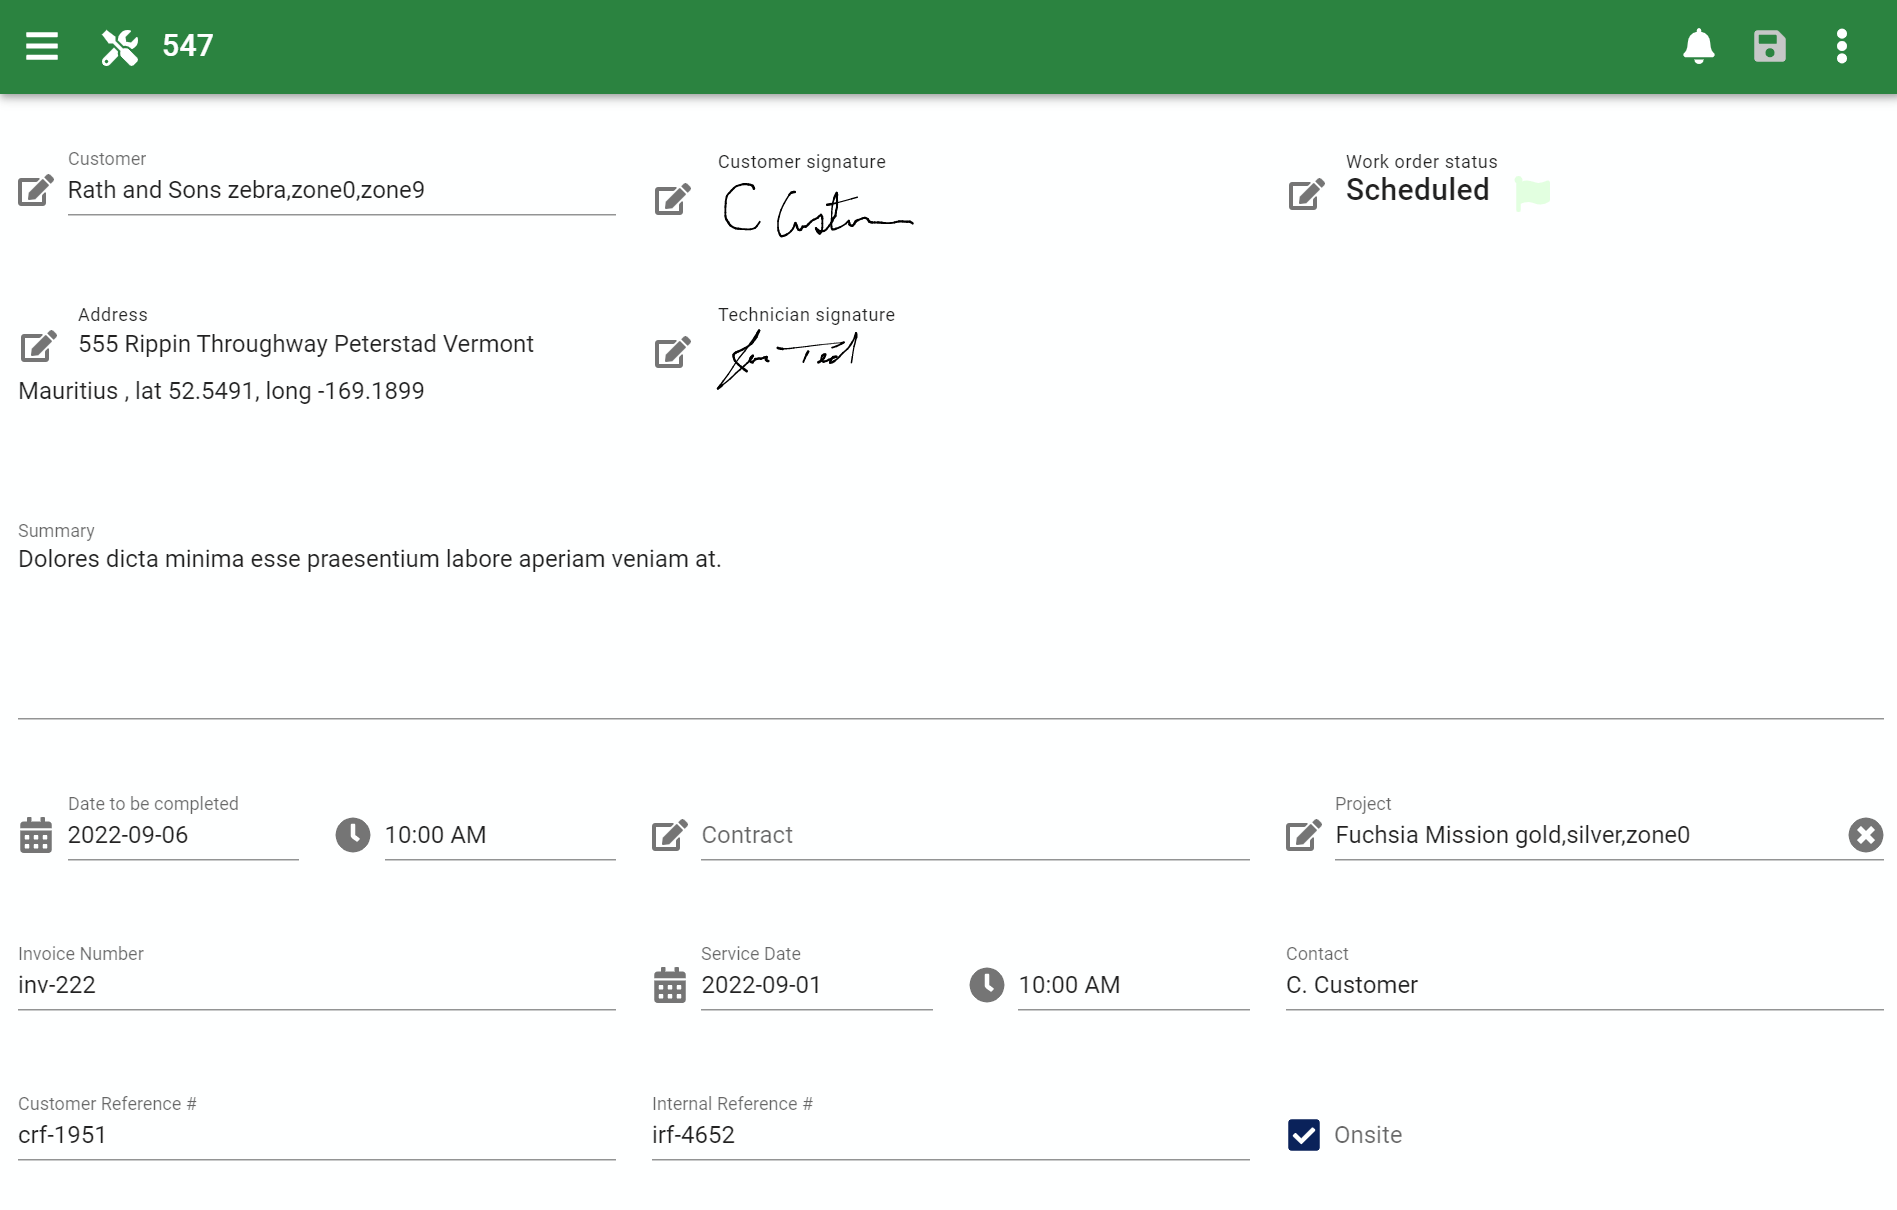
Note - the image above is a work order with every optional section included, don't worry, most work orders aren't this complex and sections not used won't even display. You can also customize this form and remove any fields or entire sections you don't need.
You can simplify this form
This form is designed by default to display as simply as possible and will not display a section unless it's been added to the work order.
For example if no Travel records are entered the Travel section is not displayed at all.
This means you can use any features you need and unused features will not take up space.
If you know you will never require a feature or some fields within a section you can remove them entirely from the Work order form using the form customization feature of AyaNova.
User interface work order structure
The user interface mirrors the logical structure of a work order with a single header section at the top, a collection of one or more work order items below the header and within each work order item, collections of optional service related objects such as Labor, Parts, Expenses etc.
Clicking on a row in a table on the work order form opens that record for editing below the table.
Tables on narrow screen devices
When AyaNova doesn't have enough width to display a full table it switches to a vertical display instead to avoid the need to scroll sideways. See the data table help page for more information. For the purposes of this help page we'll show full width tables but the functionality is the same.
How to use the work order item grand child collections
All items below the Work order Item level are collections that display as a single edit form when there is only one in the collection or as a table when there are multiple items in that collection.
For example, if there is a single Unit there is no need to take up space showing a table of one Unit so it displays as a single edit form area showing the fields of the work order item Unit record. However, if there are two or more Units then a table appears with rows representing each Work order Item Unit record in a row.
This pattern is used for all the collections below the header so that the simplest possible interface is shown at all times.
What if I don't need Loaners or Tasks or Expenses or ...?
The grand child sections of a work order are optional, designed to work around the User as needed but get out of the way if not needed, so they won't be displayed until one of that type of object is added from the Work order Items context menu.
There is generally no need to completely remove a section however you might not want it to even be offered as an option in the Work order item's Add context menu section to avoid any confusion or prevent Users from accidentally using that feature.
Unwanted sections can be completely removed as an option by customizing the work order form and un-checking the Visible checkbox for those grand child collections:
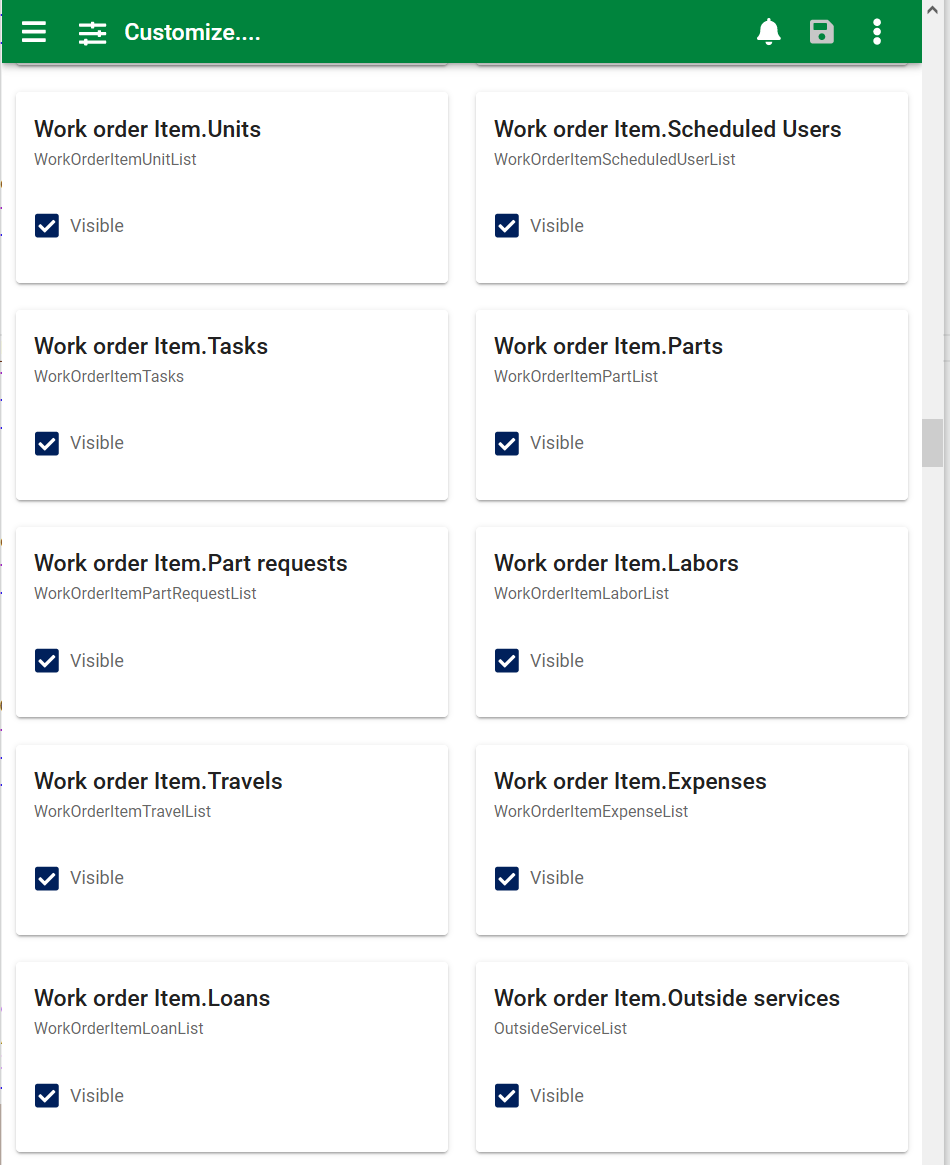
This will ensure they never show on the work order form and are not even offered as an Add item in the work order item context menu.
Selecting records for editing
When there are multiple grand child records such as work order item labor records, clicking on a row in the collections table will select that record and the edit form below the collections table will switch the record selected for editing.
The context menu for each collection will often have options that act on a selected record so you won't actually see the option in the menu until a record is selected. When there is only one record it is by default the selected record.
Adding and deleting collection items
Each collection has a context menu button to the right of it's title:

Clicking on this button will open the context menu with options for that particular type of item.
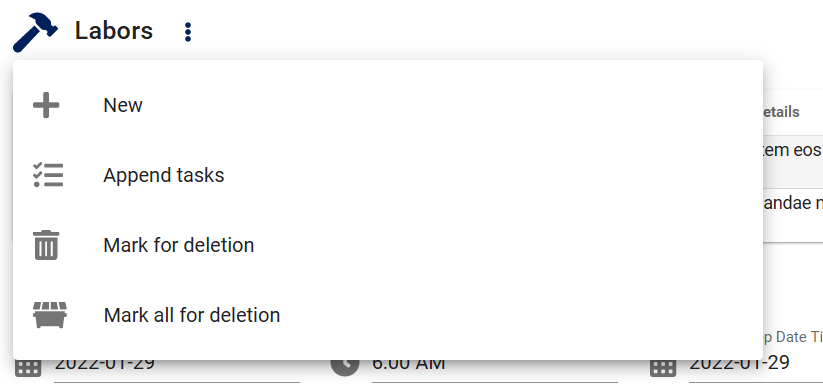
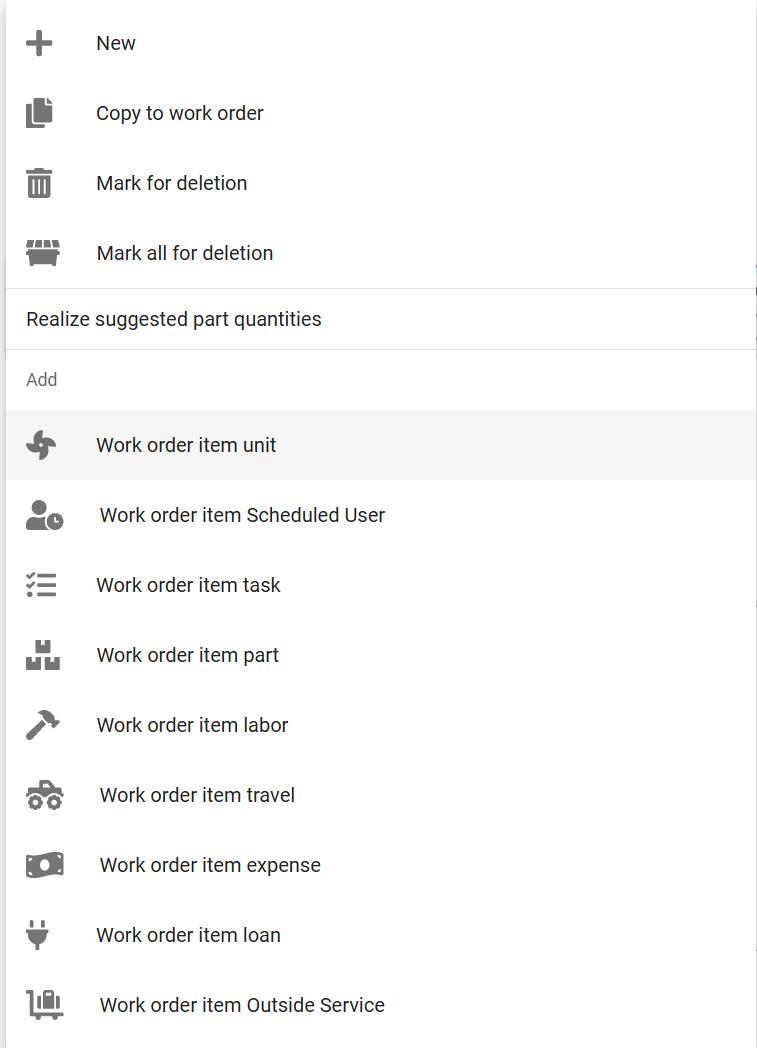
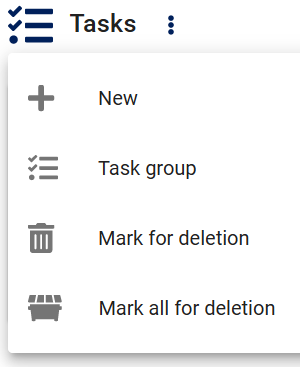
Here we see the Labor items context menu. There are three options common to all collections:
- New
+option is used to add a new record. The record is added here locally to be filled out in the form below the collection table and later saved to the server. - Mark for deletion is available because we have a record selected in the collection table by previously clicking on a row. The record will not be deleted until the entire work order is saved.
- Mark all for deletion is used to delete all records represented by their rows in the collection table. The records will not be deleted until the entire work order is saved.
Each type of collection has it's own particular set of context menu options documented in their sections below.
Header section
A work order has a single Header section which contains information and fields related to the entire work order.
Depending on the state of the work order, the specific role rights the current User has or any customization of the work order form itself, some fields may not be displayed or not available for editing.
All fields here are optional unless specifically stated otherwise.
Alert notes area
The top of the work order is where Alerts are displayed. An alert is a message that is displayed to the User to alert them to something important related to the other objects selected on the work order. Objects that can have alerts that will display here are:
- Customer Alert notes
- Customer Service tech notes
- Contract Alert notes
Customer
A required field, this autocomplete list is used to search for and select a Customer as well as providing a link to go directly to the Customer record. When you select a customer it's a good idea to save the work order to ensure defaults are set such as the Address and Contract if applicable and any alert notes are displayed.
Customer signature
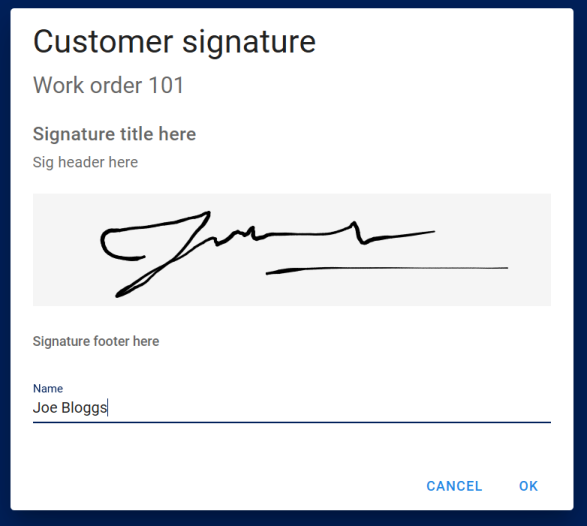
This control displays signatures and can be edited by clicking on it to open a signature "pad" that can record pointer or touch movement for customers to sign the work order. There is also a Name field provided to record the identity of the person who signs.
Signatures also can be displayed on reports such as the stock Customer work order report.
Work order status
A work order status is a collection that records all status changes and displays the current status.
Status is a powerful feature that ties into the AyaNova notification system to enable process control and many other features, see the Work order status documentation page for details.
Here in the work order you view the status history and change a status by clicking on the status control to fully open it:
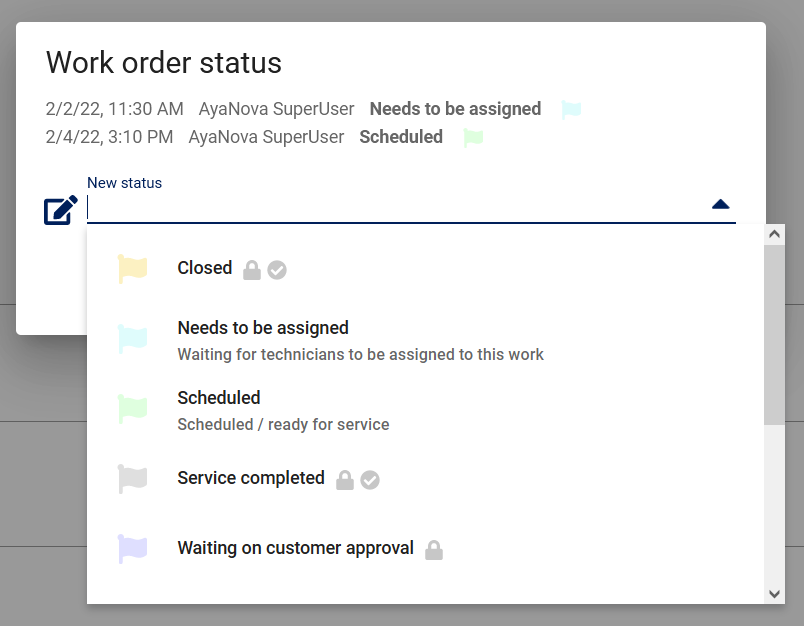
At the top of the opened status control is the history of previous status changes showing the date and time, User who made the change and the status selected. Below the status history is an selection list for choosing a new status if desired or you can close the control if you're just viewing the history of status changes.
Address
A work order has it's own address which is automatically set to the Customer's address when a new work order is saved with a Customer selected.
Once an address is set the server will not change it automatically.
In the case of a Customer with a Head office selected and the Bill head office control checkmarked, AyaNova will automatically set the mailing address to the Head office address.
The address is used for both billing purposes and physically locating the service location so there are both mailing and street addresses provided in the Address control for these purposes.
There are several time saving features built into the Address control which are documented in the Address control help page.
A work order records a moment in time when service was performed so to preserve the history, the Work order keeps it's own address separate from the Customer being serviced in case the Customer address changes over time.
Work orders also support setting the Address from other sources such as a selected unit if it has it's own address.
Sometimes you may need to provide service to a location that does not have an set address or a service call on mobile equipment in which case you can use the Address controls Latitude and Longitude fields to enter GPS co-ordinates manually or capture the current location on a mobile device that supports it.
Selecting an alternate address
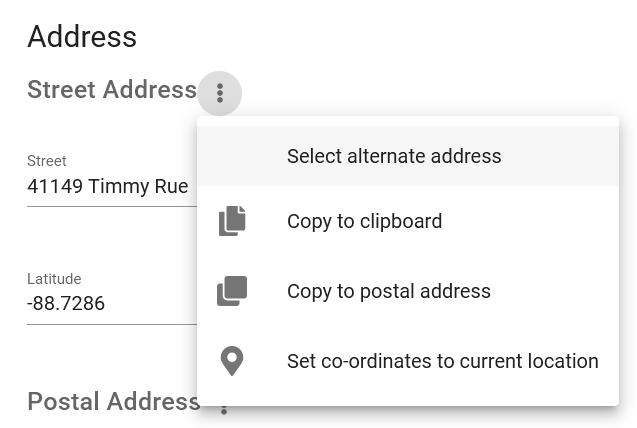
In the Work order the Address control contains an additional context menu option for the street and postal address "Select alternate address". Clicking on this option will open a pop up list of all addressible objects related to this work order if they are appropriate: Customer, Head Office and any Units selected on this work order that have their own Unit address.
If you click on a listed Address it will set the corresponding work order's street or postal address to the selected object's address (depending on which context menu you clicked "Select alternate address" from).
Technician signature
This signature control both displays signatures when not opened and can be edited by clicking on it to open a signature "pad" that can record pointer or touch movement for a service technician to sign the work order. There is also a Name field provided to record the identity of the person who signs.
Technician signatures also can be displayed on reports such as the stock Customer work order report.
Summary
This field is intended to be a summary of the work to be performed overall. This field is intended to be viewed by the service technician and is displayed in the schedule form and at the top of the stock "Service dispatch" report. Some shops work from the user interface directly on mobile devices, some print out dispatch reports to hand to technicians.
Date to be completed
Field to record a date and time by which the work should be completed. This field works with the AyaNova notification system for notifications related to work orders not being completed in a timely manner to help ensure nothing gets lost and response time commitments are honored.
This field is automatically set if empty when a new work order is first saved if there is a contract with a response time commitment in effect or if the Global setting Default work order completion age property is set.
Contract
This field is used to select a Contract which is used for providing special pricing and ensuring response time commitments. It will automatically be applied to a new work order when it is first saved if the Customer or Head office has a Contract selected.
You can change the Contract selected at any time or remove it completely. Contract changes will affect pricing, see the Contract help page for details.
Project
Flag a Project for this Work order.
Invoice number
A text field to record an Invoice number when billing the Customer for this work order. Accounting software integration tools may set this field automatically if used.
Use this field to both record the fact that the Work order has been invoiced and as a link to the Invoice that connects it to this work order.
Service date
Date / time field to identify a single date for the entire service workorder. Its intended use is to indicate the scheduled date for the service workorder as a whole.
By default, the date the workorder was created is pre-selected for you, but you can edit as needed and change this date.
The service date is used by the optional Customer notification "Service imminent" which will notify them when service is about to happen if you are allowing the use of the Customer access self-service features of AyaNova.
Contact
Enter or select a customer contact name here. Useful when filled in on intake of equipment for calling a Customer about the work required or finding the person you need when onsite.
You can enter any free form text in this box or use the button beside this field to select from any Contacts previously entered for the selected Customer.
Customer reference number
Some Customers may have their own reference number they would like recorded with the work order for their own reference purposes enter it here. This field will display on the stock Customer invoice and Customer Work order reports.
Internal reference number
Some shops may have a seperate reference number from the work order number itself that should be tracked with Work orders which can be entered here.
Onsite
Check this box if the work is to be done onsite. This is for reference, filtering and reporting purposes.
Custom fields
If the form has been customized and custom fields enabled for this object they will display here.
Tags
Optional tags control for categorizing, searching, selecting and notification filtering.
Wiki
Optional wiki control.
Attached files
Optional attachments control.
Age "virtual" field
The work order Age is displayed in the work order data table as an optional column and is calculated at the moment it's displayed based on the date and time the work order was first created. This field is not visible in the work order edit form and is not editable.
Work Order Items

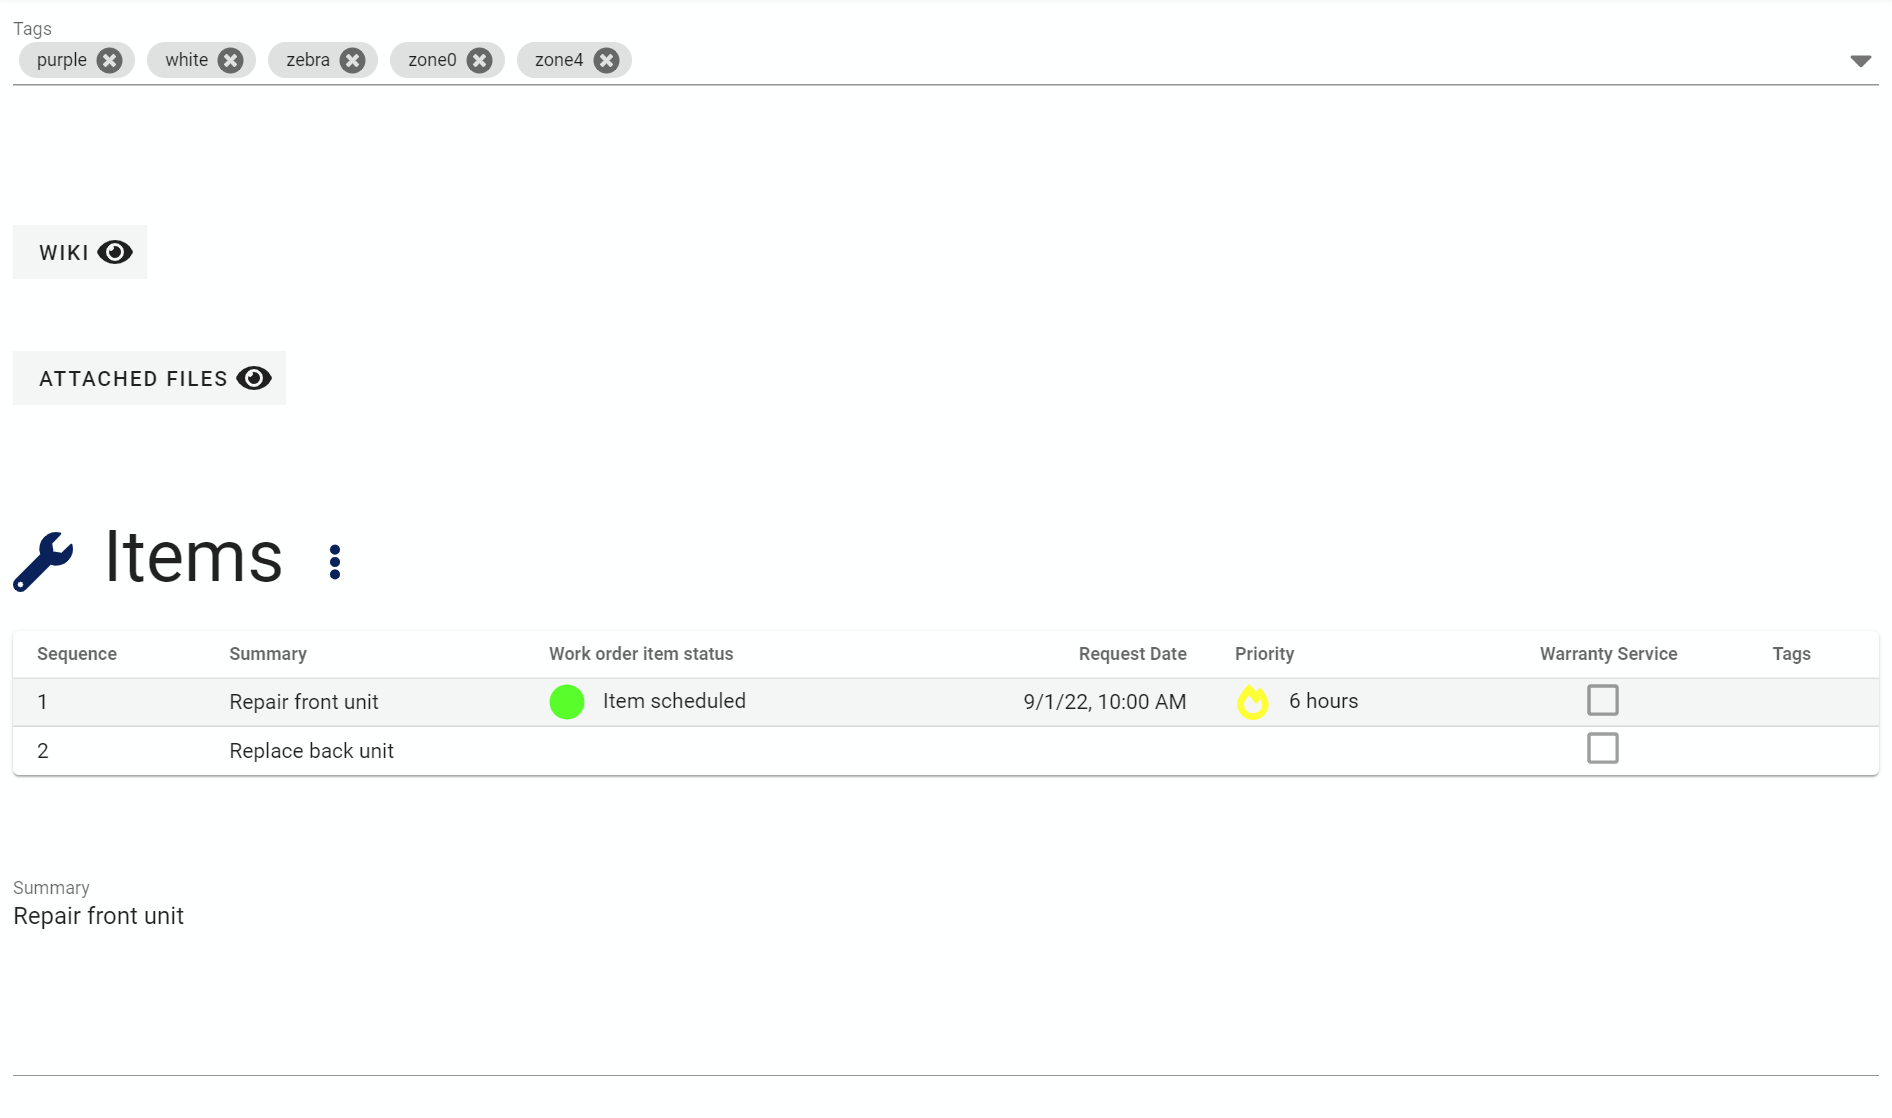
The items section of a work order is displayed as a table with an edit form below and can have one to many separate Work order Items.
Clicking on a row (or adding a new one) will cause the work order item edit form to display below the table for the particular work order item selected.
All Work order item edit form fields here are optional unless specifically stated otherwise.
Item Summary
This field is required and is used to describe an brief summary of the work to be performed for this particular work order item. Unlike the header summary field this one applies to this work order item only and it does display on stock reports intended for Customers such as the Customer Invoice and Customer Work order reports.
Sequence
This field is required but is set automatically and can be manually changed.
The Sequence controls the order in which work order items are displayed in the form and on reports. Any number can be entered here and AyaNova will sort the work order items collection by the sequence number from smallest at the top to the largest sequence number at the bottom. As with most fields in AyaNova you can also customize the work order form to hide this entirely if you don't need to adjust the order of work order items. It will automatically be set even if it's not set to display.
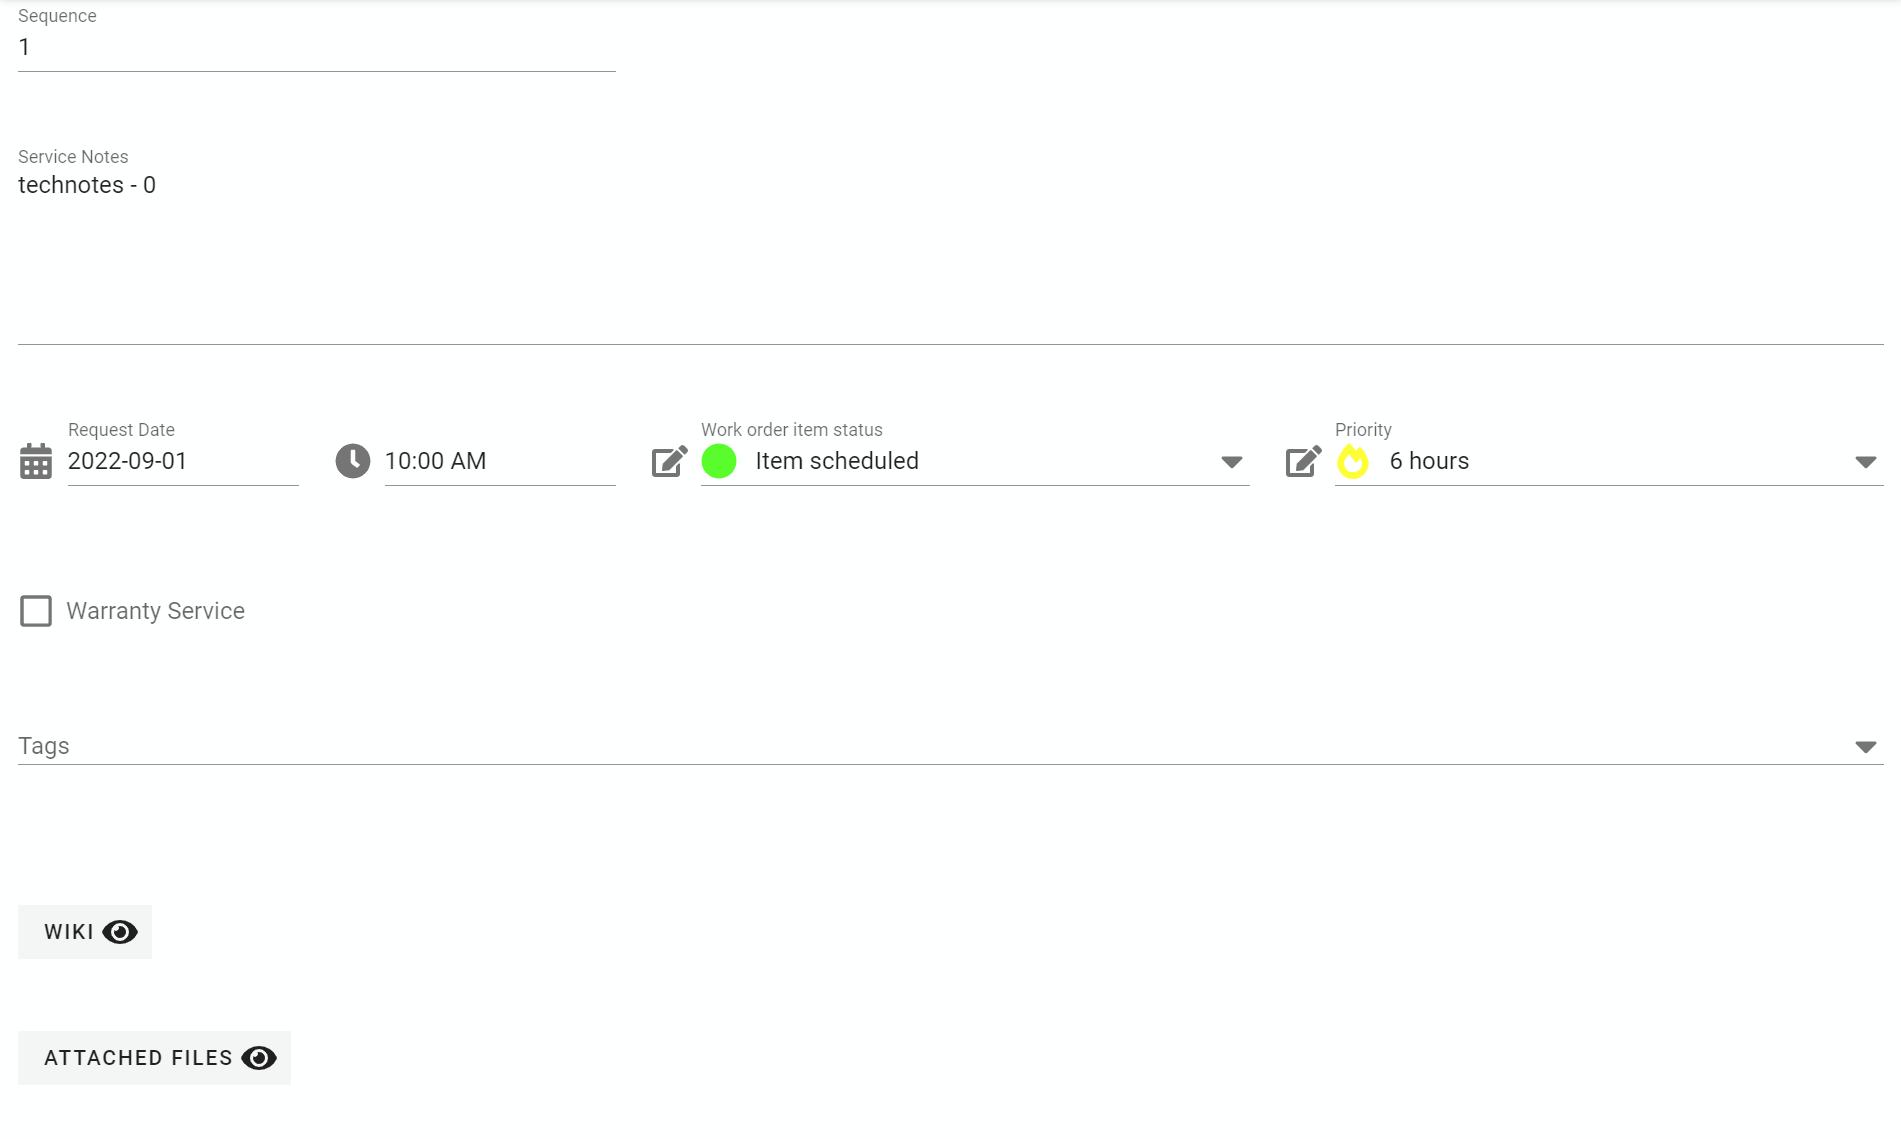
Service notes
This field is intended to provide lengthy instructions to the service technician about this work order item being serviced. These notes will display in the stock Service Dispatch work order report.
Request date
This field is provided for recording a specific date service was requested by the customer. A workorder may not be created till the following day, but you may want to track when a customer requested service against when you were able to schedule a user to perform it, or against when service was actually performed to determine if you need to hire additional staff to meet your customer's needs.
This field will display in the stock Service Dispatch work order report.
Work order item status
Used to indicate the particular status of this work order item. This is different from the work order status and has it's own Work order item status help page. This field will display on the stock Service Dispatch report and can be optionally selected as the source of the color displayed in schedules for work orders.
Work order item priority
Used to indicate the priority of this work order item. Priority has it's own Work order item priority help page. This field will display on the stock Service Dispatch report and can be optionally selected as the source of the color displayed in schedules for work orders.
Warranty service
Check this box if the work is covered under warranty. This is for reference, filtering and reporting purposes.
Work order item Custom fields
If the form has been customized and custom fields enabled for the work order item they will display here.
Work order item Tags
Optional tags control for categorizing and notification filtering work order items independantly from the work order overall.
Work order item Wiki
Optional wiki control specifically for this work order item.
Work order item Attached files
Optional attachments control to attach files to this work order item.
Work order item context menu
The work order item context menu is used to add or remove work order items and add grand-child objects:
New
Add a new work order item to the collection and open it's record in the edit form.
Copy to work order
When a work order item is selected, this menu option is offered to copy this single work order item and all it's grandchildren to another service work order.
This is used for many reasons including splitting apart a work order that's getting too large, needs to be billed when other work order items are completed but has outstanding work to be moved to a new workorder or to copy duplicate work to another work order to save typing by copying it to a new work order.
Note that this is a copy operation, not a move. To move, copy first, save and confirm then remove from this work order by deleting the work order item.
Mark for deletion
Flag this work order item and all it's grand child collection to be permanently deleted.
When clicked the work order item selected will display in the table with a line through it indicating it will deleted on the next save of the work order and an Undelete button for reversing the delete flag will appear at the top of this work order items edit form.
You can also refresh the page to abandon this and any other changes made locally to the work order that have not yet been saved at the server.
Until the work order is saved it's not actually deleted.
Mark ALL for deletion
Flag all work order items on this work order and all their grand children to be permanently deleted when the work order is saved.
When clicked all the work order items on this work order will display in the table with a lines through them indicating they will be deleted on the next save of the work order and an Undelete button for reversing the delete flag will appear at the top of each work order item's edit forms.
You can also refresh the page to abandon this and any other changes made locally to the work order that have not yet been saved at the server.
Until the work order is saved the items are not actually deleted.
Realize suggested part quantities
This menu option will appear if this work order item has an amount entered in the Suggested Quantity field for any part record.
If the Quantity field is zero, clicking on "Realize suggested part quantities" will update the Quantity field with the same number set in the Suggested Quantity field, as well as consuming that quantity of that part from inventory.
If the Quantity field presently already has any positive number, then clicking on "Realize suggested part quantities" will not result in any changes being applied.
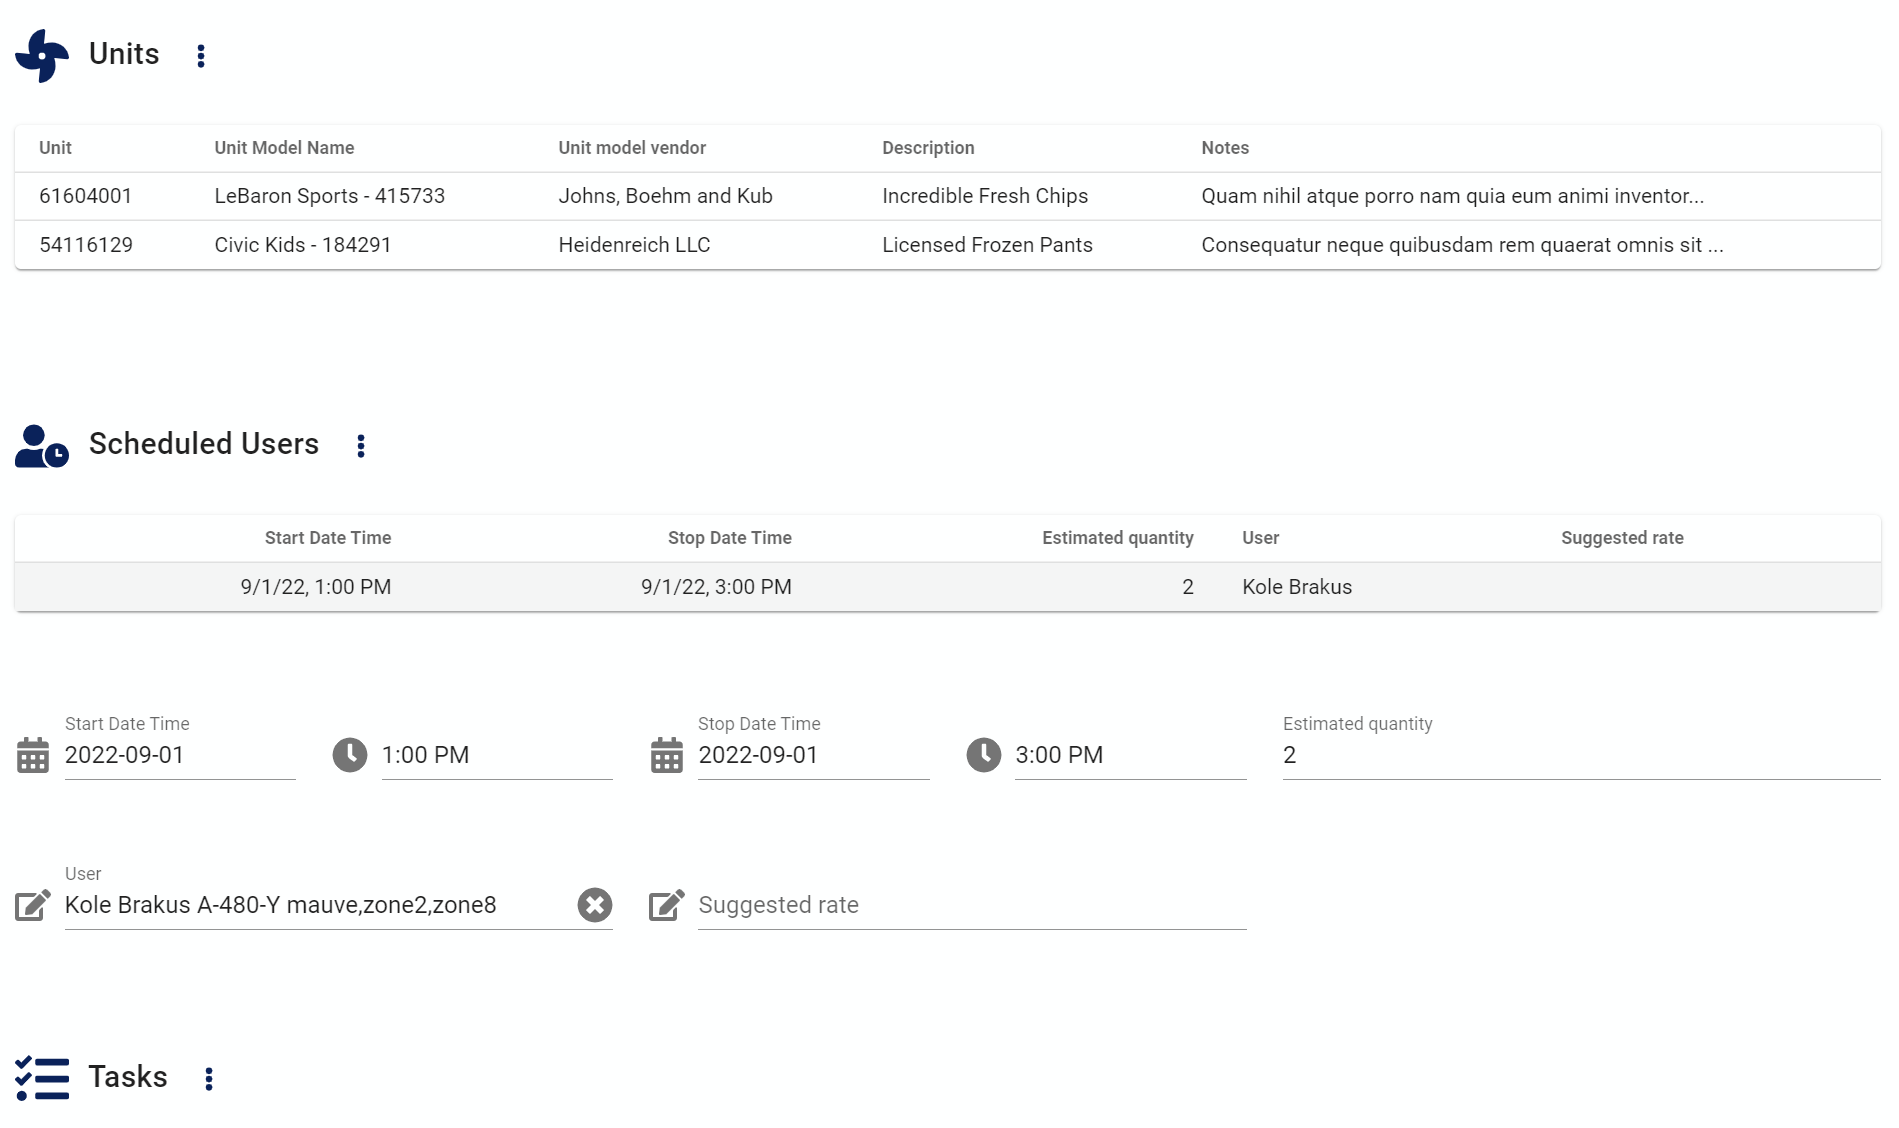
Units
The Work order item Unit is where you select a Customer owned Unit to be serviced. It's not necessary to choose a Unit here but it's a good idea if there is equipment being serviced because it will then be tracked in AyaNova and enable many additional features.
The Units section of a work order is optional and won't be displayed until a Unit is added from the Work order Items context menu.
It can also be completely removed as an option if it won't be required by customizing the work order form and un-checking the Visible checkbox in the Work order Item.Units customization box.
If more than one Unit is added to the work order item they will be displayed in a table with an edit form below. Selecting a row in the table will switch the edit form below to the row selected.
A work order item can have zero to many separate Work order item Unit records as required.
All Work order item Unit edit form fields here are optional unless specifically stated otherwise.
Unit
Selection of the Customer Unit of equipment being serviced. This field is required.
Meter reading button
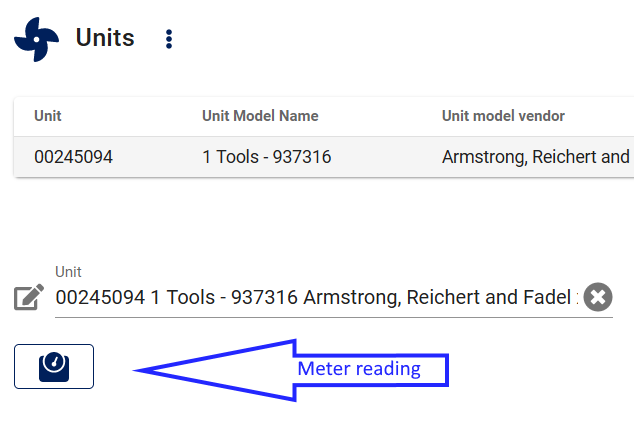
If the selected Unit is set to track Meter readings, the Unit meter reading button will appear below the Unit selected.
Clicking on this button will open the Meter readings form where you can view past meter readings or make a new one.
When a meter reading is added from a work order, the meter reading record is automatically set with a link back to the work order where the Unit meter reading was entered and this work order link displays in the Meter readings data table.
Units with Contracts
When you select a Unit and it has it's own Contract, AyaNova will ask the user if they want to select that Contract for the work order by setting the work order header Contract field to the Unit's Contract.
Contracts always apply to the entire work order so if a Unit has a Contract it is best to dedicate a single work order to it if there are other service tasks to be performed that are not related to the Unit and shouldn't have that Unit's contract be applied.
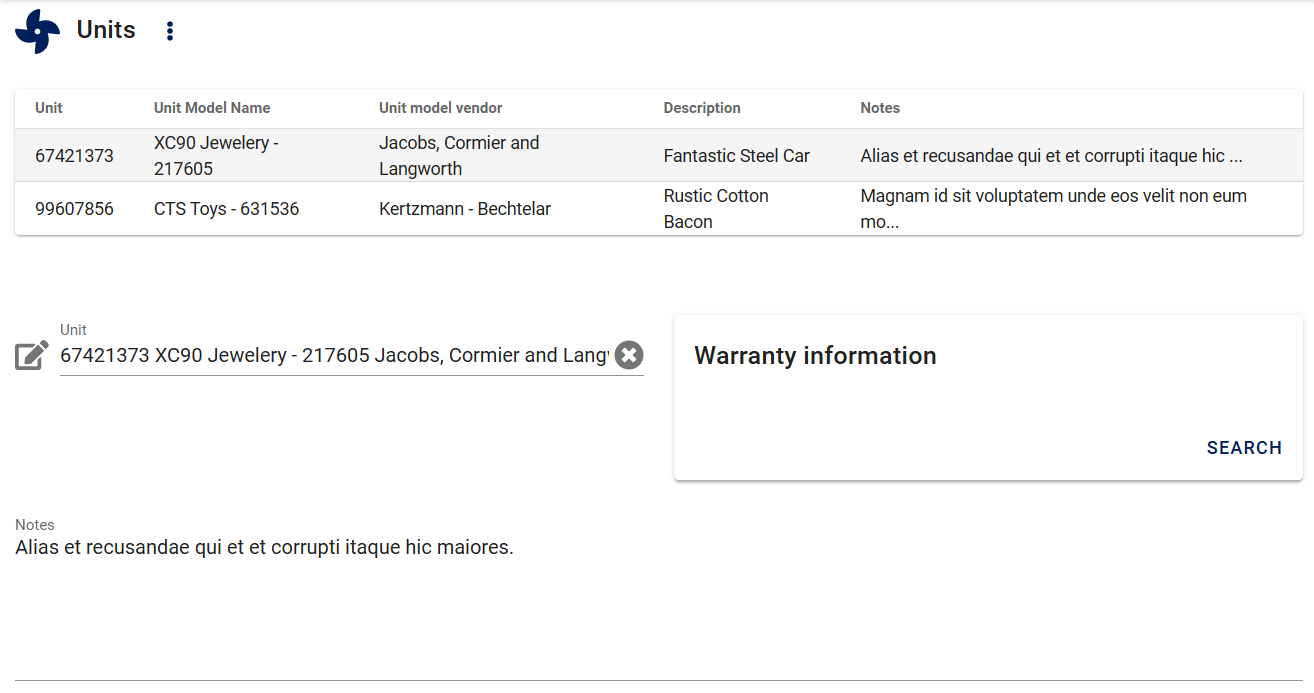
Warranty information
Warranty information is provided for both warranty and reference purposes.
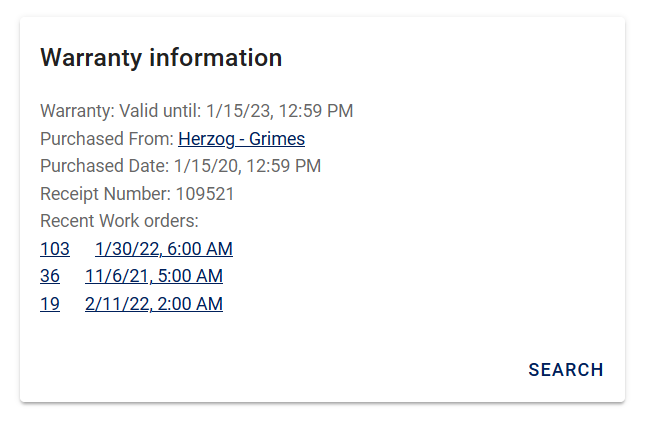
Clicking on the Search button in the warranty information box will trigger a call to the server to return the current warranty status of the Unit selected based on data entered in the unit's edit form and the Unit model edit form depending upon which entity is the source of the warranty information (Unit warranty information overrides Unit model warranty information if entered).
Also the 3 most recent service work orders this Unit was selected on are listed as links to open them for reference purposes which can be useful if a service technician wants to quickly see the most recent previous work. It's also possible to view all service work orders for this Unit clicking on the Work orders menu item in the Unit edit form.
Notes
This is a place to enter any internal notes about this work order item unit record. This field does not display on any of the stock work order or invoice reports and as with most fields on forms in AyaNova it can be removed if not used.
Work order item Unit Custom fields
If the form has been customized and custom fields enabled for the work order item Unit they will display here.
Work order item Unit Tags
Optional tags control for categorizing and notification filtering work order item Units independantly from the work order overall.
Work order item Unit Wiki
Optional wiki control specifically for this work order item Unit.
Work order item Unit Attached files
Optional attachments control to attach files to this work order item Unit.
Unit context menu
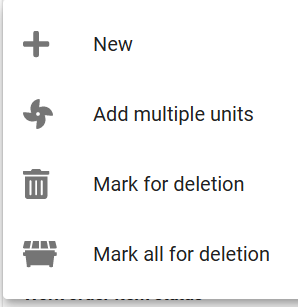
New
Add a new work order item Unit record to the collection and open it's record in the edit form.
Add multiple Units
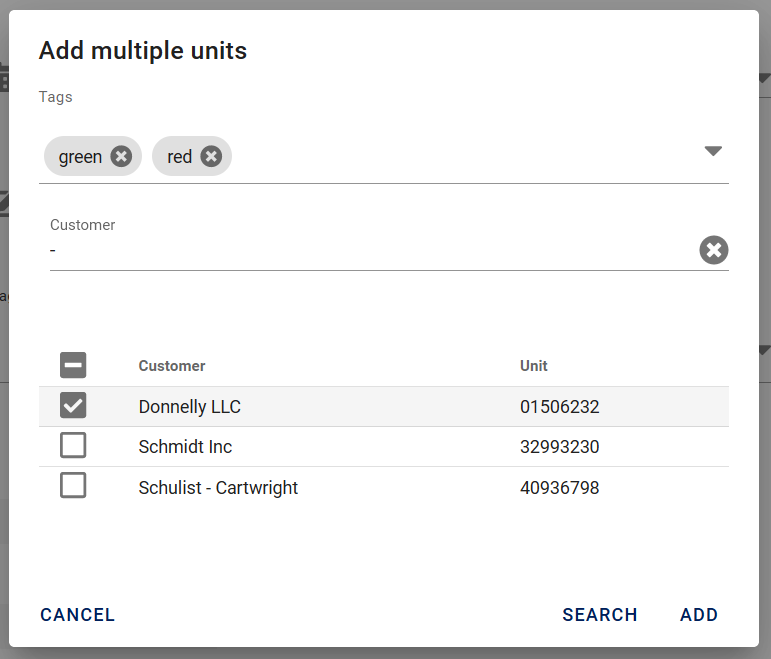
The Add multiple Units menu option opens a dialog box where you can search for Units by Tag, by Customer owner or both. Results will display in a list below with checkboxes to select to add to the work order.
Select Units by checkmarking them and click on Add to add all those Units into separate work order item Unit records at once. You can select by range by clicking into the first checkbox then press shift key and click on the last checkbox in the range to be selected.
Typically this feature is used to save time by quickly selecting a bunch of Units to be serviced at once for a single Customer saving time having to manually select them one by one.
This dialog also allows for selecting Units from any customer:
Add multiple units is not restricted to the current work order Customer: unlike the normal single Unit selection feature which is restricted to the currently selected Customer's own Units only, the add multiple Units feature intentionally allows a User to select Units that do not belong to the currently selected Customer on the work order.
This is to support some requirements for certain companies who bulk service Units that are moved around between Customers regularly but are not treated as loaner or rental Units. For most companies leaving the Customer selection in the Add Multiple selection box which is automatically set to the current work order Customer is appropriate to ensure only Units owned by that Customer are presented for selection.
Contract implications of multiple units
Contracts are not automatically offered for selection when bulk adding multiple Units unlike a single Unit selection using the Unit pick list. If a Contract is desired when adding multiple Units it can be manually selected from the Contract pick list in the Work order header section.
Reporting and tracking implications of multiple Units
If multiple units are added to a single work order item record then reporting on or tracking other related records in that work order item such as parts used or total labor done will be "connected" to those multiple units, not to an individual unit.
If you wish to ensure that labor and other items are tracked to an exact individual Unit when it's serviced, then it's important to stick with one Unit per work order item so that all the work for that work order item is connected to that single Unit.
If this is not a concern or you do specifically want the total parts and labor for all Units as a group then adding the multiple Units to the same work order item makes the most sense.
Mark for deletion
Flag the selected row work order item Unit to be permanently deleted.
When clicked the work order item Unit selected will display in the table with a line through it indicating it will deleted on the next save of the work order and an Undelete button for reversing the delete flag will appear at the top of this work order item Unit's edit form.
You can also refresh the page to abandon this and any other changes made locally to the work order that have not yet been saved at the server.
Until the work order is saved it's not actually deleted.
Mark ALL for deletion
Flag all work order item Units in this work order item only to be permanently deleted when the work order is saved.
When clicked all the work order item Units on this work order item will display in the table with lines through them indicating they will be deleted on the next save of the work order and an Undelete button for reversing the delete flag will appear at the top of each work order item Unit's edit forms.
You can also refresh the page to abandon this and any other changes made locally to the work order that have not yet been saved at the server.
Until the work order is saved the items are not actually deleted.
Scheduled Users
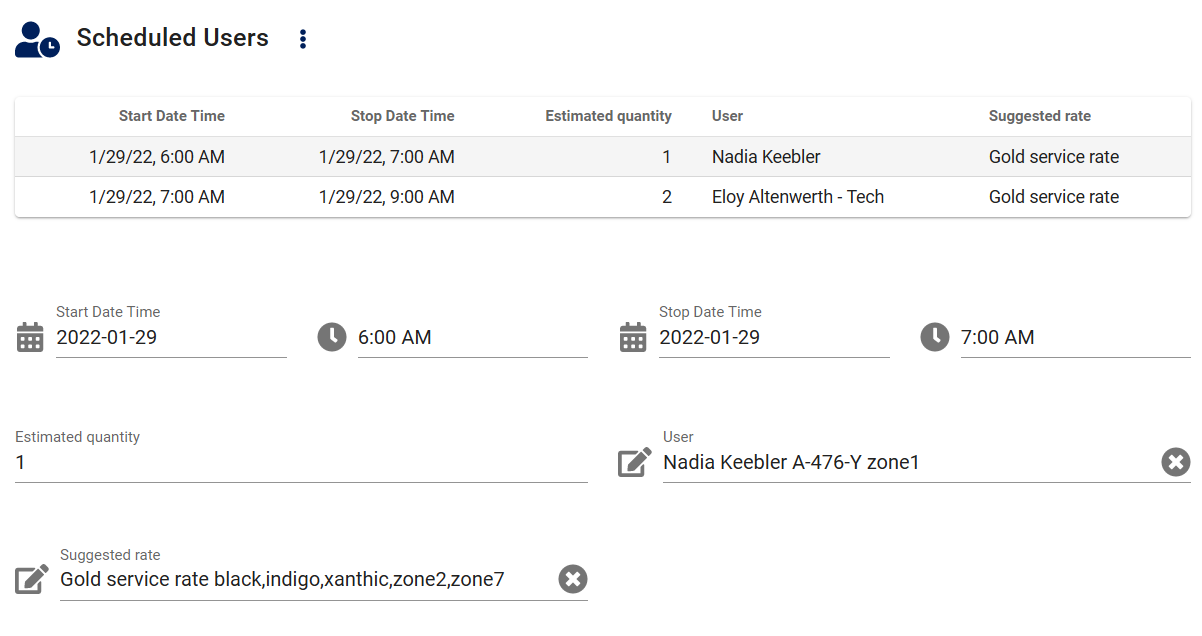
The Work order item Scheduled User record is where you schedule a service technician for future service. Users scheduled here will have an item appear on their personal schedule form and on the service manager's multiple technician service schedule form.
In addition notifications may be triggered for Users that are subscribed to them so they are aware that they have been scheduled for service.
The Scheduled Users section of a work order is optional and won't be displayed until a Schedule User record is added from the Work order Items context menu.
It can also be completely removed as an option if it won't be required by customizing the work order form and un-checking the Visible checkbox in the Work order Item.Scheduled Users customization box.
If more than one Scheduled User record is added to the work order item they will be displayed in a table with an edit form below. Selecting a row in the table will switch the edit form below to the row selected.
A work order item can have zero to many separate Work order item scheduled user records as required.
All Work order item Scheduled User edit form fields here are optional but it's a good idea to fill them in as much as possible as the technician can convert this scheduled user record to a billable work order item labor record with a click saving them time and possible errors.
Start date time
This field is a date time field control and is used to enter the scheduled point in time when service should begin.
If the Global settings Scheduled / labor default minutes value is set, AyaNova will automatically set the Stop date time and Estimated quantity on new records.
If a stop time is already set, adjusting the start time will cause AyaNova to calculate the Estimated Quantity field automatically.
Schedule conflicts / double booking
AyaNova has a feature to prevent scheduling a technician more than once within the same time period. The Global setting Allow schedule conflicts feature can be used to display a warning when attempting to save a scheduled user record that would conflict with an existing scheduled time period. By default this setting is set to allow conflicts.
Stop date time
This field is a date time field control and is used to enter the scheduled point in time when service should stop.
If the Global settings Scheduled / labor default minutes value is set, and the Start date time field is empty, AyaNova will automatically set the Start date time and Estimated quantity on new records.
If a start time is already set, adjusting the stop time will cause AyaNova to calculate the Estimated Quantity field automatically.
Estimated quantity
This is hours of service expected to be required. It doesn't have to match the selected time period between the start and stop fields but it's a good idea to do so to avoid confusion.
User (scheduled)
Here you select the scheduled User that will be providing service. When you select the User and enter start and stop times this User will see the item on their schedule form and optionally be notified that they are scheduled for service.
Suggested rate
This is the service rate that is suggested for this item of service.
Scheduled User context menu
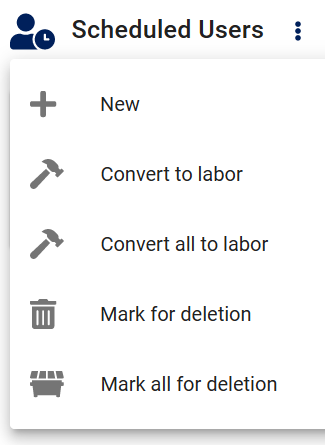
New
Add a new work order item Scheduled User record to the collection and open it's record in the edit form.
Convert to labor
This option appears in the menu when a row is selected in the Scheduled Users table. Clicking on it creates a new work order item Labor record with all the data from the scheduled User record copied to the appropriate fields.
This feature can save the service technician time and prevent errors as it allows a person scheduling service in advance such as the service manager to properly fill out all fields and leave the service tech only needing to click on this option to record their labor (they can still adjust as required in the labor record if something changes).
Convert all to labor
This option doesn't require any scheduled user record rows to be selected as it will convert all scheduled user rows to labor records exactly as is done with the single selected scheduled user row convert to labor menu option.
Mark for deletion
Flag the selected row work order item scheduled user record to be permanently deleted.
When clicked the work order item scheduled user record selected will display in the table with a line through it indicating it will deleted on the next save of the work order and an Undelete button for reversing the delete flag will appear at the top of this work order item scheduled user's edit form.
You can also refresh the page to abandon this and any other changes made locally to the work order that have not yet been saved at the server.
Until the work order is saved it's not actually deleted.
Mark ALL for deletion
Flag all work order item scheduled users in this work order item only to be permanently deleted when the work order is saved.
When clicked all the work order item scheduled users on this work order item will display in the table with lines through them indicating they will be deleted on the next save of the work order and an Undelete button for reversing the delete flag will appear at the top of each work order item scheduled user's edit forms.
You can also refresh the page to abandon this and any other changes made locally to the work order that have not yet been saved at the server.
Until the work order is saved the items are not actually deleted.
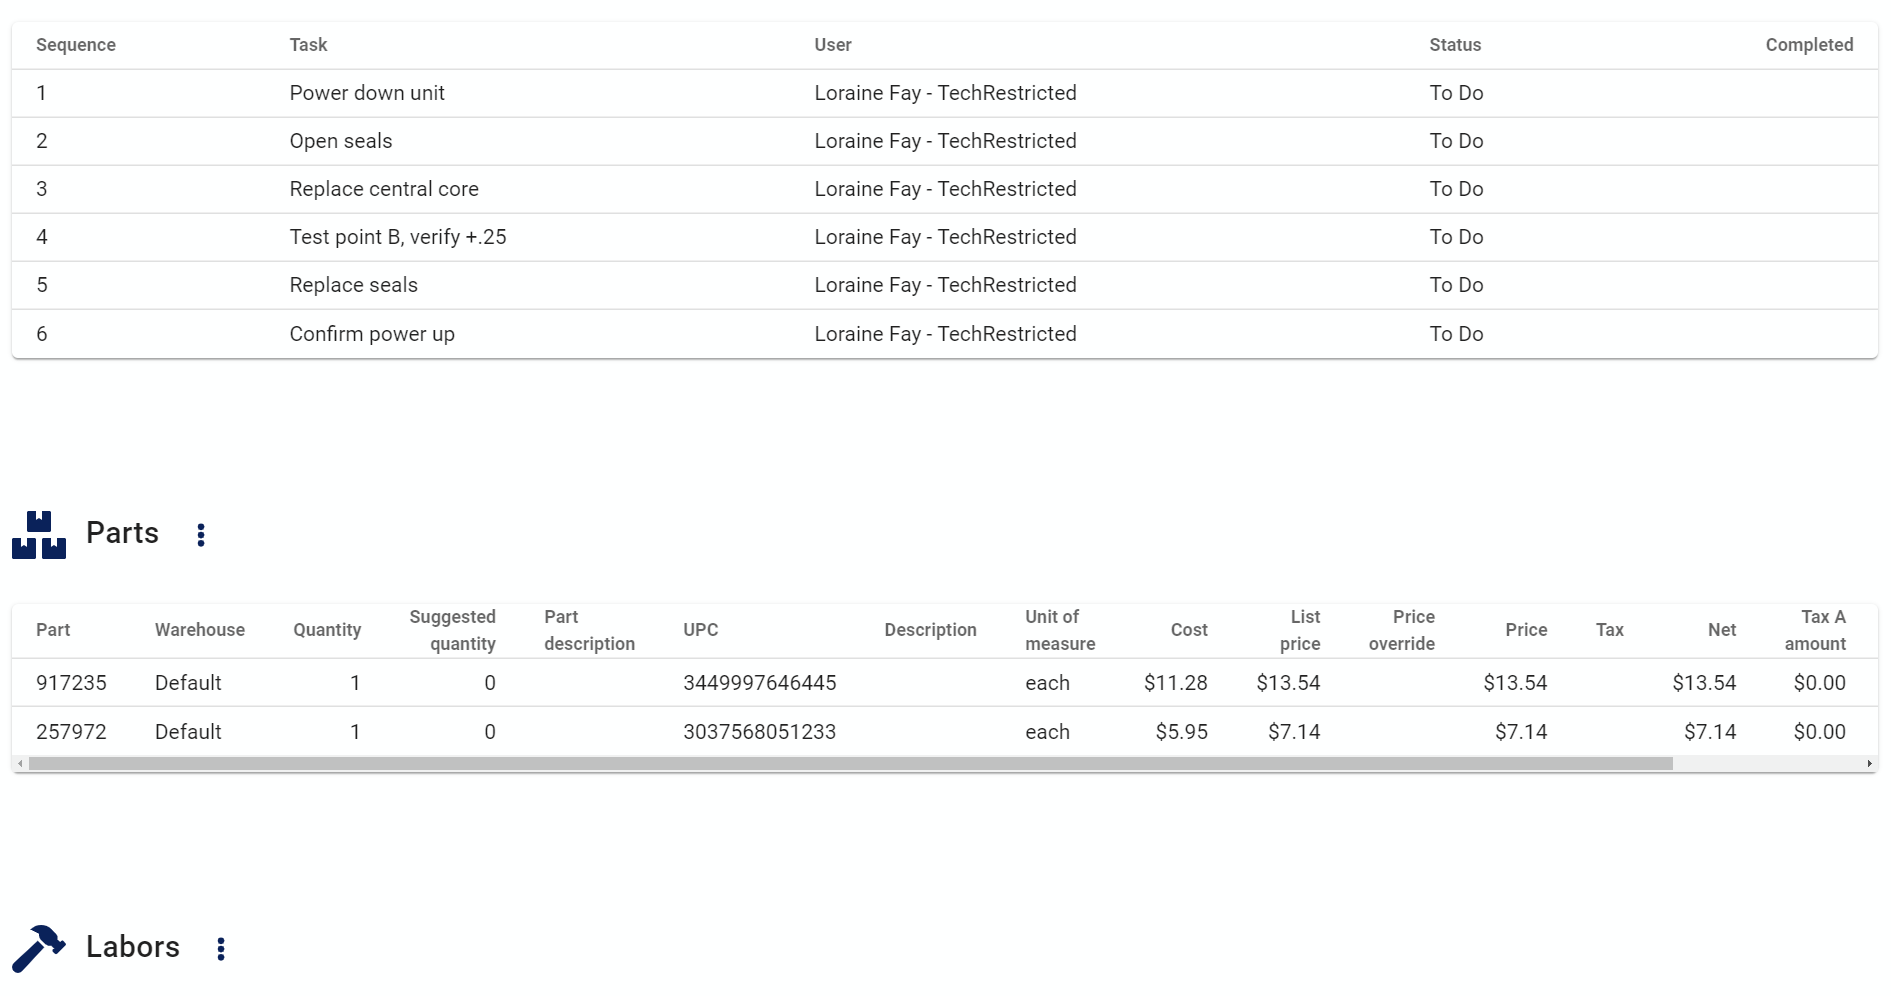
Tasks
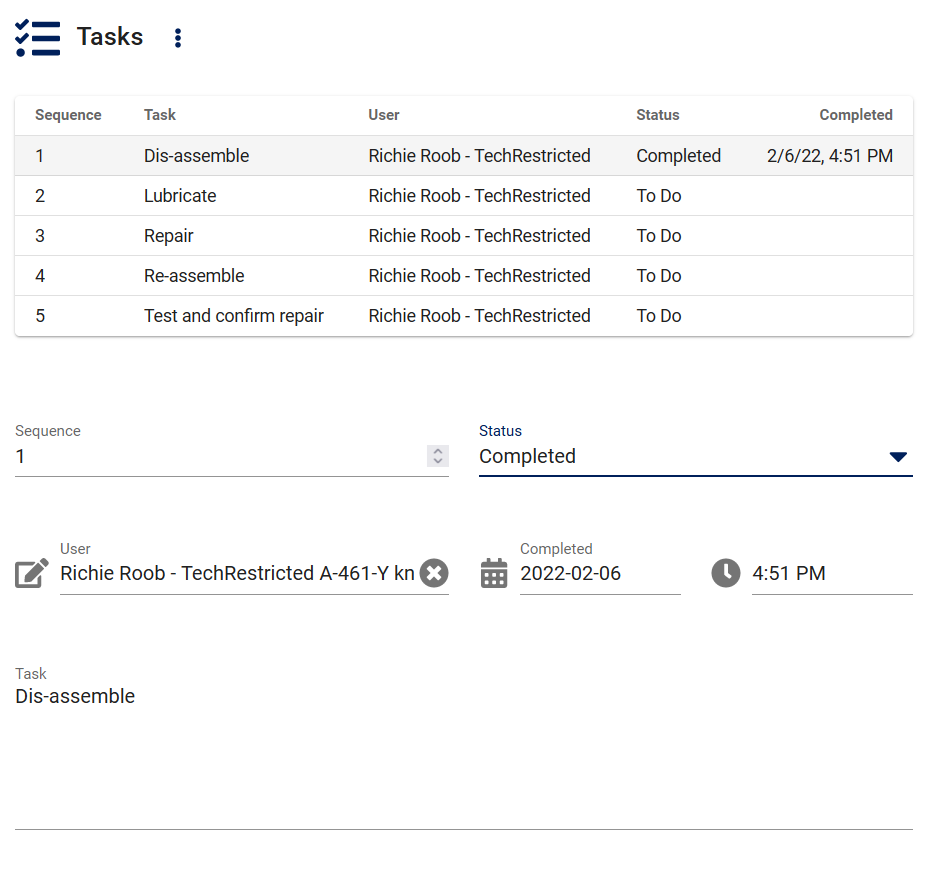
The Work order item Tasks feature is used to provide a check list of tasks to be performed and is useful for providing standardized service that ensures technician's follow each step. Tasks can be created uniquely per work order or selected from a pre-made list of tasks entered previously in a Task Group.
The Tasks section of a work order is optional and won't be displayed until a Task record is added from the Work order Items context menu.
It can also be completely removed as an option if it won't be required by customizing the work order form and un-checking the Visible checkbox in the Work order Item.Tasks customization box.
If more than one Task record is added to the work order item they will be displayed in a table with an edit form below. Selecting a row in the table will switch the edit form below to the row selected.
A work order item can have zero to many separate Work order item task records as required.
All Work order item Task edit form fields here are optional unless stated as required.
Restricted users and tasks
Restricted Users are only permitted to make edits to Tasks that for which they are the selected User. Tasks for other Users can not be changed by a restricted User.
This means the restricted User must be pre-selected as the Task "User" by the person creating the work order item tasks or the restricted user will not be able to complete the Tasks.
Sequence
This field is required but is set automatically and can be manually changed.
The Sequence controls the order in which tasks are displayed in the form and on reports. Any number can be entered here and AyaNova will sort the tasks collection by the sequence number from smallest at the top to the largest sequence number at the bottom.
Status
This field indicates the status of this particular Task item. Options are Completed , Failed , N/A (not applicable), To do (the default).
User (task)
The User who is assigned or has completed the Task.
Completed
The date and time the Task was completed.
Task
This is the required text that describes the Task to be performed.
Task context menu
New
Add a new work order item Task record to the collection and open it's record in the edit form.
Task group
The Task group option is used to append a pre-made list of tasks from a Task group. This is ideal for common lists of tasks that need to be done over and over again.
Clicking on this option will open a dialog box for selecting an existing Task group:
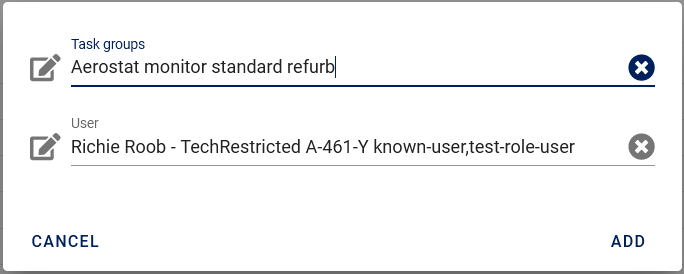
Select the desired task group and click Add to append them all to the current work order item task section.
You can also optionally select a User here so all tasks added are set to the selected User in advance.
This is important if assigning tasks to a restricted User as they will not be able to edit a task unless they are the selected User.
Mark for deletion
Flag the selected row work order item task record to be permanently deleted.
When clicked the work order item task record selected will display in the table with a line through it indicating it will deleted on the next save of the work order and an Undelete button for reversing the delete flag will appear at the top of this work order item task's edit form.
You can also refresh the page to abandon this and any other changes made locally to the work order that have not yet been saved at the server.
Until the work order is saved it's not actually deleted.
Mark ALL for deletion
Flag all work order item tasks, in this work order item only, to be permanently deleted when the work order is saved.
When clicked, all the work order item tasks on this work order item will display in the table with lines through them indicating they will be deleted on the next save of the work order and an Undelete button for reversing the delete flag will appear at the top of each work order item task's edit forms.
You can also refresh the page to abandon this and any other changes made locally to the work order that have not yet been saved at the server.
Until the work order is saved the items are not actually deleted.
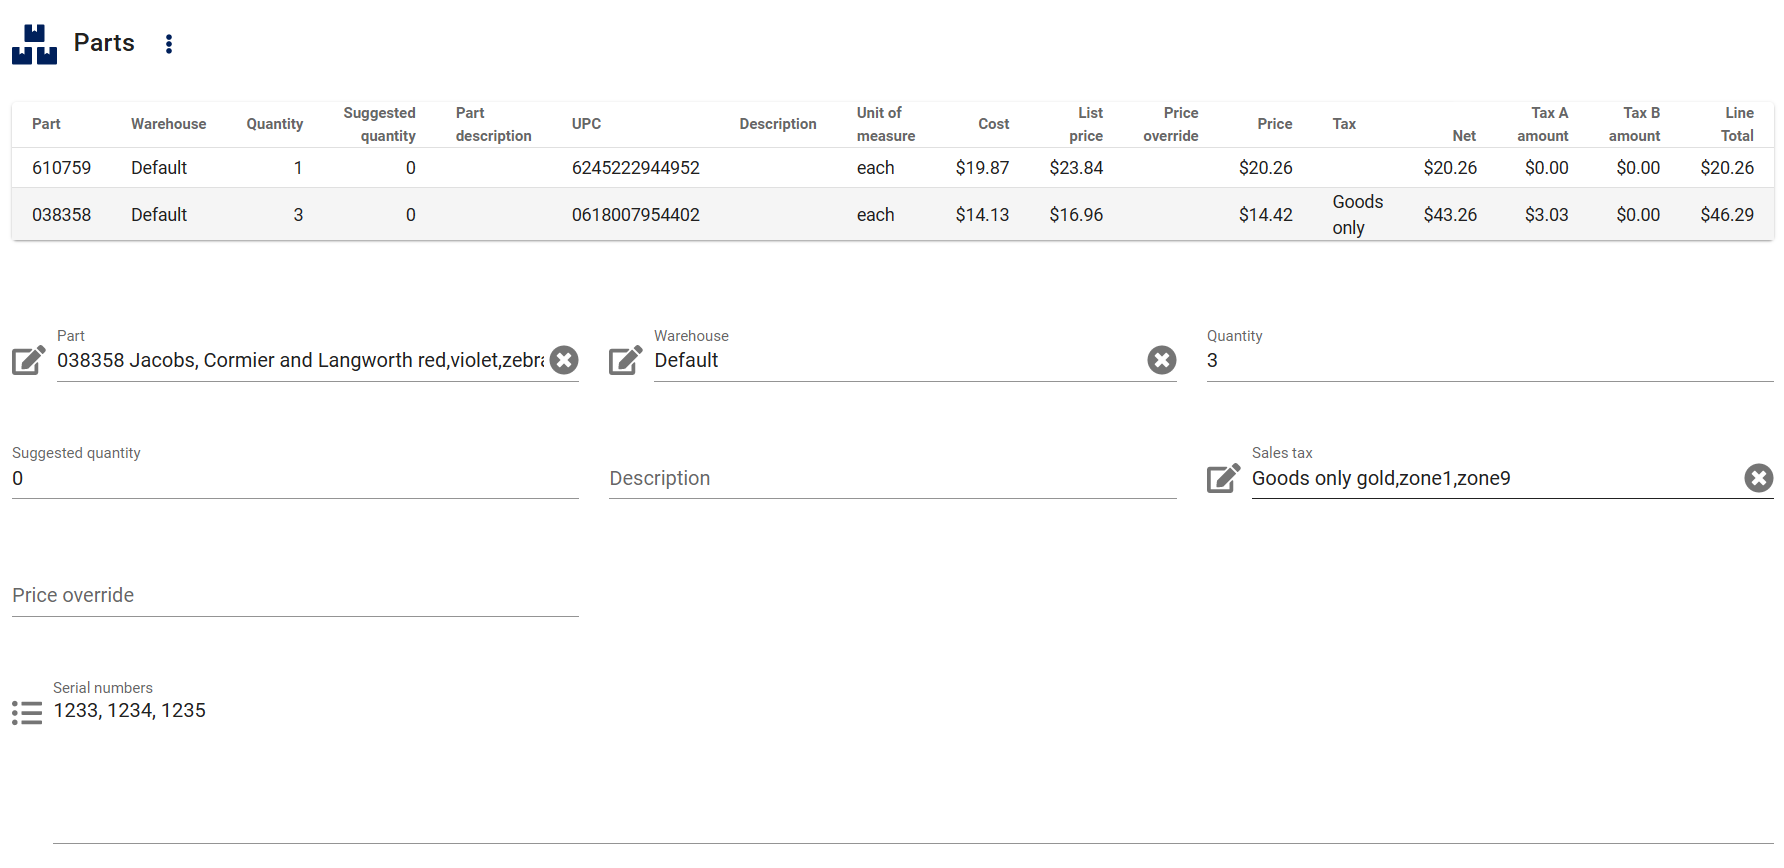
Parts
The Work order item Parts record is where you enter parts consumed during service. If inventory is turned on parts entered here will be removed from inventory the moment the work order is saved.
The Parts section of a work order is optional and won't be displayed until a work order item part record is added from the Work order Items context menu.
It can also be completely removed as an option if it won't be required by customizing the work order form and un-checking the Visible checkbox in the Work order Item.Parts customization box.
If more than one part record is added to the work order item they will be displayed in a table with an edit form below. Selecting a row in the table will switch the edit form below to the row selected.
A work order item can have zero to many separate Work order item part records as required.
All Work order item part edit form fields here are optional unless specified as required.
Unlike items like taxes and service / travel rates which cannot be changed once they have been used on a work order, Parts are an exception as the pricing is considered more volatile so part prices are "snapshotted" on being added to a work order and stored with the work order itself.
Part
This field is required to be selected. Here you select the Part that is consumed during service.
Warehouse
Select the warehouse the part comes from for inventory tracking.
Quantity
Enter the quantity used here. When the work order is saved the quantity will immediately be deducted from inventory. A zero quantity part will be considered a place-holder record and will neither affect inventory nor serial numbers until a quantity is entered and saved.
If this item is later deleted and the work order saved the inventory is immediately adjusted and the quantity entered here is put back into inventory.
Insufficient Quantity validation error
If you save this work order item part record and the AyaNova server sees there isn't enough inventory available it will return a validation error with a button to request more parts be ordered:
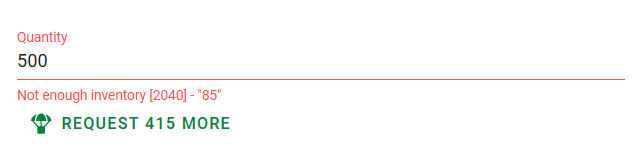
Here you can see that the user entered 500 as the Quantity however there were only 85 in stock at the moment the work order was saved. The green link prompts you to create a Work order item part request for 415 more of this part.
You have two choices here:
-
Request the part by clicking on the "Request 415 more" green link and save the work order to trigger a request for 415 more which will flow through to the inventory system where it appears when the purchase orders Part requests feature will populate it on to a purchase order. Additionally the request may trigger a notification to any subscribers to the Object created -> work order item part request event if they have subscribed to that event.
-
Change the Quantity to 85 or less and re-save the work order.
If you request the part, a work order item part request record will be created in the local work order and displayed in the work order item Part Requests section below the work order item Parts section:

Suggested quantity
This field is provided for entering quantities without affecting inventory for planning purposes. As with most AyaNova form fields it can be removed from the form if not required by form customization.
Description
Field for entering any additional information to be viewed here in the work order form, does not display on stock work order report templates.
Sales Tax Part
Tax to be charged for this Part.
Price override
Manually force the price to a certain value. This override supersedes any other source for the price including Contracts and / or the source object's price itself.
Contract adjusted pricing is not part of the Manual Price Override feature; only values entered by a user manually in this field will be present.
Serial numbers
This optional field is used to record the serial numbers of the parts used. Serial numbers should be entered separated by spaces or commas. The server will break them into individual serial numbers and automatically match and remove them from the available serial number collection for the part selected.
Spaces or commas are not supported inside a single serial number as they are considered the separator character between different serial numbers entered.
If this work order item part record is later deleted and the work order saved, OR the serial number collection changed and the work order saved, the server will automatically fix up the serial number collection for that part by re-adding back or adjusting as required.
Serial numbers entered here do not have to match the existing serial number collection, serial numbers are not controlled like inventory levels are.
Part table info fields
The part table contains some read-only fields that are calculated or brought in from other records for reference purposes. Some of these fields are only visible to higher rights users.
Part description
This is mirrored from the Part record Part description field and can be removed if not required through Customizing the work order form.
UPC
This is mirrored from the Part record UPC code field and can be removed if not required through Customizing the work order form.
Unit of measure
This is mirrored from the Part record Unit of measure field and can be removed if not required through Customizing the work order form.
Cost
This is mirrored from the Part record Cost field and can be removed if not required through Customizing the work order form.
List price
This is mirrored from the Part record Retail field and can be removed if not required through Customizing the work order form.
Price
This is the calculated effective price of this record. If Price override is set, that is the effective price no matter any other setting, otherwise it's the Parts List price as is, or adjusted if there is a Contract with a Part price adjustment in effect.
Net
This calculated value is the effective Price field multiplied by the Quantity field.
Tax A amount
Net multiplied by the selected Tax's A percentage.
Tax B amount
If the selected Tax does not have a Tax B set this field will be zero.
If the selected Tax has Tax on Tax checked then this value is (Net + Tax A amount) multiplied by Tax's B percentage.
If Tax on Tax is not set then this is Net multiplied by the selected Tax's B percentage.
Line total
Net + Tax A amount + Tax B amount.
Part context menu
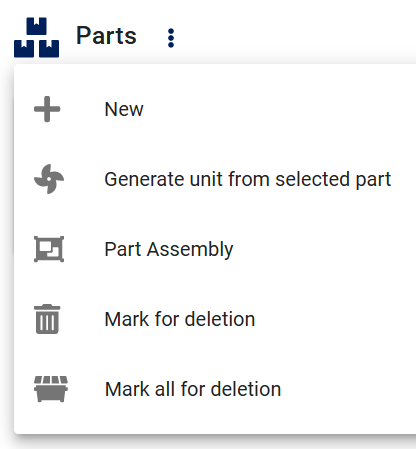
New
Add a new work order item Part record to the collection and open it's record in the edit form.
Generate Unit from selected part
It's often the case that service companies will supply Parts to a customer during service which in turn are large enough units of equipment that they may also need to be serviced or maintained themselves in future and tracked in AyaNova as a Customer unit which can be selected on work orders as the Unit under service.
This menu option is provided to easily create a new Customer unit in AyaNova based on the selected Part. Clicking on this option will open a Unit form for entry and autoamtically select the Customer and fill in some fields based on the part selected in the work order. Once this new Unit record is saved it's immediately available to be selected as a Unit for this Customer.
Part assembly
The Part assembly feature is used to append a pre-made list of parts from a Part assembly into this work order item. This is ideal for common lists of parts that are always used as a group together but need to be tracked individually.
Clicking on this option will open a dialog box for selecting an existing Part assembly:
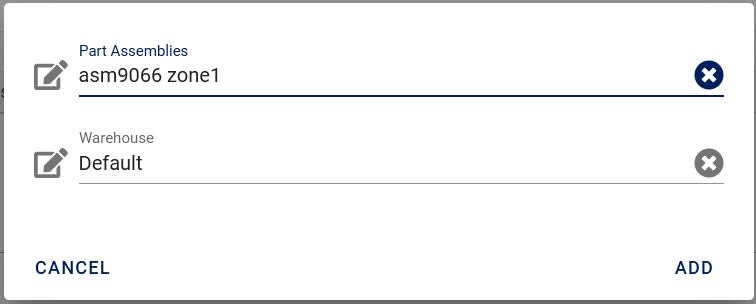
Select the desired part assembly and part warehouse and click Add to append them all to the current work order item part section.
Mark for deletion
Flag the selected row work order item part record to be permanently deleted.
When clicked the work order item part record selected will display in the table with a line through it indicating it will deleted on the next save of the work order and an Undelete button for reversing the delete flag will appear at the top of this work order item part's edit form.
You can also refresh the page to abandon this and any other changes made locally to the work order that have not yet been saved at the server.
Until the work order is saved it's not actually deleted.
Mark ALL for deletion
Flag all work order item parts, in this work order item only, to be permanently deleted when the work order is saved.
When clicked, all the work order item parts on this work order item will display in the table with lines through them indicating they will be deleted on the next save of the work order and an Undelete button for reversing the delete flag will appear at the top of each work order item part's edit forms.
You can also refresh the page to abandon this and any other changes made locally to the work order that have not yet been saved at the server.
Until the work order is saved the items are not actually deleted.
Part requests
The work order item Part Requests section is where any previously request parts are displayed.
This section is created automatically and is not editable by the User directly.
The user can delete rows in this section provided the part has not yet been ordered on a Purchase order.
There is no edit form for Part Requests, all their information displays in the Part requests table.
On order
Once a Part request has been added to a Purchase order it will display additional information in the table:

Here we can see there is a link to the Purchase order, the date it was ordered and the expected date it will be received based on fields entered in the Purchase order.
Received
When the part is received on the purchase order, it will display as received in the Part request table:

If the service tech had subscribed to the Requested part received notification they would also receive a notification the moment it was received.
Now the user can update the part record from 85 to 500 (or add a new line for the 415 additional) and complete the service.
Part request context menu

Mark for deletion
Flag the selected row work order item part request record to be permanently deleted.
When clicked the work order item part request record selected will display in the table with a line through it indicating it will deleted on the next save of the work order and an Undelete button for reversing the delete flag will appear below the table for this row when selected.
You can also refresh the page to abandon this and any other changes made locally to the work order that have not yet been saved at the server.
Until the work order is saved it's not actually deleted.
Mark ALL for deletion
Flag all work order item part requests, in this work order item only, to be permanently deleted when the work order is saved.
When clicked, all the work order item part requests on this work order item will display in the table with lines through them indicating they will be deleted on the next save of the work order and an Undelete button for reversing the delete flag will appear below the table for each row when selected.
You can also refresh the page to abandon this and any other changes made locally to the work order that have not yet been saved at the server.
Until the work order is saved the items are not actually deleted.
Labors
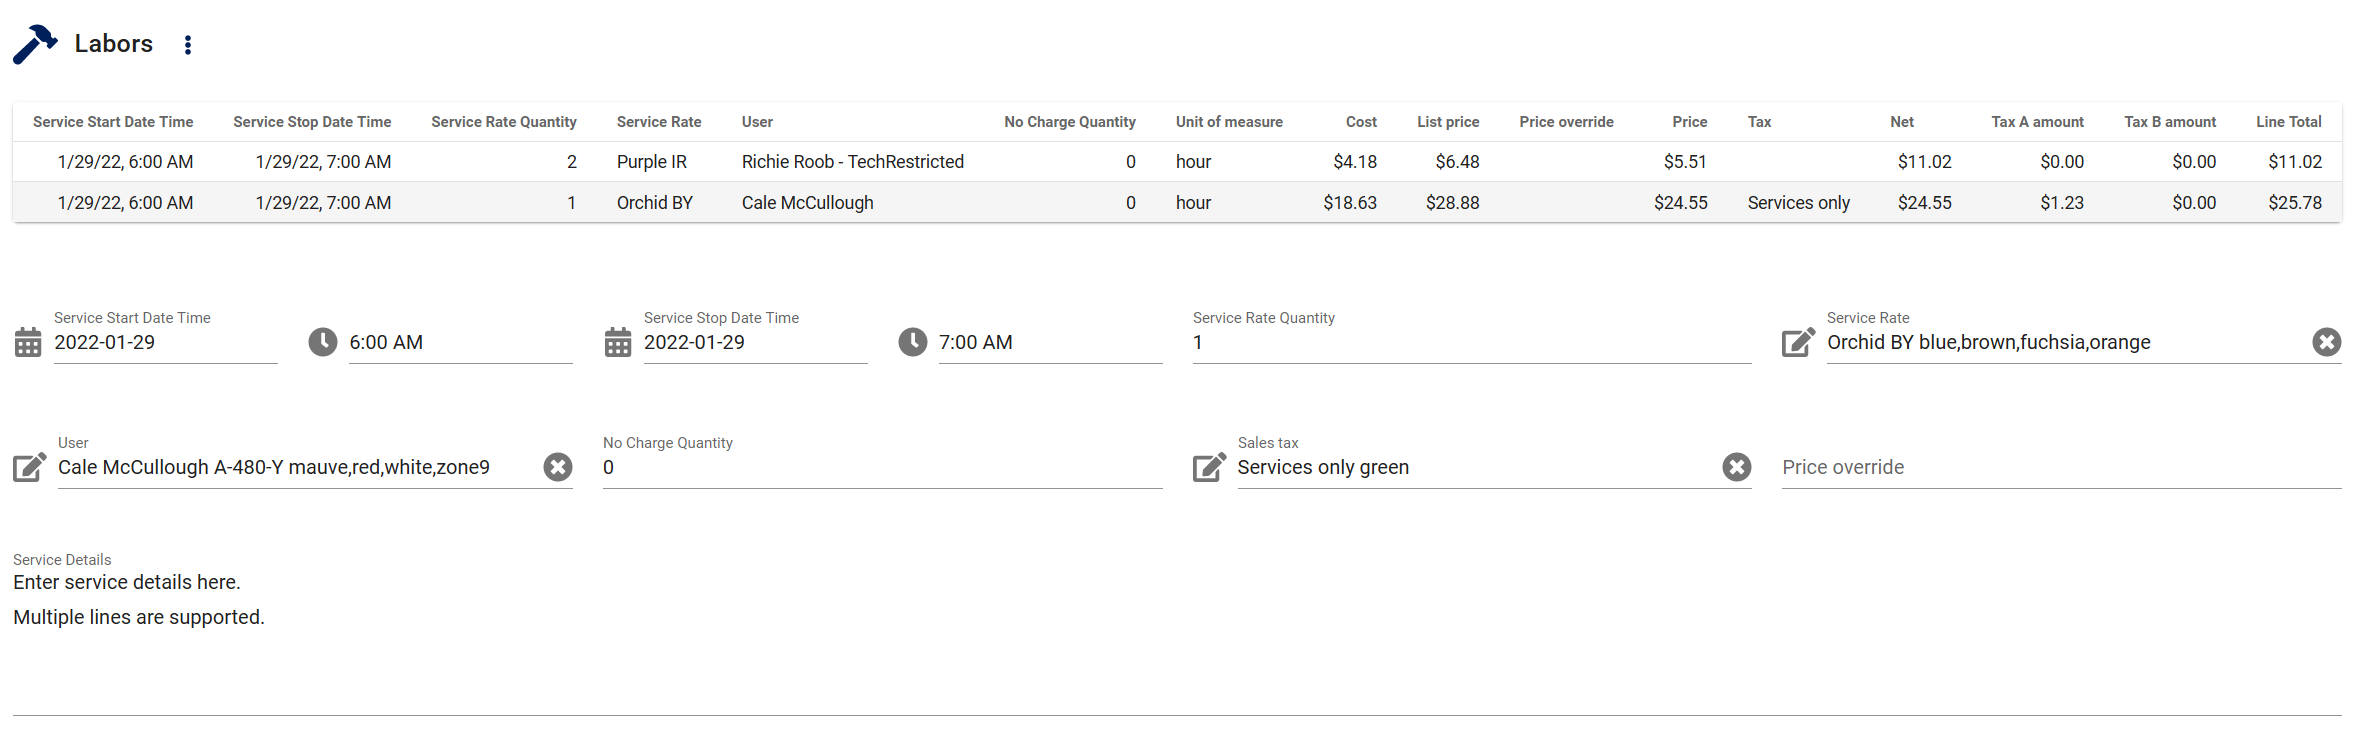
The Work order item Labors record is where you enter labor provided during service.
The Labors section of a work order is optional and won't be displayed until a work order item labor record is added from the Work order Items context menu.
It can also be completely removed as an option if it won't be required by customizing the work order form and un-checking the Visible checkbox in the Work order Item.Labors customization box.
If more than one labor record is added to the work order item they will be displayed in a table with an edit form below. Selecting a row in the table will switch the edit form below to the row selected.
A work order item can have zero to many separate Work order item labor records as required.
All Work order item labor edit form fields here are optional.
Service Start date time
This field is a date time field control and is used to enter the point in time when labor began.
If the Global settings Scheduled / labor default minutes value is set, AyaNova will automatically set the Service Stop date time and Quantity on new records.
If a stop time is already set, adjusting the start time will cause AyaNova to calculate the Quantity field automatically.
Service Stop date time
This field is a date time field control and is used to enter the point in time when labor ended.
If the Global settings Scheduled / labor default minutes value is set, and the Service Start date time field is empty, AyaNova will automatically set the Service Start date time and Quantity on new records.
If a start time is already set, adjusting the stop time will cause AyaNova to calculate the Quantity field automatically.
Service rate quantity
This is hours of service to be recorded / billed. It doesn't have to match the selected time period between the start and stop fields but it's a good idea to do so to avoid confusion.
Service rate
This is the service rate that is billable rate for this labor item.
User (labor)
Here you select the service technician User that provided service.
No charge quantity
Enter no charge hours here (Labor that was provided but will not be billed) so that they appear on the stock Customer invoice / work order and other reports and are tracked in the system.
This value is not deducted from the Service rate quantity it is simply tracked here so the Customer can see they received some free labor and so that time can be tracked in AyaNova for reporting and business metric purposes.
Sales Tax Labor
Tax to be charged for this Labor.
Price override
Manually force the price to a certain value. This override supersedes any other source for the price including Contracts and / or the source object's price itself.
Contract adjusted pricing is not part of the Manual Price Override feature; only values entered by a user manually in this field will be present.
Service details
This optional field is used to record the details of the labor provided. Text entered here appears on stock work order and invoice reports as the explanation of labor provided and is (along with all other text entered on a work order) indexed for searching so it can be useful as a reference for future technicians searching for past resolutions to similar problems.
Typically the more technical or complex the labor provided the more details are entered here.
You can also automatically append all Tasks here from the labor context menu.
Labor table info fields
The labor table contains some read-only fields that are calculated or brought in from other records for reference purposes. Some of these fields are only visible to higher rights users.
Unit of measure
This is mirrored from the Service rate's Unit charge description field and can be removed if not required through Customizing the work order form.
Cost
This is mirrored from the Service rate's Cost field and can be removed if not required through Customizing the work order form.
List price
This is mirrored from the Service rate's Retail charge field and can be removed if not required through Customizing the work order form.
Price
This is the calculated effective price of this record. If Price override is set, that is the effective price no matter any other setting, otherwise it's the Labors List price as is, or adjusted if there is a Contract with a Service rate price adjustment in effect.
Net
This calculated value is the effective Price field multiplied by the Service Rate Quantity field.
Tax A amount
Net multiplied by the selected Tax's A percentage.
Tax B amount
If the selected Tax does not have a Tax B set this field will be zero.
If the selected Tax has Tax on Tax checked then this value is (Net + Tax A amount) multiplied by Tax's B percentage.
If Tax on Tax is not set then this is Net multiplied by the selected Tax's B percentage.
Line total
Net + Tax A amount + Tax B amount.
Labor context menu
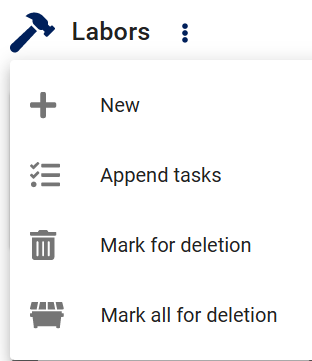
New
Add a new work order item Labor record to the collection and open it's record in the edit form.
Append Tasks
Often the list of Tasks from the Task section is also the description of the labor performed so this option will append the "task" text of all the Tasks in the current work order item to the Service details field beneath any other text already entered there.
Mark for deletion
Flag the selected row work order item labor record to be permanently deleted.
When clicked the work order item labor record selected will display in the table with a line through it indicating it will deleted on the next save of the work order and an Undelete button for reversing the delete flag will appear at the top of this work order item labor's edit form.
You can also refresh the page to abandon this and any other changes made locally to the work order that have not yet been saved at the server.
Until the work order is saved it's not actually deleted.
Mark ALL for deletion
Flag all work order item labors, in this work order item only, to be permanently deleted when the work order is saved.
When clicked, all the work order item labors on this work order item will display in the table with lines through them indicating they will be deleted on the next save of the work order and an Undelete button for reversing the delete flag will appear at the top of each work order item labor's edit forms.
You can also refresh the page to abandon this and any other changes made locally to the work order that have not yet been saved at the server.
Until the work order is saved the items are not actually deleted.
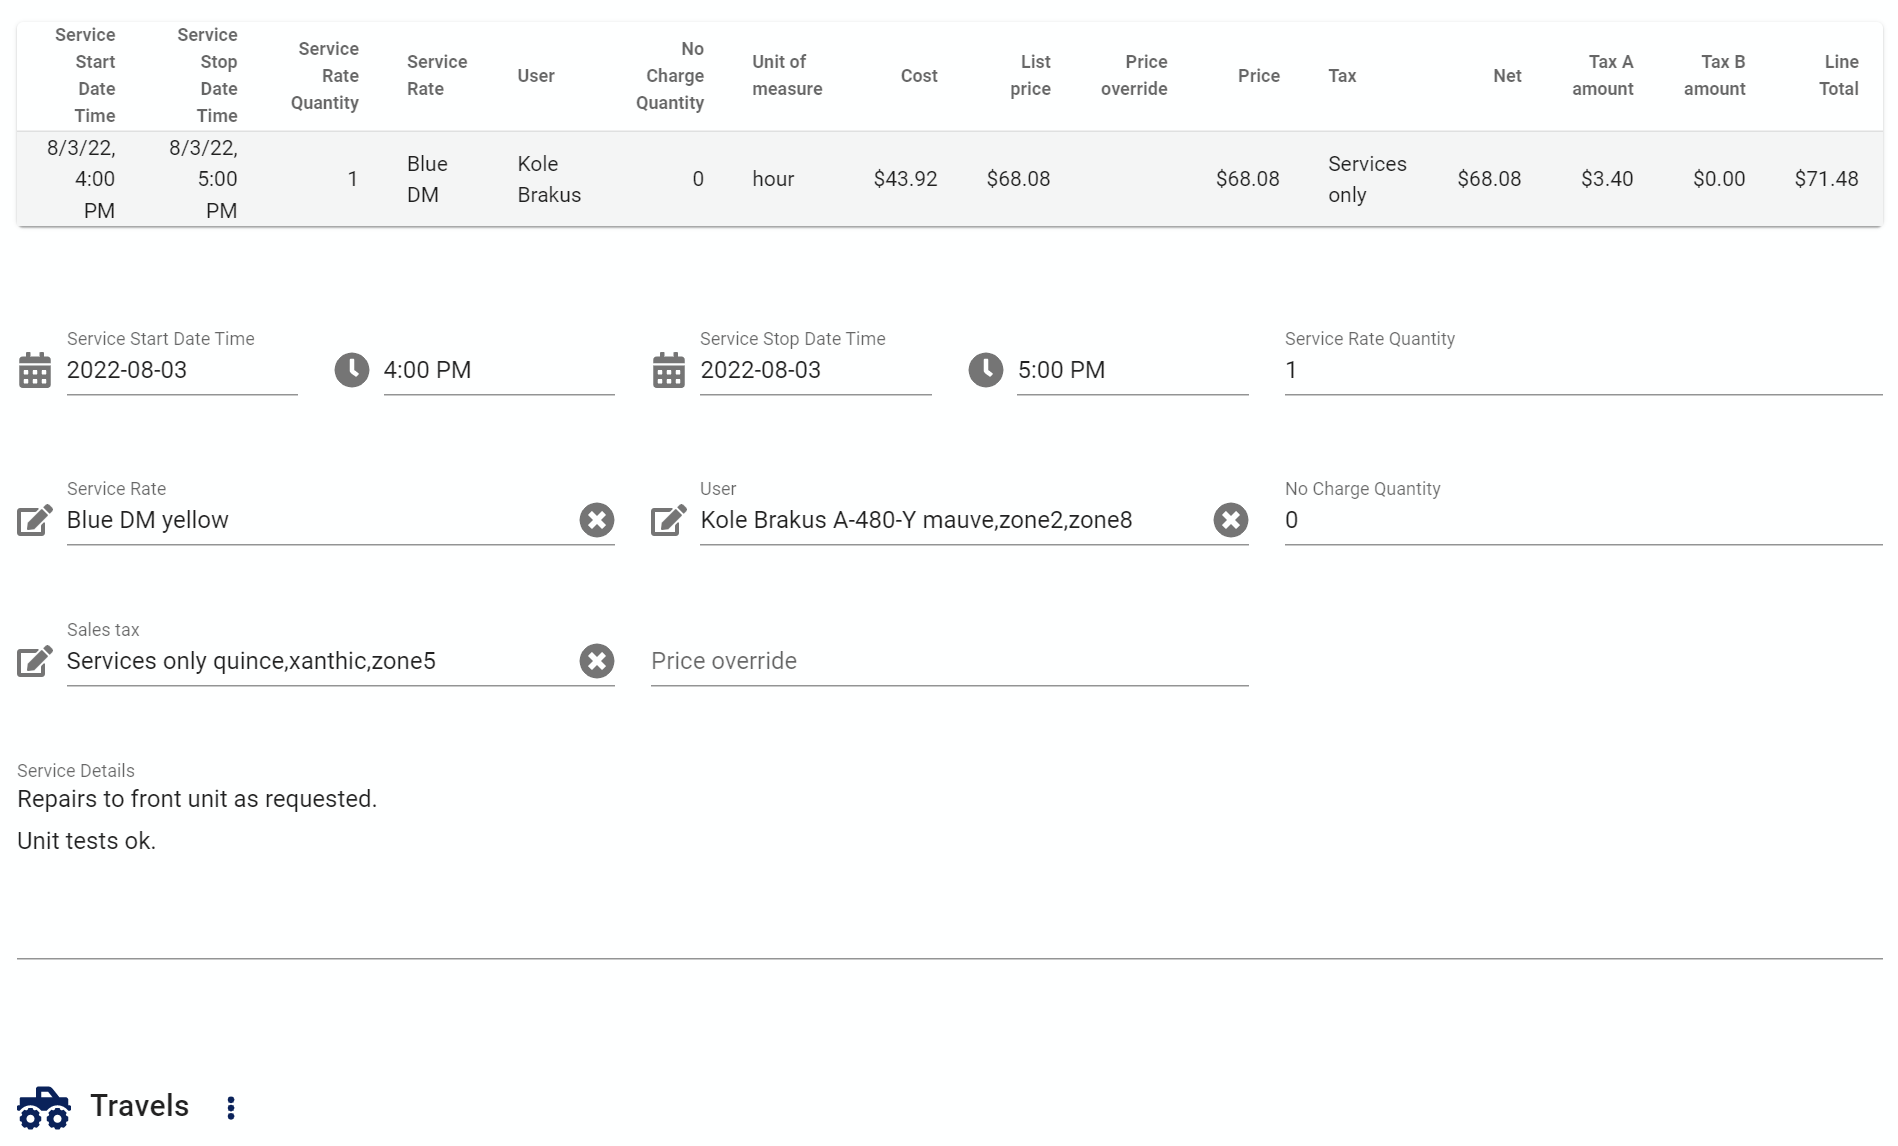
Travels
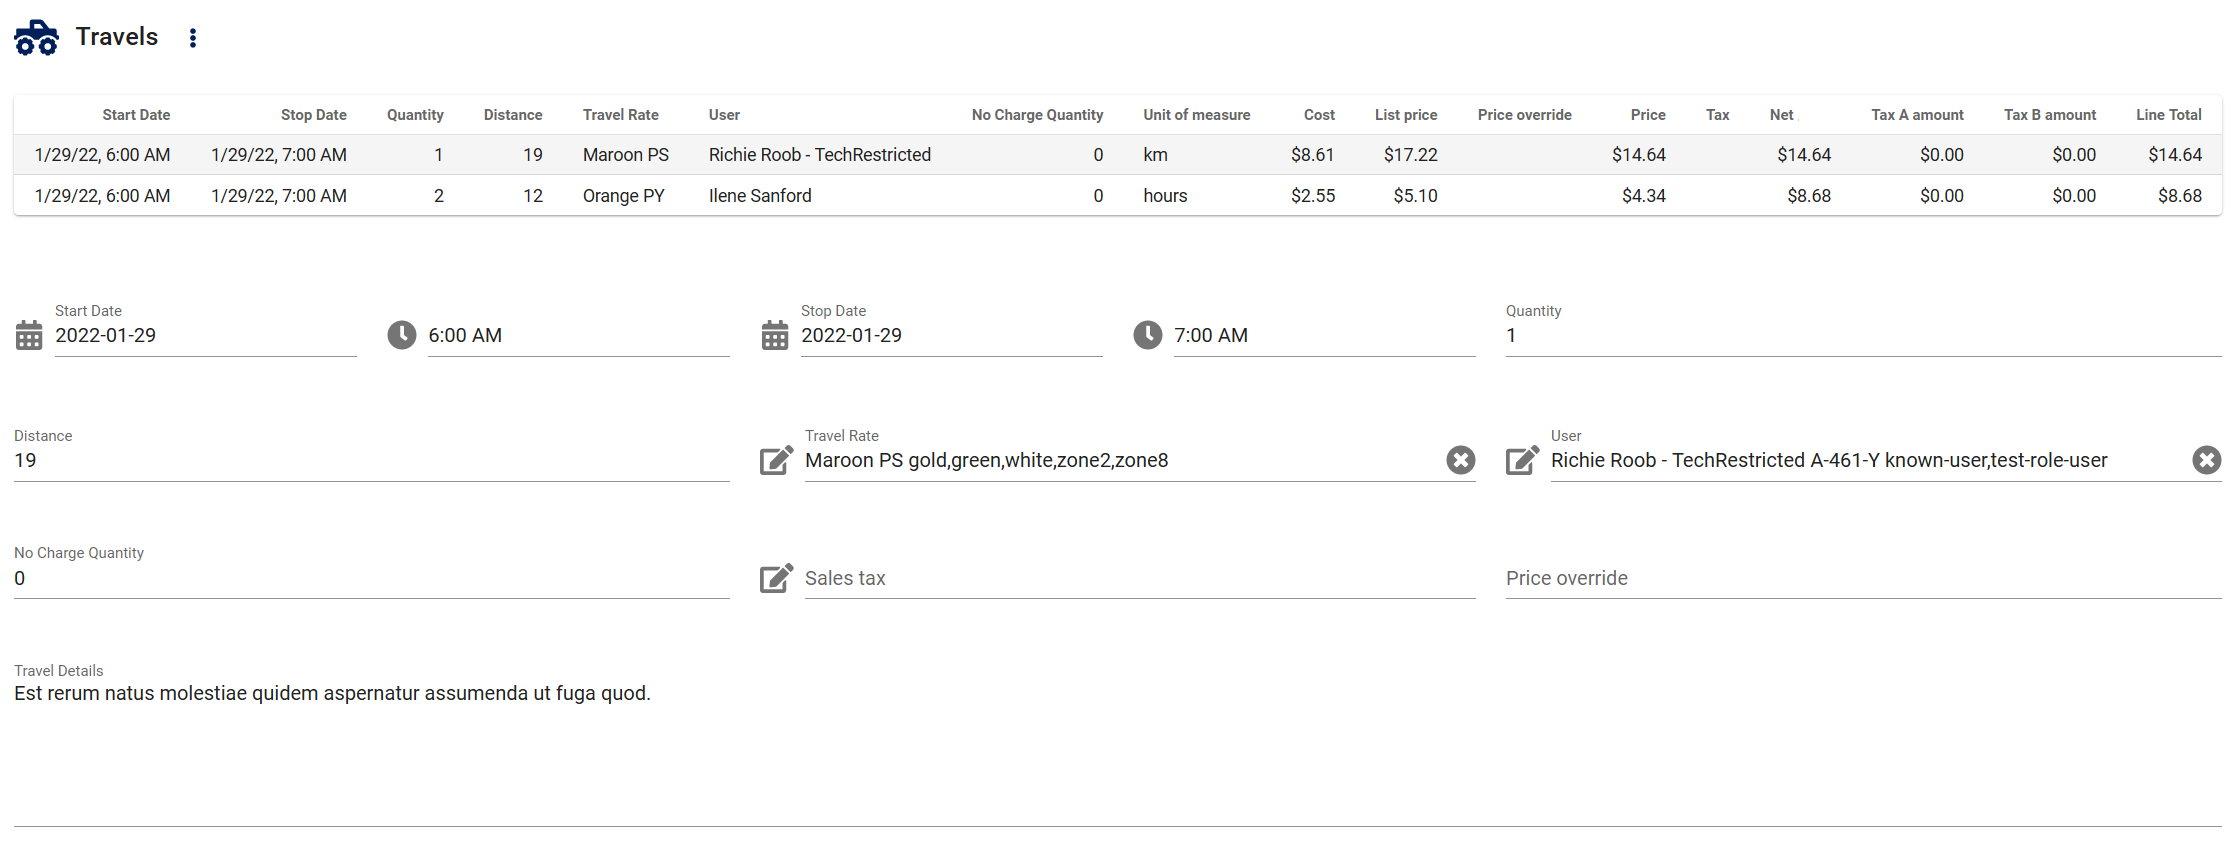
The Work order item Travel record is where you enter travel required to provide service.
The Travels section of a work order is optional and won't be displayed until a work order item travel record is added from the Work order Items context menu.
It can also be completely removed as an option if it won't be required by customizing the work order form and un-checking the Visible checkbox in the Work order Item.Travels customization box.
If more than one travel record is added to the work order item they will be displayed in a table with an edit form below. Selecting a row in the table will switch the edit form below to the row selected.
A work order item can have zero to many separate Work order item travel records as required.
All Work order item travel edit form fields here are optional.
Start date
This field is a date time field control and is used to enter the point in time when travel began.
If the Global settings travel default minutes value is set, AyaNova will automatically set the Stop date and Quantity on new records.
If a stop time is already set, adjusting the start time will cause AyaNova to calculate the Quantity field automatically.
Stop date
This field is a date time field control and is used to enter the point in time when travel ended.
If the Global settings travel default minutes value is set, and the Start date field is empty, AyaNova will automatically set the Start date and Quantity on new records.
If a start time is already set, adjusting the stop time will cause AyaNova to calculate the Quantity field automatically.
Quantity
This is hours of travel to be recorded / billed. It doesn't have to match the selected time period between the start and stop fields but it's a good idea to do so to avoid confusion.
Distance
This optional field is the distance travelled.
Travel rate
This is the travel rate that is billable rate for this travel item.
User (travel)
Here you select the service technician User that had to travel to provide service.
No charge quantity
Enter no charge hours here (Travel that was required but will not be billed) so that they appear on the stock Customer invoice / work order and other reports and are tracked in the system.
This value is not deducted from the Quantity it is simply tracked here so the Customer can see they received some free travel and so that time can be tracked in AyaNova for reporting and business metric purposes.
Sales Tax Travel
Tax to be charged for this Travel.
Price override
Manually force the price to a certain value. This override supersedes any other source for the price including Contracts and / or the source object's price itself.
Contract adjusted pricing is not part of the Manual Price Override feature; only values entered by a user manually in this field will be present.
Travel details
This optional field is used to record the details of the travel required. Text entered here appears on stock work order and invoice reports as the explanation of travel required.
Travel table info fields
The travel table contains some read-only fields that are calculated or brought in from other records for reference purposes. Some of these fields are only visible to higher rights users.
Unit of measure
This is mirrored from the Travel rate's Unit charge description field and can be removed if not required through Customizing the work order form.
Cost
This is mirrored from the Travel rate's Cost field and can be removed if not required through Customizing the work order form.
List price
This is mirrored from the Travel rate's Retail charge field and can be removed if not required through Customizing the work order form.
Price
This is the calculated effective price of this record. If Price override is set, that is the effective price no matter any other setting, otherwise it's the Travel's List price as is, or adjusted if there is a Contract with a Travel rate price adjustment in effect.
Net
This calculated value is the effective Price field multiplied by the Quantity field.
Tax A amount
Net multiplied by the selected Tax's A percentage.
Tax B amount
If the selected Tax does not have a Tax B set this field will be zero.
If the selected Tax has Tax on Tax checked then this value is (Net + Tax A amount) multiplied by Tax's B percentage.
If Tax on Tax is not set then this is Net multiplied by the selected Tax's B percentage.
Line total
Net + Tax A amount + Tax B amount.
Travel context menu
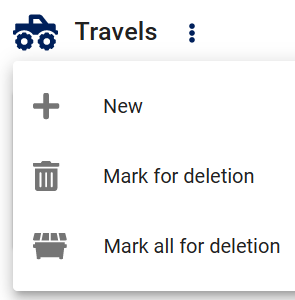
New
Add a new work order item Travel record to the collection and open it's record in the edit form.
Mark for deletion
Flag the selected row work order item travel record to be permanently deleted.
When clicked the work order item travel record selected will display in the table with a line through it indicating it will deleted on the next save of the work order and an Undelete button for reversing the delete flag will appear at the top of this work order item travel's edit form.
You can also refresh the page to abandon this and any other changes made locally to the work order that have not yet been saved at the server.
Until the work order is saved it's not actually deleted.
Mark ALL for deletion
Flag all work order item travels, in this work order item only, to be permanently deleted when the work order is saved.
When clicked, all the work order item travels on this work order item will display in the table with lines through them indicating they will be deleted on the next save of the work order and an Undelete button for reversing the delete flag will appear at the top of each work order item travel's edit forms.
You can also refresh the page to abandon this and any other changes made locally to the work order that have not yet been saved at the server.
Until the work order is saved the items are not actually deleted.
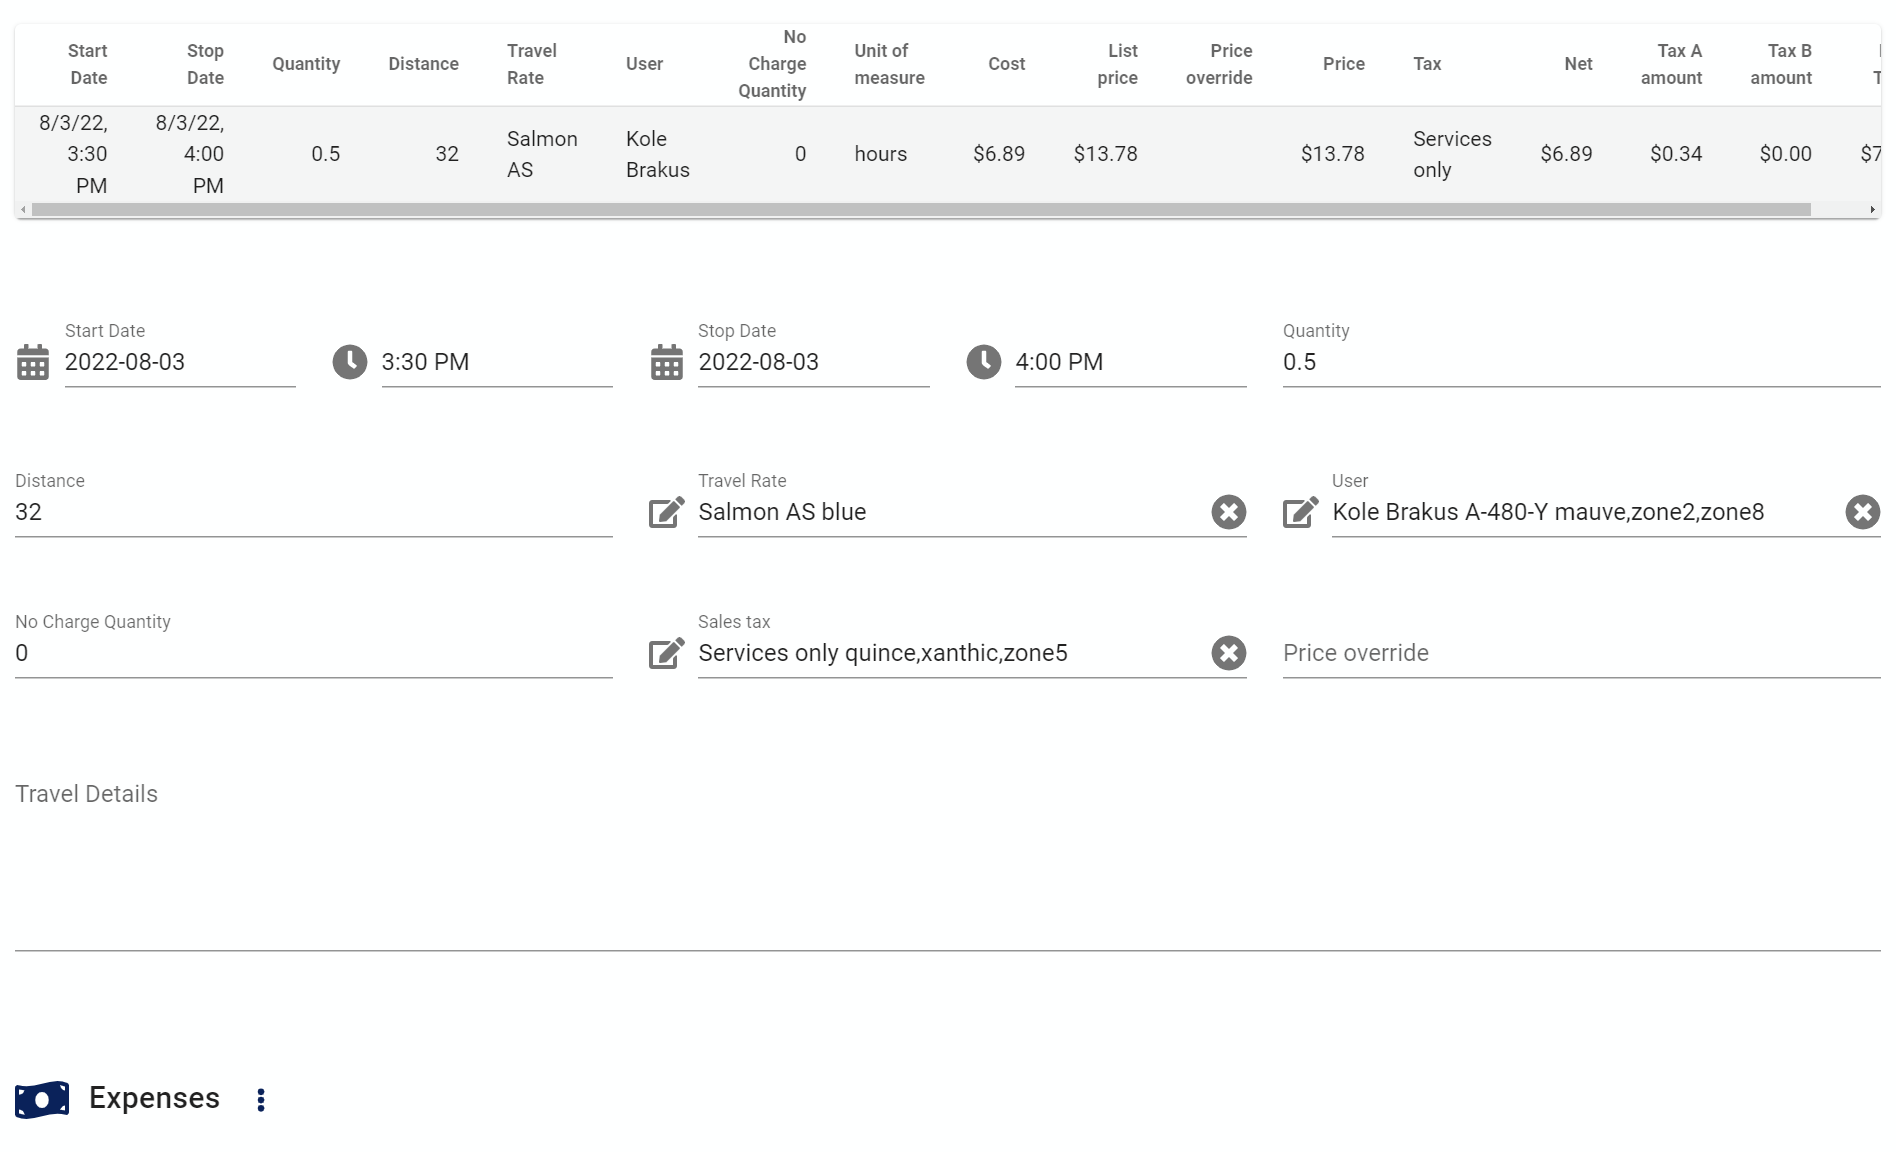
Expenses

The Work order item Expenses record is where you enter any miscellaneious expenses required to provide service.
Typically these are items that a service technician needs to purchase locally when providing on-site service to a remote location or any expense that is not tracked in inventory.
The Expenses section of a work order is optional and won't be displayed until a work order item expense record is added from the Work order Items context menu.
It can also be completely removed as an option if it won't be required by customizing the work order form and un-checking the Visible checkbox in the Work order Item.Expenses customization box.
If more than one expense record is added to the work order item they will be displayed in a table with an edit form below. Selecting a row in the table will switch the edit form below to the row selected.
A work order item can have zero to many separate Work order item expense records as required.
All Work order item expense edit form fields here are optional but the currency fields must at least have a zero in them.
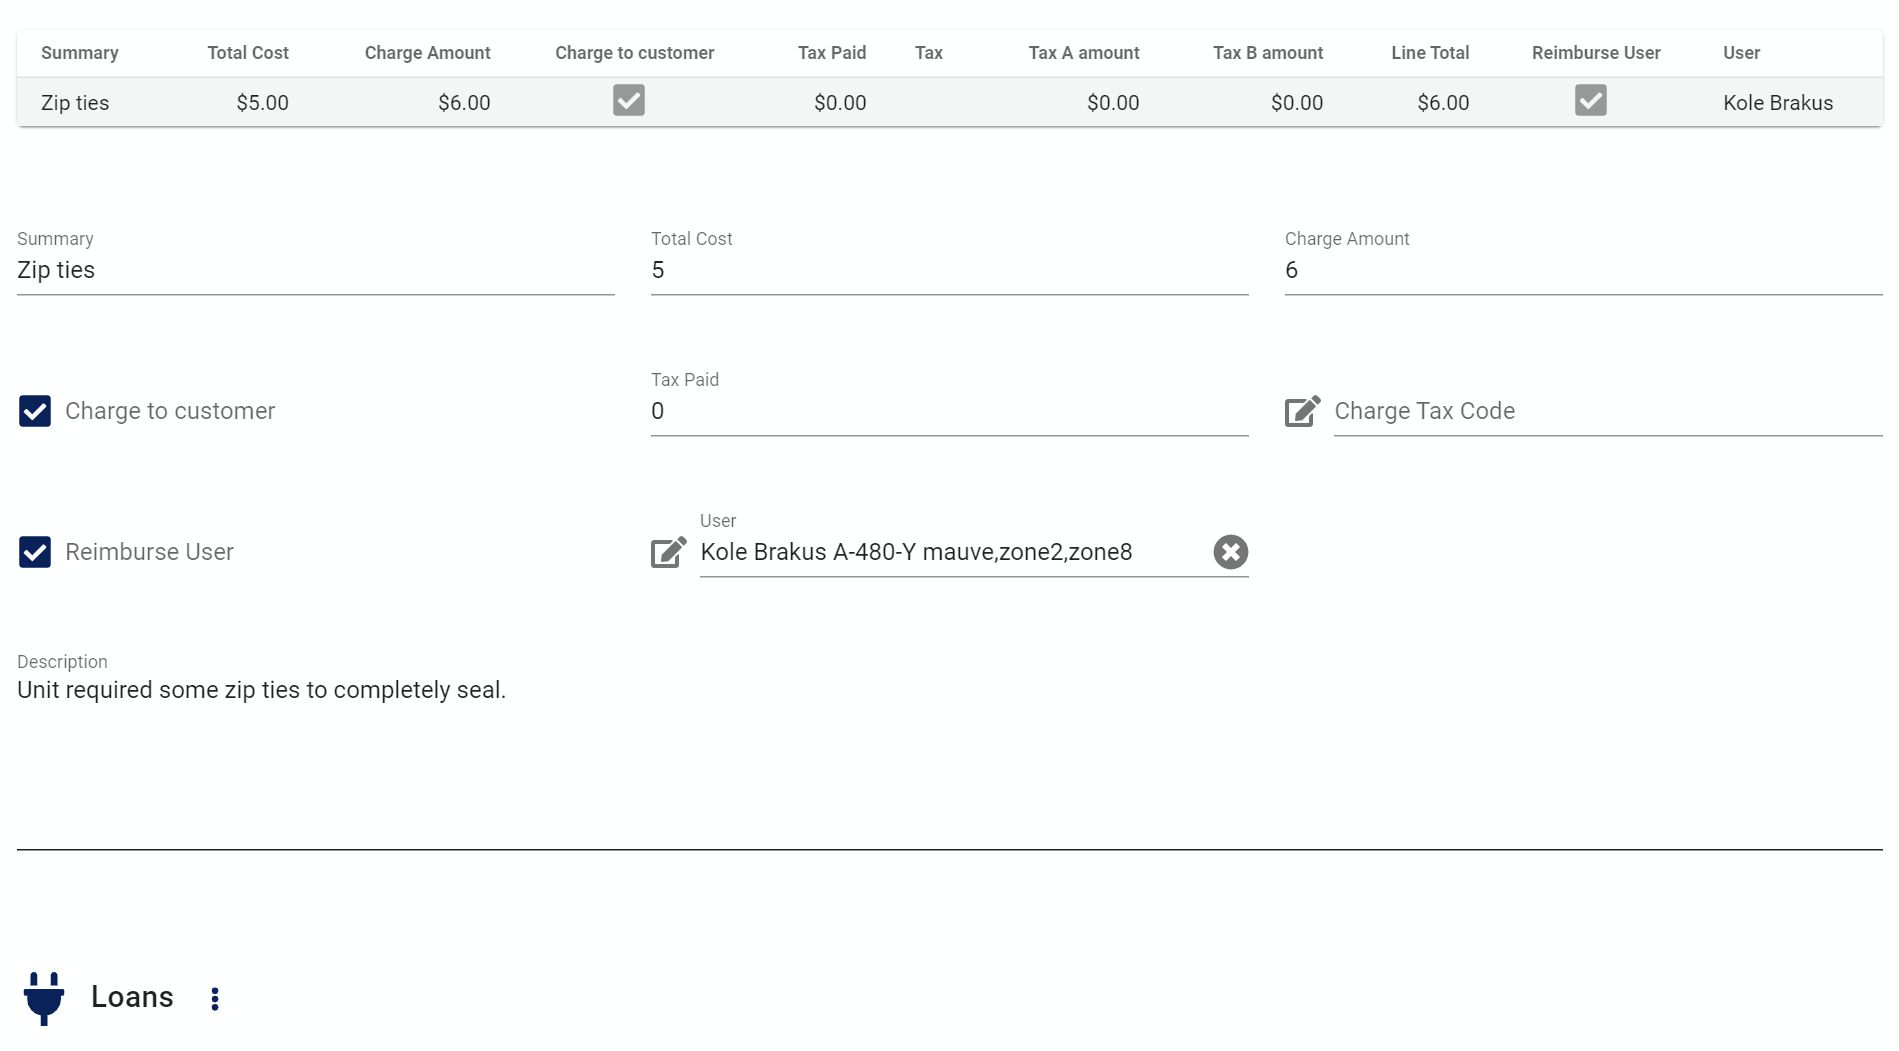
Summary
Text field describing the expense. Text entered here appears on stock work order and invoice reports as the explanation of the expense required.
Total Cost
The currency amount of the pre-tax cost of this expense item for internal tracking purposes, this is not displayed in stock Customer facing work order reports.
Charge amount
The amount to charge the Customer for this expense. Displays on the stock work order reports.
Charge to customer
Checking this box includes this expense in stock work order reports intended for Customers and is used in calculations for Customer charges.
Tax paid
Any taxes paid for this expense.
Charge Tax Code
Tax code used to calculate charges to the Customer for this expense.
Reimburse User
Select if User should be re-imbursed for this expense (i.e. they paid for it out of pocket). Doesn't trigger anything in AyaNova; used on reports and for general tracking purposes.
User
The User who required this expense and paid for it.
Description
This optional field is used to record additional details of the expense required.
Tax A amount
Charge amount multiplied by the selected Tax's A percentage.
Tax B amount
If the selected Tax does not have a Tax B set this field will be zero.
If the selected Tax has Tax on Tax checked then this value is (Charge amount + Tax A amount) multiplied by Tax's B percentage.
If Tax on Tax is not set then this is Charge amount multiplied by the selected Tax's B percentage.
Line total
Charge amount + Tax A amount + Tax B amount.
Expense context menu
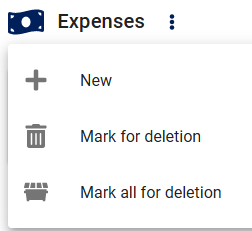
New
Add a new work order item Expense record to the collection and open it's record in the edit form.
Mark for deletion
Flag the selected row work order item expense record to be permanently deleted.
When clicked the work order item expense record selected will display in the table with a line through it indicating it will deleted on the next save of the work order and an Undelete button for reversing the delete flag will appear at the top of this work order item expense's edit form.
You can also refresh the page to abandon this and any other changes made locally to the work order that have not yet been saved at the server.
Until the work order is saved it's not actually deleted.
Mark ALL for deletion
Flag all work order item expenses, in this work order item only, to be permanently deleted when the work order is saved.
When clicked, all the work order item expenses on this work order item will display in the table with lines through them indicating they will be deleted on the next save of the work order and an Undelete button for reversing the delete flag will appear at the top of each work order item expense's edit forms.
You can also refresh the page to abandon this and any other changes made locally to the work order that have not yet been saved at the server.
Until the work order is saved the items are not actually deleted.
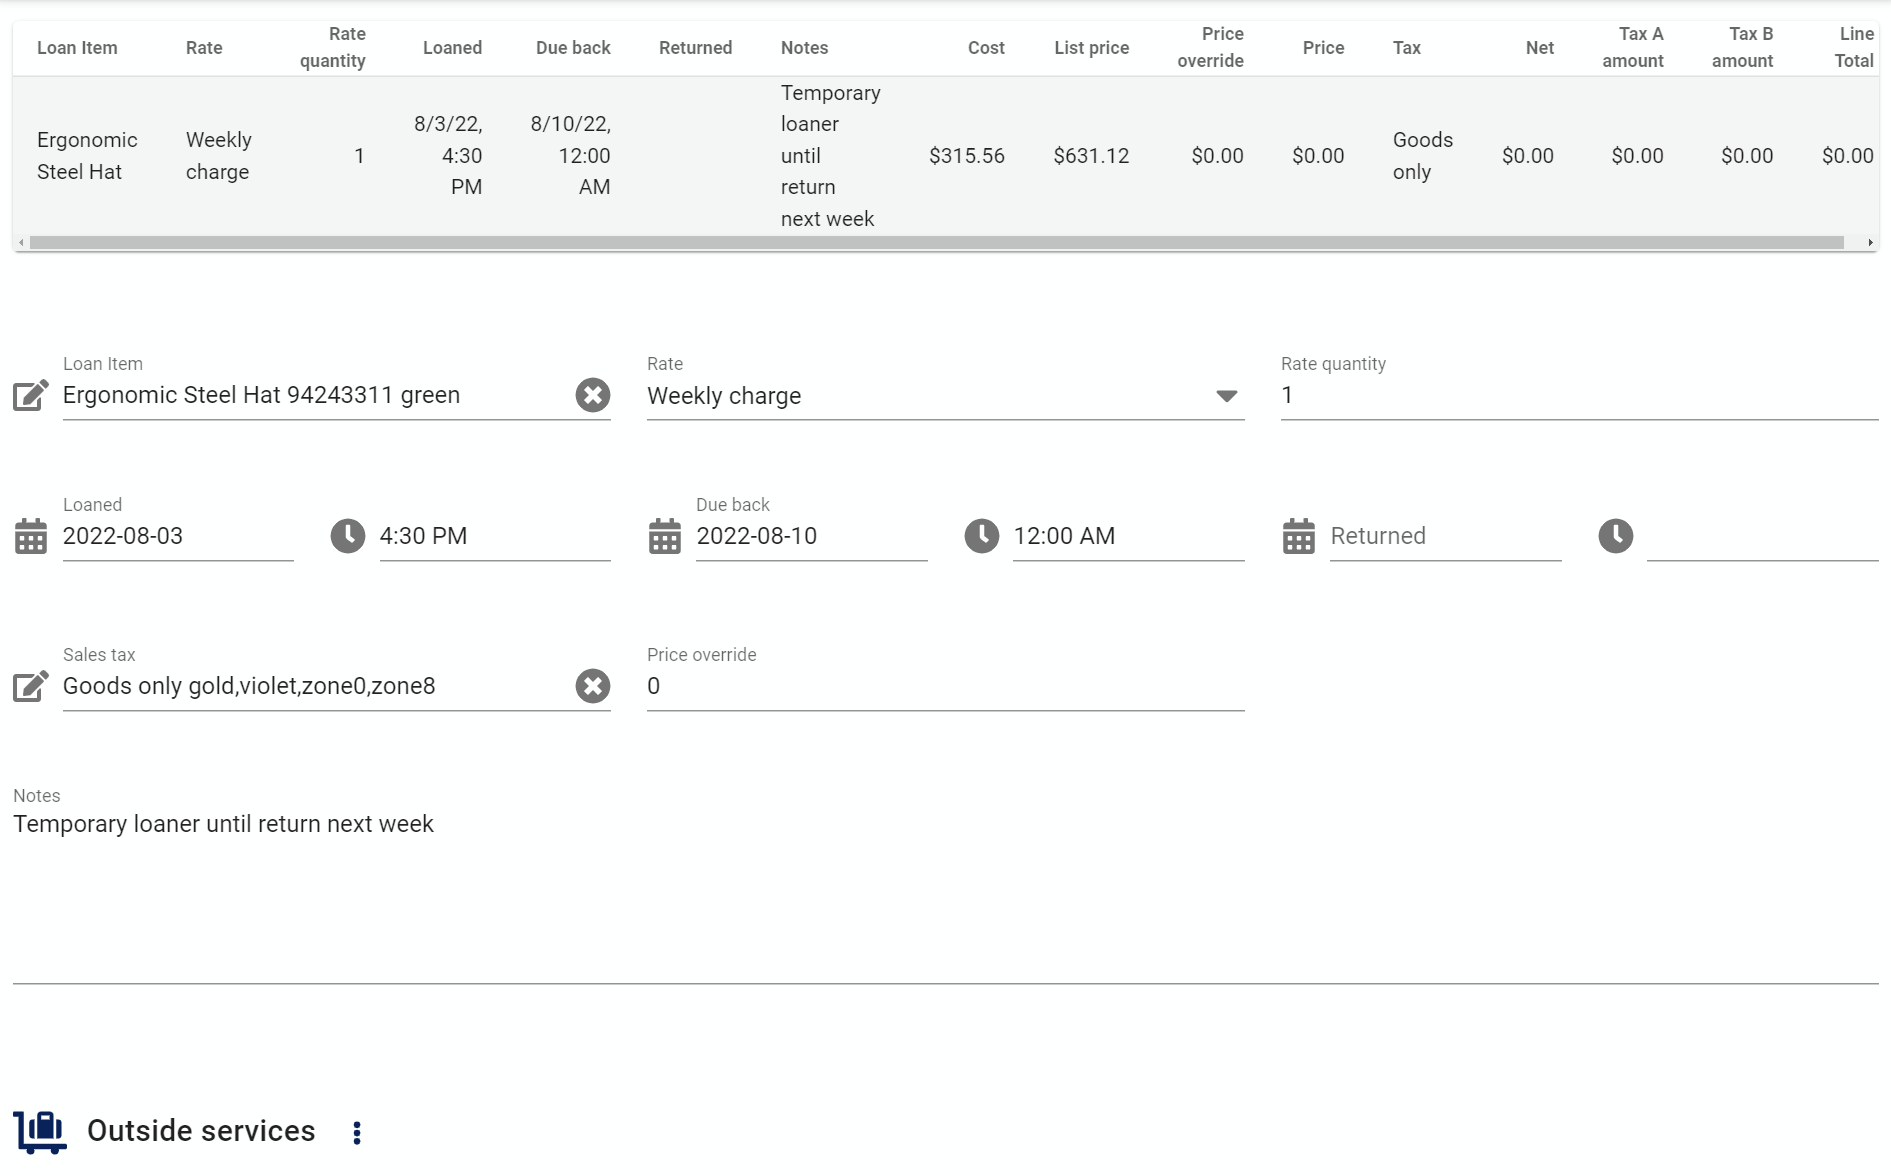
Loans

The Work order item Loans record is where you enter and track Loaner items which is equipment loaned / rented to a Customer.
The Loans section of a work order is optional and won't be displayed until a work order item loan record is added from the Work order Items context menu.
It can also be completely removed as an option if it won't be required by customizing the work order form and un-checking the Visible checkbox in the Work order Item.Loans customization box.
If more than one loan record is added to the work order item they will be displayed in a table with an edit form below. Selecting a row in the table will switch the edit form below to the row selected.
A work order item can have zero to many separate Work order item loan records as required.
All Work order item loan edit form fields here are optional unless marked otherwise.
Loan item
This required field is where you select the Loaner items for this record.
Rate
This field specifies the time period of the loan / rental of the loan item. The fixed values avaiable correspond to time periods on the Loaner items form where you can enter the prices and costs for each time period provided.
Rate quantity
This is quantity of the Rate to be recorded / billed.
Loaned
This field is a date time field control and is used to enter the point in time when loan began.
Due back
This field is is used to enter the point in time when the Loan unit is expected to be returned.
Returned
The point in time when the Loan unit was returned, ending the loan period.
Sales Tax Loan
Tax to be charged for this Loan.
Price override
Manually force the price to a certain value. This override supersedes any other source for the price.
Notes
This optional field is used to record any internal notes about the loan provided. Text entered here does not appear on the stock work order reports.
Loan table info fields
The loan table contains some read-only fields that are calculated or brought in from other records for reference purposes. Some of these fields are only visible to higher rights users.
Cost
This is mirrored from the Loaner items corresponding Cost field for the Rate selected and can be removed if not required through Customizing the work order form.
List price
This is mirrored from the Loaner items corresponding Charge field for the Rate selected and can be removed if not required through Customizing the work order form.
Price
This is the calculated effective price of this record. If Price override is set, that is the effective price no matter any other setting, otherwise it's the Loan unit's List price as is.
Net
This calculated value is the effective Price field multiplied by the Service Rate Quantity field.
Tax A amount
Net multiplied by the selected Tax's A percentage.
Tax B amount
If the selected Tax does not have a Tax B set this field will be zero.
If the selected Tax has Tax on Tax checked then this value is (Net + Tax A amount) multiplied by Tax's B percentage.
If Tax on Tax is not set then this is Net multiplied by the selected Tax's B percentage.
Line total
Net + Tax A amount + Tax B amount.
Loan context menu

New
Add a new work order item Loan record to the collection and open it's record in the edit form.
Mark for deletion
Flag the selected row work order item loan record to be permanently deleted.
When clicked the work order item loan record selected will display in the table with a line through it indicating it will deleted on the next save of the work order and an Undelete button for reversing the delete flag will appear at the top of this work order item loan's edit form.
You can also refresh the page to abandon this and any other changes made locally to the work order that have not yet been saved at the server.
Until the work order is saved it's not actually deleted.
Mark ALL for deletion
Flag all work order item loans, in this work order item only, to be permanently deleted when the work order is saved.
When clicked, all the work order item loans on this work order item will display in the table with lines through them indicating they will be deleted on the next save of the work order and an Undelete button for reversing the delete flag will appear at the top of each work order item loan's edit forms.
You can also refresh the page to abandon this and any other changes made locally to the work order that have not yet been saved at the server.
Until the work order is saved the items are not actually deleted.
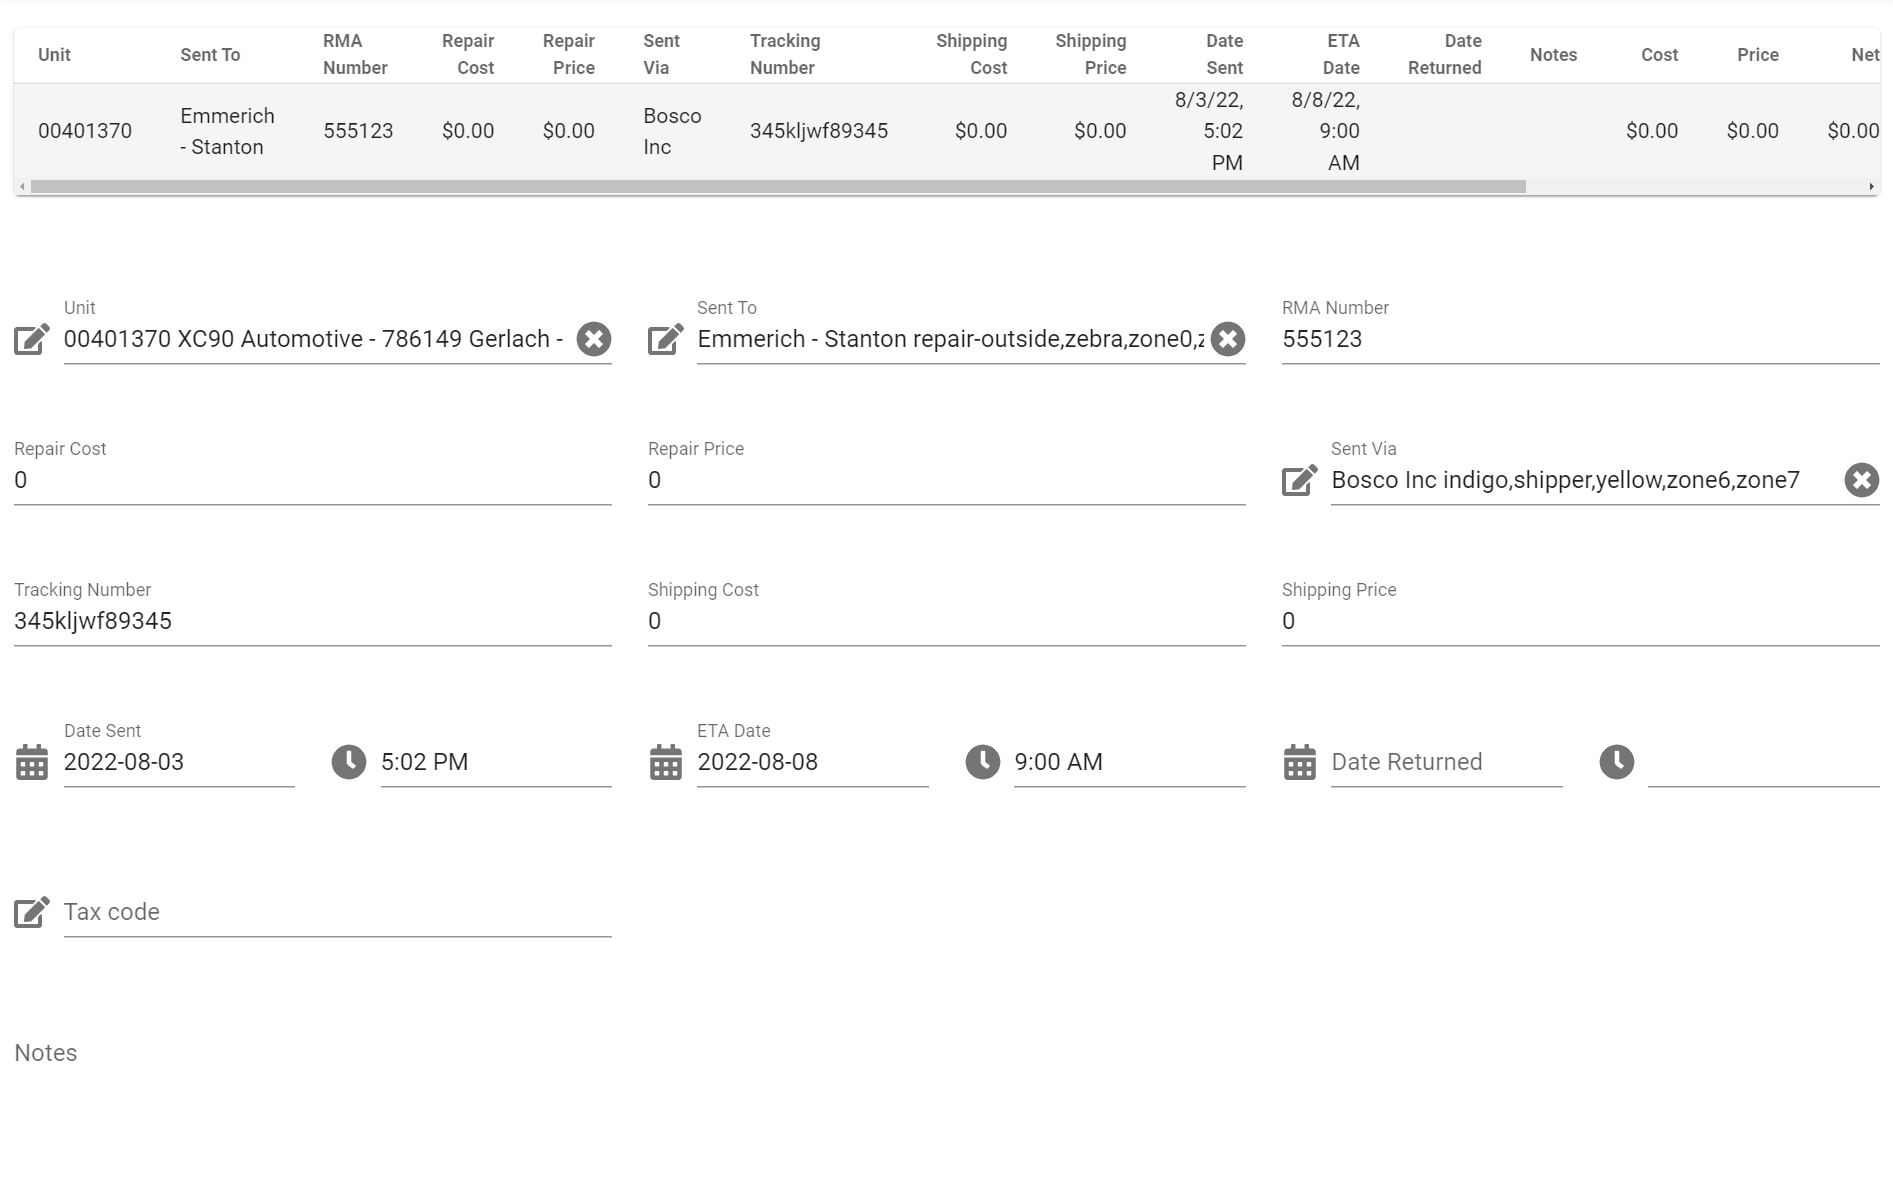
Outside services

The Work order item Outside service record is where you record 3rd party service such as service depot or RMA / Warranty repairs.
The Outside services section of a work order is optional and won't be displayed until a work order item outside service record is added from the Work order Items context menu.
It can also be completely removed as an option if it won't be required by customizing the work order form and un-checking the Visible checkbox in the Work order Item.Outside services customization box.
If more than one outside service record is added to the work order item they will be displayed in a table with an edit form below. Selecting a row in the table will switch the edit form below to the row selected.
A work order item can have zero to many separate Work order item outside service records as required.
All Work order item outside service edit form fields here are optional unless marked otherwise.
Unit
Selection of the Customer Unit of equipment being sent out for service. This field is required.
Sent to
Vendor this Unit was sent to for repair.
RMA number
RMA (Return Merchandise Authorization) number is the tracking number assigned by the 3rd party repair service to repair this unit. If RMA doesn't make sense in your industry, you can rename the title of this field or remove it completely see the form customization help page for more information.
Repair cost
The cost charged to your service company for this repair to be made by the repair service.
Repair price
The price you are charging your customer for this repair made by the repair service.
Sent via
Vendor used to ship this Unit to the repair service.
Tracking number
The shipping tracking number provided by the shipper.
Shipping cost
The cost charged to your service company to ship this Unit to the repair service.
Shipping price
The price you are charging your customer to ship this Unit to the repair service.
Date sent
This field is a date time field control and is used to enter the point in time when the Unit was shipped to the repair service.
ETA date
This field is is used to enter the point in time when the Unit is expected to be returned from the repair service.
If a user has subscribed to the Outside service overdue notification they will receive a notification if this date passes without a return date being entered so they can follow up.
Date returned
The point in time when the Unit was received back in your shop from the repair service.
If a user had subscribed to the Outside service unit received back notification they would also receive a notification the moment it was received.
Tax code Outside service
Tax to be charged for this Outside service.
Notes
This optional field is used to record internal notes. Text entered here does not appear on stock work order or invoice reports.
Outside service table info fields
The outside service table contains some read-only fields that are calculated from the data entered. Some of these fields are only visible to higher rights users.
Price
This value is Shipping charges plus repair charges.
Net
This value is a duplicate of the Price field included for consistency with reporting and other automated functionality.
Tax A amount
Net multiplied by the selected Tax code's Tax A percentage.
Tax B amount
If the selected Tax code does not have a Tax B set this field will be zero.
If the selected Tax code has Tax on Tax checked then this value is (Net + Tax A amount) multiplied by Tax's B percentage.
If Tax on Tax is not set then this is Net multiplied by the selected Tax's B percentage.
Line total
Net + Tax A amount + Tax B amount.
Outside service context menu
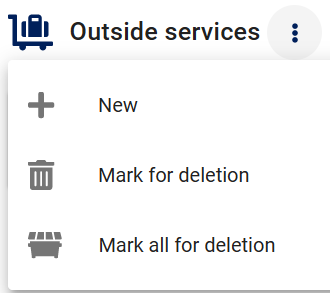
New
Add a new work order item Outside service record to the collection and open it's record in the edit form.
Mark for deletion
Flag the selected row work order item outside service record to be permanently deleted.
When clicked the work order item outside service record selected will display in the table with a line through it indicating it will deleted on the next save of the work order and an Undelete button for reversing the delete flag will appear at the top of this work order item outside service's edit form.
You can also refresh the page to abandon this and any other changes made locally to the work order that have not yet been saved at the server.
Until the work order is saved it's not actually deleted.
Mark ALL for deletion
Flag all work order item outside services, in this work order item only, to be permanently deleted when the work order is saved.
When clicked, all the work order item outside services on this work order item will display in the table with lines through them indicating they will be deleted on the next save of the work order and an Undelete button for reversing the delete flag will appear at the top of each work order item outside service's edit forms.
You can also refresh the page to abandon this and any other changes made locally to the work order that have not yet been saved at the server.
Until the work order is saved the items are not actually deleted.
Menu options
In addition to the common edit form menu options, the work order edit form also has these unique options:
Duplicate
This menu option makes a new local copy of the current work order ready to be modified and saved.
Some reasons to duplicate a work order are:
-
as a "template", when a new work order needs to be made that is very similar to an existing one, duplicating it can save entry time by using an existing work order as a "template" to create a new one.
-
splitting apart a work order that has become too large, the work order can be duplicated then items removed from the original and copy to turn one work order into two separate ones.
Duplicate to Quote
This menu option makes a Quote by copying the shared fields from the work order to a new Quote.
Duplicate to Preventive Maintenance
This menu option makes a Preventive maintenance order by copying the shared fields from the current work order to a new PM. Use this option with a work order that is to be turned into regular recurring maintenance on a schedule.
Work order status list
Link to edit or create the Work order states available. See the Work order status help page for more details.
Work order item status list
Link to edit or create the work order item states available. See the Work order item status help page for more details.
Work order item priority list
Link to edit or create the work order item priorities available. See the Work order item priority help page for more details.
Task groups
Link to edit or create Task groups for use with the Work order item tasks feature.
PM parent
If this work order was automatically generated or duplicated from a Preventive Maintenance order, this option is a link to open that PM record.
Quote parent
If this work order was duplicated from a Quote, this option is a link to open that Quote record.
Report template security flags
As some Work order data is not shown or available to restricted Users, several boolean true / false flag fields are provided with the work order header report data which are available to use in Report templates to hide or show sections as required:
- IsCompleteRecord false if some Work order Item records were removed as not available to current restricted user
- UserIsRestrictedType
- UserIsTechRestricted
- UserIsSubContractorFull
- UserIsSubContractorRestricted
- UserCanViewPartCosts
- UserCanViewLaborOrTravelRateCosts
- UserCanViewLoanerCosts