Getting started - Set up for production use
Once you and your staff have evaluated AyaNova and you have acquired and installed an AyaNova license it's time to set things up for real-world production use.
The following is a suggested order for setting up AyaNova for production use.
These are suggestions only, you do not necessarily have to do things in this manner, many items can and will be entered "on the fly" as you use AyaNova day to day, but it's helpful to start with the basics.
We've indicated which steps we consider required and not optional.
What about migrating from an older version?
When migrating from an older version of AyaNova you should follow that guide to do a fresh migration timed to work with your existing work flow as outlined there.
You should also read over and consider the following steps post migration as some of them still may apply or be useful to know.
Also be sure to continue on to the advanced features guide in the configuration completed section on this page to get the most out of AyaNova 8.
1. Secure AyaNova
Required
The first step is to secure AyaNova to ensure no one can access it without permission.
Change the superuser password
The superuser User account in AyaNova is always present, can not be erased and is intended to be used only to create other Users and to initiate specific operations that are higher risk or dangerous.
The first and most important step in securing your AyaNova server is changing the superuser password from the default l3tm3in.
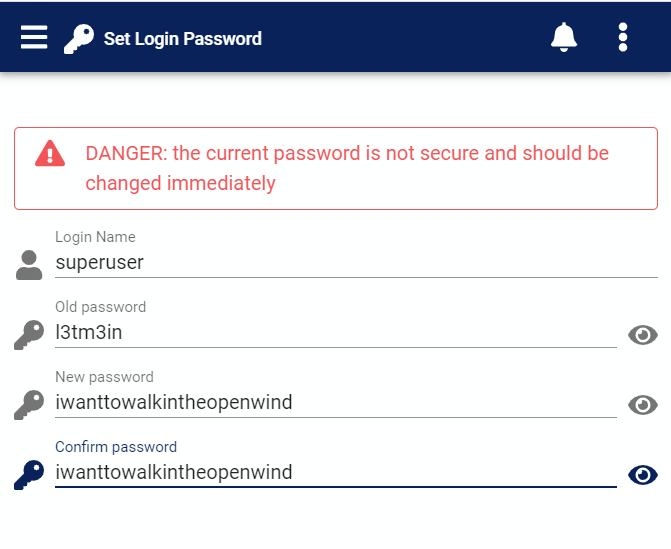
(You will see this warning if you login to a licensed AyaNova with the default superuser password)
It is critically important to do this before taking any further steps; particularly before creating any Users.
Failing to do this would mean you will have no effective security as the AyaNova superuser password is well known and could be used by anyone to cause significant damage to your data or create more Users with administrative level privileges.
Once AyaNova is licensed, if you log in as the superuser with the default password l3tm3in, you will be taken automatically to the change password form to encourage it to be changed.
We have secure password guidelines for the latest best practices in choosing a secure password and we encourage you to read about it and consider the advice written there in order to choose an easy to memorize, secure password that does not need to be written down or stored insecurely.
We also strongly recommend the use of Two factor authentication, in particular with the superuser User but also with any User account with a Business Administration role which can be used to create Users or grant them higher permission levels.
What if I lose my superuser password?
No worries, AyaNova has a built in method to recover the superuser account provided you have shell / command line access to the AyaNova server. A subscription server superuser password can be reset by contacting technical support from your registered email address and verifying your identity if requested.
Disable sample Users
This sub-step only applies if you will be keeping the sample data.
In a later step you will either erase the generated sample database or keep it and selectively erase items you don't want to keep.
Erasing the database will remove all Users other than the built in SuperUser account and if that is what you will be doing you do not need to deal with the generated sample Users.
If you have decided to not erase the sample database entirely then you should make sure that the sample Users generated by AyaNova are either deleted or de-activated so you free up a license for your own Users and to secure your database no one can login with those User accounts.
Login as the SuperUser, open each sample User record and either remove the checkmark from their Active property and save them or delete them. It's likely that you won't be able to delete them at first as there is still sample data tied to them and AyaNova won't allow a User to be deleted once there is other data tied to that User, but you can de-activate them preventing login and freeing up a license.
2. Export
Before erasing the AyaNova database to clear out any sample data there may be some things you want to keep for production use.
What if I want to keep a lot of data?
If there is a lot of data that was entered during evaluation that you would want to keep it might make more sense to not erase the database in step 2 below but instead selectively erase the sample data you don't want to keep.
The Delete extension can be useful for this purpose, it allows you to mass delete most object types in AyaNova. You can fine tune what gets deleted by selectively filtering and sorting the data table containing the data to be deleted first.
Export report templates
Export (and later import) any customized or new report templates that you want to keep by using the report template import export feature.
Export custom translations
If you have made a customized translation for AyaNova you want to keep, use the Translation export feature.
Export data
If there are any items of data that were entered that you want to export and later re-import, for example Customers first have a look at the Import feature documentation and confirm that the data type you want to import is supported.
Use the Export extension to export the specific data you want to keep so you can import it back later.
3. Erase evaluation data
It's time to erase any sample data so you can get started with your own.
You must be logged in as the SuperUser User account to erase the database.
The following has a link to the Erase database manual section which has important information about what will and will not be erased and it's important to read through that section before you erase your database.
The AyaNova database is erased from the License form using the Erase database menu option.
Once you have read and understand what will happen when erasing the database and are ready to do so, go ahead and take that option.
4. Create a Business Administration role User
Several of the following steps will require being logged in as a User with the Business administration Authorization Role.
If you are following this guide it's very likely you are the Business Administration role user, create a new User account that you will use for setting up and configuring AyaNova now.
Assign this User the Business administration role and a reminder that any User with the Business Admin Role has the power to create Users and change passwords so this is a powerful User account and it must have a secure password and ideally two factor authentication as well.
System operations role
If you are also the person responsible for ensuring AyaNova data is backed up then you will want to give your User account the System Operations Authorization Role so you can setup the backup process.
Test and confirm you can login as this User before continuing.
5. Import
If you have exported any data in step 2 above now is the time to import it back.
Import report templates
Import exported report templates using the report template import export feature.
Import custom translations
Import any exported translations using the Translation import feature.
Import data
Import your data back using the Import feature.
6. Backup configuration
Required
Before we go any further it's time to make sure your backup is configured and works and that you have a backup plan and procedures in place.
AyaNova is safe and secure and uses a reliable database server but there's always the risk of natural disaster, fire, theft, hardware failure etc.
A properly implemented backup system can have you back up and running quickly with minimal interruption.
There is no difference in backup requirements between a self-hosted "perpetual" AyaNova installation and a "subscription" hosted AyaNova service, these steps apply in both cases.
We have a full backup guide that covers how to set up the backup and best practices to follow to ensure you don't lose your data.
Read that guide to learn important safety precautions such as why it's not good enough to setup an automated backup and forget about it, the data must be stored off-site.
Also be sure to read and follow the important advice regarding setting up a regular non technical staff member with the Operations - restricted Role.
Once this step is completed and you are confident your backup process is in place and your data secure it's safe to proceed.
Do I still need to backup even if I use AyaNova as a subscription service?
Yes! Accidents can happen. You must set up a backup routine and regularly download a copy of your backup for safe storage in your own custody.
We strongly recommend you read our backup guide and follow the best practices outlined there to ensure the safety of your data.
We do not maintain a separate copy of your backup; it is your responsibility to ensure you have a recent copy of your backup available to provide to us should it ever be required to be restored.
7. Create tax codes
Optional step but generally necessary for most service businesses using AyaNova.
Now is a good time create your Tax codes as they will need to be selected when configuring Global settings later.
8. Create Service and Travel rates
Optional step but generally necessary for most service businesses using AyaNova.
Again like tax codes these are items that need to be in place so they can be selected when configuring Global settings later.
Service / Labor rates must be entered in advance so they can be selected on work orders.
Travel rates should be entered now if they are appropriate for your business.
Note that you can also import Service and travel rates if there are many of them and they can be exported from another program.
9. Configure global settings
Required, the first two Global settings sections listed below "Business settings" and "Company information" must be completed.
It's time to configure the Global settings.
We encourage you to read the help documentation for each item as there are some important and time saving features here.
There's a lot of things that can be set here and not all of it needs to be configured immediately but it is a good idea to at minimum set these items to get started:
- Business settings section, required setting configure all items here that are applicable to your business
- Company information, required setting set this up as completely as possible, these values are used in many places in AyaNova.
- Business logos, it is not necessary to set your business logo, AyaNova will work without them, however they will be used in reports and other areas that may be seen by your Customers so it's a good idea, particularly if you are going to be using any of the Customer access features in future.
10. Create Users
Required
Create User accounts for your staff and set up initial logins (which they can change on their own later).
We recommend limiting the authorization roles initially granted to your Users so that they only have the minimum required to do their job and only adding more access later as required.
Warning: Be careful and think twice before granting the Business administration Authorization Role to any User. The Business administration Role is not required for day to day service related work and it gives a User complete control of all aspects of AyaNova.
You must create a separate User account for every User who will be using AyaNova.
AyaNova does not permit the same User account to be logged in more than once at a time.
When you create the User accounts, give each User a temporary password and encourage them to change it immediately when they first log in following our recommended best practices for choosing a password.
While it's a good idea for any User, if the User has been granted the Business administration role we particularly encourage you to have them set up Two factor authentication to ensure the highest level security for what is a very powerful role in AyaNova.
SuperUser account
The built-in SuperUser User account should never be used other than in very limited circustances to perform initial setup and any operations that specifically require that User role. It is reserved for potentially dangerous operations and should be secured properly and put aside for use only when absolutely needed.
Operations - restricted role
Be sure to assign one or more regular staff members the Operations - restricted Authorization role so that you are not completely reliant on a IT person with the full Operations Role to be able to check for important server operations information like viewing the server logs and confirming if the backup has run without error or not.
They won't be able to make any server setting changes but they will be able to check when things go wrong to determine if it's time to call in an IT person or contact AyaNova support.
11. Create vendors
Vendors are used all over AyaNova and are technically optional but usually required for inventory and other features.
Note that you can also import Vendors if you have them in another program.
12. Create Parts, Warehouses and opening inventory
Optional - if your shop does not use Inventory or Parts you can skip this section.
The Part form is used to create the parts you will be selecting on work orders in the course of providing service.
Now is also the time to create any Part warehouses if you have more than one or are tracking inventory stored in service vehicles (for example).
Once a Part has been created you can enter an opening inventory for it as well as any serial numbers on hand if used.
Note that you can also import Parts, import Warehouses and import Part Inventory if you have them available for export from another program.
13. Create Customers
Entering new Customers into AyaNova is an ongoing business process but usually you will have a starting set of Customers you know you will need right away.
By entering a few Customers up front you know you will need right away you can "set the standard" of how much and how they should be entered so that Users can refer to what was entered before for confirmation.
Note that you can also import Customers if you have them in another program.
Configuration completed
At this point the minimal requirements are met and your staff can start working with AyaNova in production use.
To get the most out of AyaNova though you will probably want to make use of one or more advanced features: